Is your RV water heater not getting hot enough? You’re not alone.
Many RV owners face this issue, which can quickly dampen the excitement of your travels. RV water heaters are essential for comfort on the road. They provide hot water for showers, washing dishes, and more. But what happens when the water just isn’t hot enough?
This problem can stem from various causes, such as faulty components, incorrect settings, or maintenance issues. In this blog post, we’ll explore common reasons why your RV water heater might be underperforming and offer practical solutions to get it back to its optimal heat level. So, let’s dive in and make sure your next adventure is warm and comfortable.

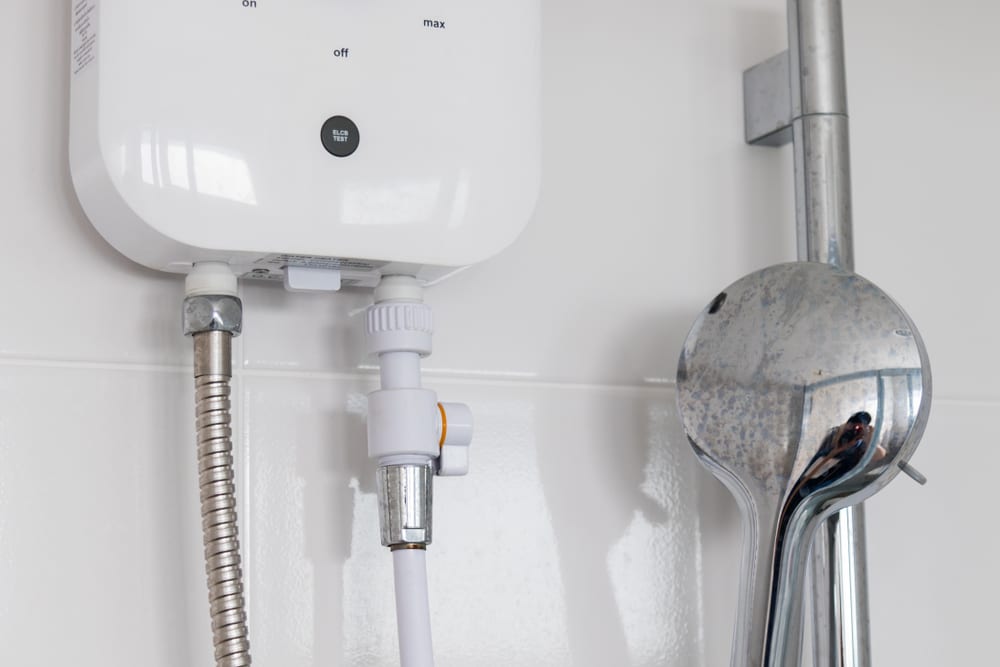
Credit: www.reddit.com
Common Causes
Is your RV water heater not getting hot enough? Several common causes might be affecting its performance. Understanding these can help you troubleshoot and fix the issue quickly. Let’s explore two main reasons: thermostat issues and sediment build-up.
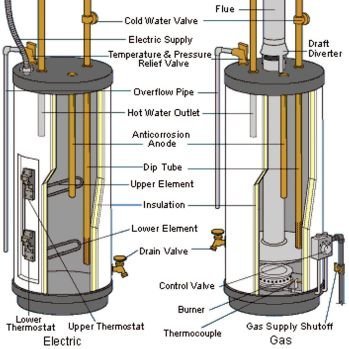
Thermostat Issues
The thermostat regulates the water temperature in your heater. If it’s faulty, the water may not heat properly. A broken thermostat can misread temperatures. It might shut off the heating element prematurely. Check if your thermostat is set to the desired temperature. Adjust if necessary. If adjusting doesn’t help, consider replacing the thermostat.
Sediment Build-up
Sediment build-up can reduce water heater efficiency. Minerals from water settle at the bottom of the tank. Over time, these deposits form a thick layer. This layer acts as an insulator. It prevents the heating element from warming the water properly. Flushing the tank regularly can remove sediment. This simple maintenance task can improve water heating performance.

Credit: www.youtube.com
Basic Troubleshooting
Experiencing issues with your RV water heater not getting hot enough? Don’t worry. Basic troubleshooting can often resolve the problem. Below are simple steps to help you identify and fix the issue.
Check Power Supply
The power supply is essential for your RV water heater to function properly. Follow these steps to check the power supply:
- Ensure the water heater is plugged in correctly.
- Check the circuit breaker and reset it if tripped.
- Inspect the fuse. Replace it if it’s blown.
- Confirm the power switch is turned on.
These steps ensure your water heater is receiving the necessary power.
Inspect Heating Element
The heating element is crucial for heating water. If it’s faulty, your water won’t get hot. Follow these steps to inspect the heating element:
- Turn off the power to the water heater.
- Remove the access panel to expose the heating element.
- Use a multimeter to test the heating element for continuity.
- If the element is bad, replace it with a new one.
Testing and replacing the heating element can restore hot water.
Adjusting The Thermostat
If your RV water heater is not getting hot enough, it might be due to an incorrect thermostat setting. Adjusting the thermostat can help you achieve the desired water temperature. Follow these steps to make sure your thermostat is set correctly.
Locate The Thermostat
The first step is to find the thermostat. The thermostat is usually located near the bottom of the water heater. You might need to remove a cover panel to access it. Here is a simple guide to help you:
- Turn off the power supply.
- Remove the cover panel.
- Locate the thermostat, which is often a small dial.
Set Desired Temperature
Once you have located the thermostat, the next step is to set the desired temperature. Most RV water heaters have a dial that you can turn to set the temperature. Here is how to do it:
- Turn the dial to increase or decrease the temperature.
- Check the recommended temperature in the manual (usually 120°F to 140°F).
- Set the dial to your preferred temperature within this range.
Adjusting the thermostat correctly can help ensure your water heater works efficiently. Always remember to reattach the cover panel and turn the power back on after making adjustments.
Flushing The Tank
Flushing the tank of your RV water heater can solve issues with water temperature. Sediment and mineral buildup often cause the heater to lose efficiency. This simple maintenance can make a big difference.
Tools Needed
Gathering the right tools is the first step. You will need:
- Garden hose
- Adjustable wrench
- Bucket
- Safety gloves
Step-by-step Guide
Follow these steps to flush your RV water heater tank:
- Turn off the water heater. Ensure it’s cool before starting.
- Shut off the water supply to the heater.
- Connect a garden hose to the drain valve. Place the other end in a bucket.
- Open the drain valve using an adjustable wrench. Let the water flow out completely.
- Close the drain valve. Remove the hose.
- Turn on the water supply. Let it fill the tank halfway.
- Repeat the draining process to remove any remaining sediment.
- Close the drain valve again. Disconnect the hose.
- Turn the water heater back on. Let it heat up and check the water temperature.
Regularly flushing the tank keeps your RV water heater running efficiently. It ensures hot water anytime you need it.
Replacing The Heating Element
If your RV water heater is not getting hot enough, it might be time to replace the heating element. This essential part of the heater ensures that water reaches the desired temperature. A faulty element can lead to lukewarm water, which is not ideal for showers or cleaning.
Safety Precautions
Before you start, ensure you follow these safety precautions:
- Turn off the power supply to the water heater.
- Ensure the water heater is not hot.
- Drain the water from the heater tank.
- Wear protective gloves and goggles.
Installation Process
Follow these steps to replace the heating element:
- Locate the heating element access panel on the water heater.
- Remove the panel using a screwdriver.
- Disconnect the wires attached to the heating element.
- Use a heating element wrench to unscrew the old element.
- Install the new heating element and tighten it with the wrench.
- Reconnect the wires to the new heating element.
- Replace the access panel and secure it with screws.
- Refill the water heater tank and turn the power back on.
After completing these steps, the water heater should start working efficiently.
Checking For Leaks
If your RV water heater isn’t getting hot enough, a leak might be the problem. Leaks can cause the heater to lose pressure, reducing its efficiency. Fixing leaks can solve the issue and restore hot water. Start by inspecting connections and repairing or replacing any faulty parts.
Inspect Connections
First, examine all the water heater connections. Check for loose or damaged fittings. These can cause leaks and lower heating efficiency. Use a wrench to tighten any loose connections. Look for water stains or puddles around the heater. These are signs of leaks. Also, inspect the pressure relief valve. It can leak if it’s faulty.
Repair Or Replace
If you find a leak, decide whether to repair or replace the part. Small leaks can often be fixed with plumber’s tape. Wrap the tape around the threads of the leaking connection. For larger leaks, you may need to replace the faulty part. This can include hoses, fittings, or the valve itself. Ensure you buy the correct parts for your specific water heater model. Follow the manufacturer’s instructions for replacement.
Maintaining Your Water Heater
Keeping your RV water heater in top condition ensures you always have hot water. Regular maintenance can prevent many common problems. Here are some essential tips to keep your water heater running smoothly.
Regular Cleaning
Regular cleaning is vital for your RV water heater. Sediment buildup can reduce efficiency. Follow these steps to clean your water heater:
- Turn off the water heater and let it cool.
- Drain the water from the heater.
- Use a hose to flush out sediment from the tank.
- Inspect the anode rod and replace if necessary.
Cleaning the tank removes sediment, which can block heat transfer. This helps your heater run more efficiently.
Annual Inspections
Schedule annual inspections to catch issues early. A professional can check for leaks, corrosion, and other problems. Here’s what a typical inspection includes:
| Inspection Task | Purpose |
|---|---|
| Check for leaks | Prevent water damage |
| Inspect electrical connections | Ensure safe operation |
| Test thermostat | Verify correct temperature settings |
| Examine burner assembly | Ensure efficient combustion |
Professional inspections ensure your water heater runs safely and efficiently.
Credit: www.wmhendersoninc.com
When To Call A Professional
Sometimes, RV water heaters stop heating water effectively. Basic troubleshooting might not help. Knowing when to call a professional can save you time and stress. Let’s explore two key areas to consider: identifying serious issues and finding a qualified technician.
Identifying Serious Issues
Some problems need expert help. If your water heater leaks, you need a pro. A leak can damage your RV’s interior. Also, strange noises often mean mechanical issues. These can be complex to fix. If you smell gas, leave your RV. Then call a technician. Gas leaks are dangerous. They can cause explosions.
If the water heater trips the breaker, it signals an electrical issue. This can be risky to handle alone. Also, if the water remains cold despite all attempts, an expert can diagnose the problem. They have tools and experience for these tasks. Don’t risk further damage.
Finding A Qualified Technician
Finding the right technician is crucial. Start by asking fellow RV owners for recommendations. Trustworthy reviews can guide you. Check for certifications. A certified technician has proven skills. They understand RV water heaters well.
Online directories can help too. Look for specialists in RV appliances. Read customer feedback to gauge reliability. Ask about their experience with your water heater brand. Communication is key. Ensure they explain the issue clearly. This builds trust and ensures you understand the problem.
Getting a professional to fix your water heater ensures safety. It also prolongs the life of your appliance. Don’t hesitate to call a technician if needed.
Frequently Asked Questions
Why Is My Rv Water Heater Not Hot Enough?
Your RV water heater may not be hot enough due to a faulty thermostat, sediment buildup, or a malfunctioning heating element. Check and clean the components to restore proper heating.
How Do I Fix My Rv Water Heater?
To fix your RV water heater, inspect and clean the thermostat, heating element, and burner. Regular maintenance ensures optimal performance and prevents issues.
What Causes Rv Water Heater To Heat Slowly?
Sediment buildup, a faulty thermostat, or a malfunctioning heating element can cause your RV water heater to heat slowly. Regular cleaning can prevent these issues.
How Often Should I Maintain My Rv Water Heater?
It’s recommended to maintain your RV water heater every six months. Regular maintenance ensures efficient heating and prolongs the heater’s lifespan.
Conclusion
Fixing an RV water heater that isn’t hot enough can be simple. Check the thermostat, clean the burner, and inspect the pressure relief valve. These steps often solve common issues. Regular maintenance helps avoid problems. Enjoy hot water on your RV trips.
Happy camping!


