The RV water heater check valve is crucial for proper function. It prevents backflow and ensures efficient heating.
Finding the exact location of the check valve in your RV water heater can be tricky. The check valve is small, but it plays a vital role in your water heating system. Knowing where it is can save you time and hassle.
It helps in maintenance and troubleshooting. This blog will guide you through locating the check valve in your RV water heater. We will provide clear steps and tips. By the end, you will know exactly where to look. This makes your RV adventures smoother and more enjoyable. Let’s get started!
Introduction To Rv Water Heater Check Valves
Understanding the RV water heater check valve is important for any RV owner. This small component plays a big role in maintaining water flow in your RV. It prevents backflow and ensures a smooth supply of hot water.
Purpose And Function
The RV water heater check valve has a simple yet crucial purpose. It allows water to flow in one direction. This prevents hot water from flowing back into the cold water lines. It ensures your hot water remains hot. Without it, you could face inconsistent water temperatures.
Common Issues
RV water heater check valves can encounter several issues. One common problem is clogging. Debris or minerals can block the valve, affecting water flow. Another issue is leakage. A faulty valve might not seal properly, causing water to leak. This can lead to water damage in your RV.
Regular maintenance can prevent these issues. Check your valve for any signs of damage or wear. Replace it if necessary to ensure your water heater functions well. Keeping an eye on this small component can save you from bigger problems.
Signs Of A Failing Check Valve
A failing RV water heater check valve may cause leaks or no hot water. The check valve location is typically near the water heater inlet. Rust or unusual noises can also indicate issues.
A check valve in your RV water heater ensures water flows in one direction. When it fails, you may notice several issues. Catching these signs early can save you from bigger problems.
Water Temperature Fluctuations
One common sign is water temperature fluctuations. You might notice the water suddenly getting too hot or too cold. This happens because the check valve is not controlling the flow properly. Inconsistent water temperature can make showering and washing difficult.
Unusual Noises
Another sign is unusual noises from the water heater. You may hear banging or clunking sounds. These noises indicate that the check valve is struggling to function. It could be stuck or partially blocked. Unusual noises are a clear sign that the check valve needs attention. “`
Tools Needed For Inspection
Inspecting your RV water heater’s check valve requires specific tools. Having the right tools ensures a smooth inspection and helps identify issues accurately. Let’s break down the tools needed for this task.
Basic Tools
You’ll need a few basic tools for inspecting the check valve. First, a flashlight. This helps you see in tight, dark spaces. A wrench set is also essential. The check valve may need loosening or tightening. A set of screwdrivers, both flathead and Phillips, will be handy. They help with removing any screws or panels. Lastly, pliers are useful. They assist in gripping and turning parts that are hard to reach.
Safety Gear
Safety gear is crucial for any inspection. Wear gloves to protect your hands from sharp edges and hot parts. Safety goggles are also important. They shield your eyes from debris and splashes. A dust mask can be beneficial. It helps you avoid inhaling dust and other particles. Having these safety items ensures you stay safe while inspecting the check valve.

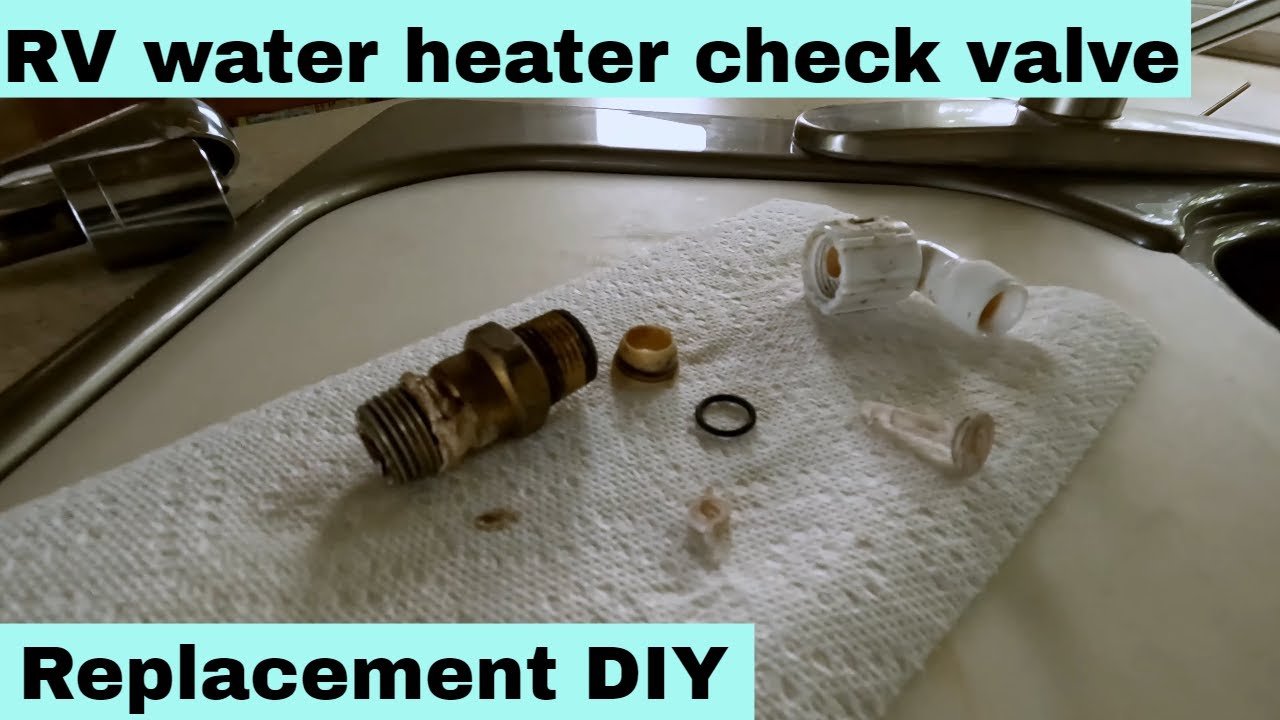
Credit: www.youtube.com
Locating The Check Valve In Different Rv Models
Knowing the location of the check valve in your RV water heater is crucial. This part prevents backflow and maintains water pressure. Different RV models have varying locations for their check valves. Let’s look at where you can find them in Class A, Class B, and Class C motorhomes.
Class A Motorhomes
Class A motorhomes are large and luxurious. The check valve in these models is often located near the rear of the water heater. Accessing it usually involves removing a panel. The panel is commonly found in an exterior compartment. Sometimes, the valve is located under the sink or in a storage bay. It’s best to refer to your RV’s user manual for the exact location.
Class B Motorhomes
Class B motorhomes are smaller and more compact. The check valve in these models is typically found closer to the water heater. It is often located under the kitchen sink or behind a small access panel. These panels are usually inside the van, making them easier to reach. Check your RV’s manual for precise details.
Class C Motorhomes
Class C motorhomes are medium-sized and offer a balance between space and convenience. The check valve is usually located near the water heater, similar to Class A models. However, it might be easier to access. You may find it in an exterior compartment or under the dinette area. Always refer to the user manual for the best guidance.
Here is a quick overview in a table format:
| RV Model | Check Valve Location |
|---|---|
| Class A | Near rear of the water heater, exterior compartment, under sink |
| Class B | Under kitchen sink, behind small access panel |
| Class C | Near water heater, exterior compartment, under dinette |
By locating the check valve easily, you can perform maintenance tasks more efficiently. This ensures your RV water heater works smoothly and prevents potential issues.
Step-by-step Guide To Finding The Check Valve
Finding the check valve in your RV’s water heater can be a bit tricky. This guide will help you locate it with ease. Just follow these simple steps, and you will have no trouble getting the job done.
Preparation Steps
- Turn off the water supply to the RV.
- Ensure the water heater is off and cool to the touch.
- Gather necessary tools: flashlight, screwdriver, and wrench.
- Wear safety gloves and goggles to protect yourself.
These steps will ensure your safety and readiness.
Accessing The Water Heater Compartment
- Locate the water heater compartment outside the RV. It usually has a vent cover.
- Use a screwdriver to remove the screws on the vent cover.
- Gently pull the cover off to expose the water heater.
- Shine a flashlight inside to locate the water lines connected to the heater.
Once you have the water heater exposed, you are ready to find the check valve.
| Step | Description |
|---|---|
| 1 | Identify the cold water inlet pipe. It is usually at the bottom. |
| 2 | Locate the check valve on the cold water inlet pipe. |
| 3 | Check if the valve is functioning properly by turning it. |
Identifying and checking the valve ensures it works correctly.
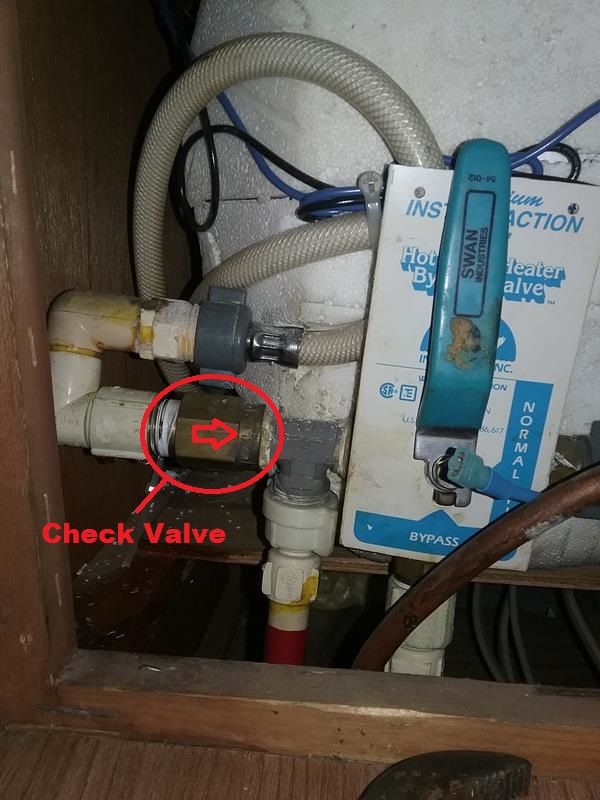
Credit: liveworkdream.com
Inspecting The Check Valve
Regular inspection of your RV water heater check valve is essential. It ensures efficient operation and prevents issues. A faulty check valve can lead to water leaks or pressure problems. Let’s break down the steps needed for a thorough inspection.
Visual Inspection
Start with a visual inspection of the check valve. Look for any visible signs of wear and tear. Check for cracks, corrosion, or leaks around the valve. A flashlight can help you see better in tight spaces.
- Check for cracks: Look closely at the valve body.
- Inspect for corrosion: Rust or discoloration indicates a problem.
- Search for leaks: Water around the valve is a red flag.
Note any issues you find. A damaged valve needs immediate attention.
Functional Testing
Next, test the functionality of the check valve. Turn on the water heater and observe the valve. Ensure water flows freely in one direction. The valve should prevent backflow.
- Turn on the water heater.
- Watch the check valve closely.
- Ensure water flows in the correct direction.
- Check for backflow prevention.
If the valve fails to stop backflow, it might need a replacement. Listen for unusual sounds. Hissing or whistling indicates a malfunctioning valve.
Regular inspections and maintenance keep your RV water heater in top shape. They prevent costly repairs and ensure a comfortable trip.
Replacing A Faulty Check Valve
Replacing a faulty check valve in your RV water heater can seem like a daunting task. But with the right steps, you can get the job done quickly. This process ensures your water heater functions properly. A working check valve prevents water from flowing back into the heater. Here is a simple guide to help you replace a faulty check valve.
Removal Process
First, turn off the water supply to the RV. This stops water from flowing while you work. Next, drain the water heater. Open the drain valve to release all the water. Now, locate the check valve. It is usually found near the water heater’s inlet. Use a wrench to remove the old check valve. Turn it counterclockwise to unscrew. Be gentle to avoid damaging nearby parts.
Installing A New Check Valve
Take your new check valve and wrap the threads with Teflon tape. This ensures a tight seal. Screw the new check valve into place. Turn it clockwise until it is secure. Tighten with a wrench, but do not over-tighten. Reconnect any hoses or pipes you removed. Turn the water supply back on. Check for leaks around the new valve. If there are no leaks, your new check valve is installed.
Turn on the water heater and test the system. Ensure hot water flows properly. This confirms the valve works correctly. Regular checks and maintenance can prevent future issues. Keep your RV’s water system in top shape. Happy travels!
Credit: www.1999southwind.com
Preventive Maintenance Tips
Locate the RV water heater check valve at the back of the water heater. Regular inspection ensures proper functionality.
Maintaining your RV water heater check valve is crucial. This ensures smooth operation and extends its lifespan. Regular preventive maintenance can save you from costly repairs. Here are some essential tips to keep your RV water heater check valve in top shape.
Regular Inspections
Conduct regular inspections of your RV water heater check valve. Look for any signs of wear or damage. Check for leaks around the valve area. Ensure the valve moves freely and isn’t stuck. If you spot issues, address them immediately. Early detection can prevent bigger problems.
Proper Cleaning
Clean the check valve to maintain its efficiency. Remove any debris or build-up around the valve. Use a soft brush or cloth to clean the valve gently. Avoid using harsh chemicals that can damage the valve. Regular cleaning helps in maintaining smooth water flow. “`
Frequently Asked Questions
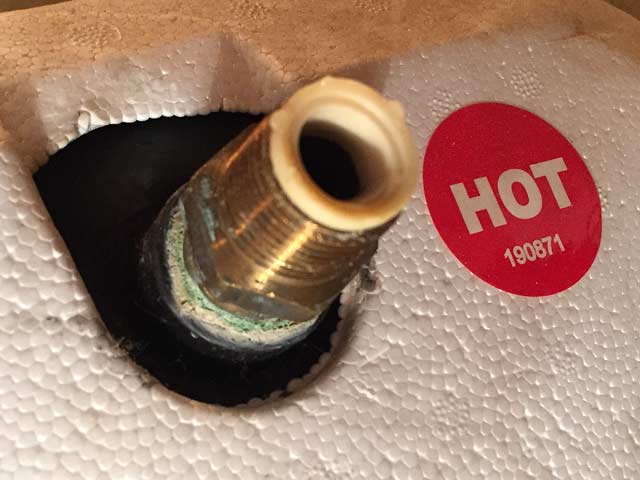
Where Is The Rv Water Heater Check Valve?
The RV water heater check valve is typically located near the water heater. It’s often found on the hot water outlet line.
How To Identify The Check Valve In Rv?
The check valve in an RV is usually a small brass or plastic fitting. It allows water flow in one direction only.
Why Is My Rv Check Valve Not Working?
A faulty RV check valve can be due to debris or mineral buildup. Replacing or cleaning it can fix the issue.
Can I Replace The Rv Water Heater Check Valve Myself?
Yes, you can replace the RV water heater check valve yourself. Ensure you turn off the water supply before starting.
Conclusion
Finding the RV water heater check valve is crucial. It ensures proper functioning. Locate it near the water heater. Regular checks can prevent issues. Simple steps can save costly repairs. Understanding its location helps with maintenance. Always refer to your RV manual.
Stay informed for a smooth RV experience. Happy travels and safe adventures!


