Understanding the wiring diagram for your RV slide out switch is essential. It ensures smooth operation and prevents potential issues.
RV slide outs add extra space and comfort to your traveling home. But, the wiring can seem complex. Knowing how to read and understand the wiring diagram is crucial. This knowledge helps in troubleshooting any electrical issues that may arise.
Whether you are a seasoned RV owner or a beginner, grasping this information is key. In this blog, we will break down the RV slide out switch wiring diagram in simple terms. You will learn the basics and some helpful tips. Get ready to make your RV experience even better with this essential guide.

Credit: pdxrvwholesale.com
Introduction To Rv Slide Out Switch Wiring
Understanding the wiring of an RV slide out switch can save you time and stress. This vital component helps control the extension and retraction of your RV slide outs. Proper wiring ensures smooth operation and safety during your travels.
Purpose Of Slide Out Switch
The slide out switch is crucial for your RV’s functionality. It allows you to control the movement of your slide outs with ease. A well-wired switch lets you extend or retract the slide outs quickly. This is especially important when setting up or packing up your campsite. The convenience it provides makes your RV experience more enjoyable.
Importance Of Proper Wiring
Proper wiring is essential for the safety and efficiency of your RV slide out switch. Incorrect wiring can cause malfunctions or even damage to your RV. Ensuring that the wiring is done correctly prevents electrical issues. It also helps in avoiding unnecessary repairs or replacements. Regular checks and maintenance of the wiring can prolong the life of your slide out switch.
Always follow the manufacturer’s guidelines for wiring. Using the correct wires and connections is key. Proper wiring ensures a seamless operation of your RV slide outs, making your trips hassle-free.
Essential Tools And Materials
Understanding the Rv Slide Out Switch Wiring Diagram can be challenging. It becomes easier with the right tools and materials. This guide helps you gather all necessary items. Let’s get started with the essentials.
Required Tools
Having the right tools makes the job simpler and more efficient. Here is a list of essential tools for working on your RV slide out switch wiring:
- Multimeter: For measuring electrical values.
- Wire Strippers: To strip the insulation from the wires.
- Screwdrivers: Both flathead and Phillips for different screws.
- Crimping Tool: For securing wire connectors.
- Needle-Nose Pliers: For gripping small parts and bending wires.
- Electrical Tape: To insulate and protect the wires.
- Cable Ties: For organizing and securing cables.
Necessary Materials
In addition to the tools, you will need certain materials to complete the wiring. These materials ensure the wiring is safe and efficient. Below is a list of necessary materials:
- Electrical Wires: Different gauges for different purposes.
- Wire Connectors: To join wires securely.
- Slide Out Switch: The main component for controlling the slide out.
- Fuse: To protect the circuit from overloads.
- Shrink Tubing: For additional insulation and protection.
Gathering the required tools and necessary materials is the first step. This ensures a smooth and successful wiring project. Proper preparation saves time and avoids frustration.
Safety Precautions
Working on an RV slide-out switch wiring diagram involves electricity. Safety precautions are essential to prevent accidents. Always prioritize safety. This section covers personal and electrical safety tips.
Personal Safety
Wear protective gear. Gloves and goggles are a must. They protect your hands and eyes. Use tools with insulated handles. This reduces the risk of shocks. Keep your workspace clean. A cluttered area can cause trips and falls. Ensure good lighting. You need to see what you are doing.
Electrical Safety
Turn off the RV’s main power. This is crucial. Avoid working on live circuits. Test wires with a voltage tester. This confirms no current flows. Use proper connectors. Loose connections can cause shorts. Label wires clearly. This prevents confusion. Follow the wiring diagram closely. Mistakes can be costly and dangerous. Keep a fire extinguisher nearby. Electrical fires can happen. Be prepared.
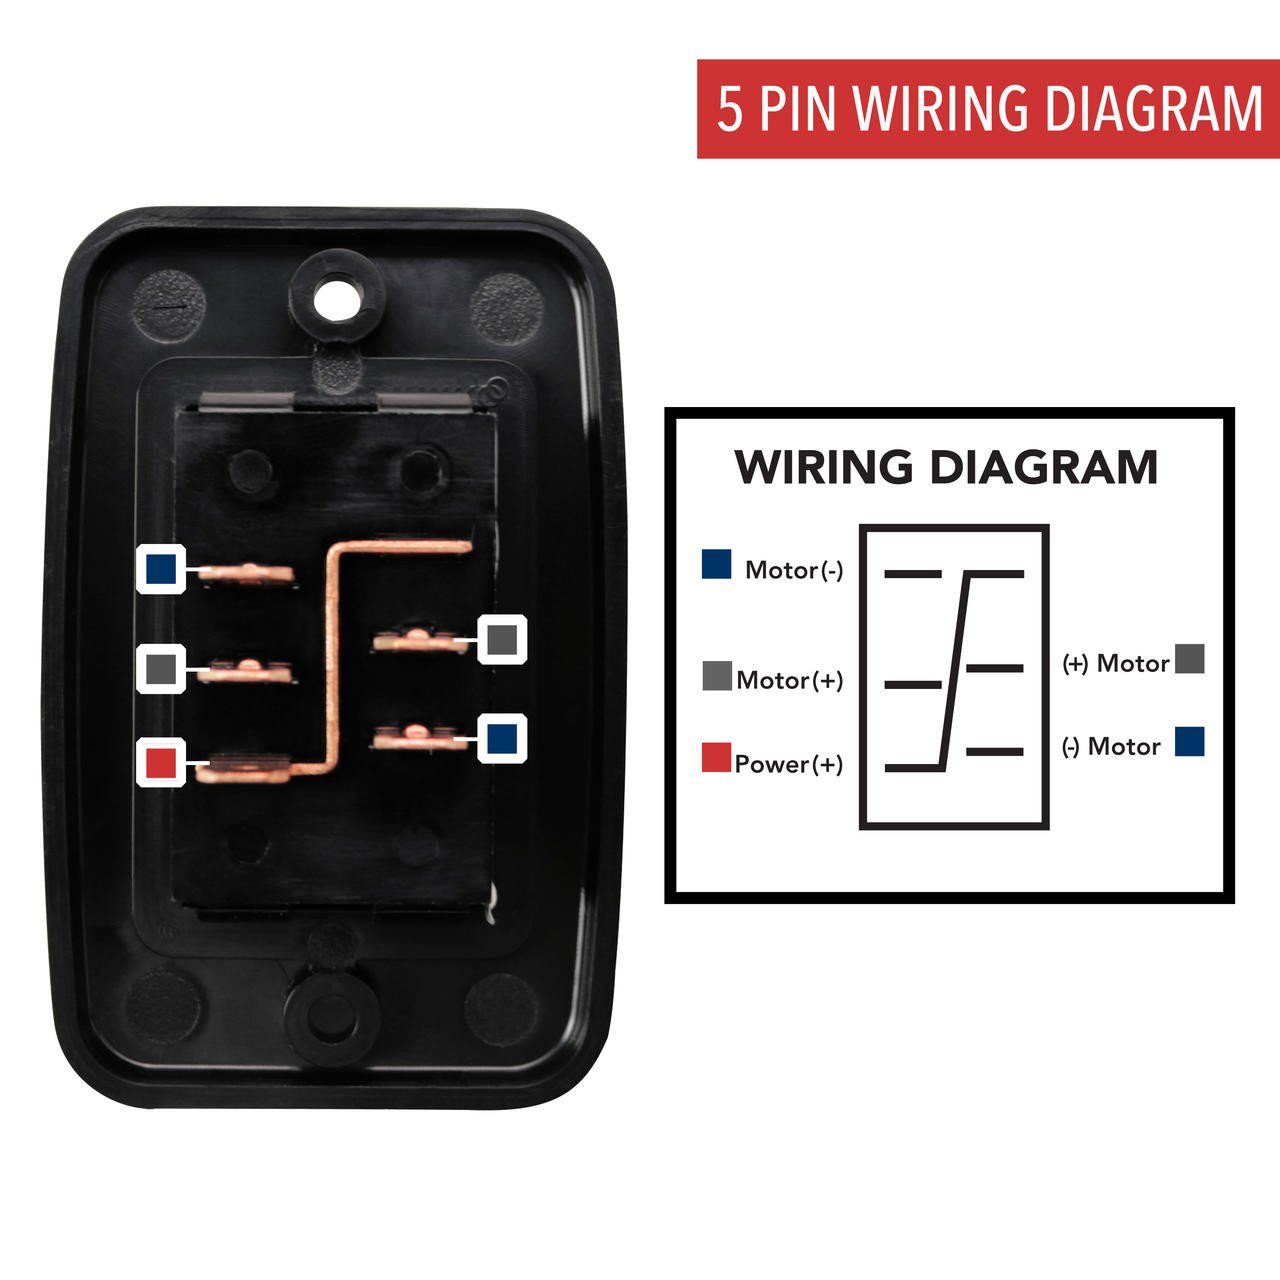
Identifying Wiring Components
Understanding the RV slide-out switch wiring diagram can help identify wiring components. This knowledge ensures safe and efficient electrical connections. Clear diagrams simplify the process.
Understanding the wiring components in your RV slide out switch is crucial. It ensures the slide out operates smoothly. Identifying these components can be a bit challenging. But with the right guidance, it becomes manageable.
Types Of Wires
Different wires serve different purposes. Identifying them correctly is key. – Power Wires: These carry electrical power from the battery. They are usually thicker. – Ground Wires: These connect to the RV’s chassis. They complete the circuit. – Signal Wires: These send signals to the switch. They are often thinner.
Key Components
Several components work together in the wiring system. Each has a specific role. – Slide Out Motor: This powers the slide out. It needs a direct power connection. – Switch: This controls the slide out movement. It needs both power and ground connections. – Fuse: This protects the circuit from overload. It is usually found near the battery. – Connectors: These join wires together. They ensure a secure connection. – Wiring Harness: This groups wires together. It keeps the wiring organized. By understanding these components, you can troubleshoot issues easily. Ensure all connections are secure. This will help maintain the smooth operation of your RV slide out. “`
Step-by-step Wiring Process
Understanding the wiring process for an RV slide out switch can feel overwhelming. But with clear steps, you can do it yourself. This guide will help you with the basics. Follow along and you’ll have your switch wired in no time.
Initial Preparations
First, gather all necessary tools and materials. You will need:
- A wiring diagram specific to your RV model
- Wire strippers
- Electrical tape
- Multimeter
- Screwdrivers
Next, ensure the RV is powered off. Safety is crucial. Check that all power sources are disconnected. Identify the slide out switch and its location. This is usually near the slide out mechanism.
Connecting The Wires
Using the wiring diagram, identify the wires. You will usually have:
| Wire Color | Function |
|---|---|
| Red | Positive Power |
| Black | Ground |
| Blue | Slide Out Motor |
Strip the wires to expose the ends. Connect the wires to the switch terminals. Typically, the red wire goes to the positive terminal. The black wire connects to the ground terminal. The blue wire connects to the motor terminal.
Secure each connection with electrical tape. Ensure there are no exposed wires. Proper insulation prevents short circuits.
Testing The Switch
Turn on the RV power. Use the multimeter to check the voltage. Ensure the switch is functioning correctly.
- Press the slide out switch.
- Observe the slide out mechanism.
- Check for proper extension and retraction.
If the slide out moves smoothly, your wiring is correct. If there are issues, recheck the connections. Ensure all wires are securely connected.
Congratulations! You’ve successfully wired your RV slide out switch.
Common Wiring Issues
Faulty connections often cause RV slide out switch wiring issues. Loose wires or corroded terminals can disrupt functionality. Regular inspection helps prevent these common problems.
RV slide out switch wiring can sometimes present challenges. Many RV owners face common wiring issues. These issues can affect the functionality of the slide-out switch. Understanding these problems can help in fixing them quickly.
Troubleshooting Tips
First, check for any loose connections. Loose wires can cause intermittent power loss. Use a multimeter to test for continuity. This helps identify broken wires. Also, inspect the switch itself. A faulty switch can be the root of the problem. Replace it if necessary. Next, examine the slide-out motor. Ensure it receives the correct voltage. Sometimes, cleaning the motor connections can solve the issue. Look for blown fuses as well. Replace any blown fuses to restore power.
Preventative Measures
Prevent wiring problems with regular maintenance. Inspect your RV’s wiring every few months. Tighten any loose connections. Keep the wiring clean and free from debris. Use dielectric grease to protect electrical connections from corrosion. Label all wires clearly. This helps during any future repairs. Ensure the slide-out switch is not exposed to water. Moisture can damage electrical components. Finally, invest in high-quality wiring and components. Cheap parts fail more often. Regular care and simple checks can prevent most wiring issues. Keep these tips in mind for a trouble-free RV experience.
Maintenance Tips
Understanding the RV slide-out switch wiring diagram ensures safe and efficient operation. Regularly inspect connections and check for wear. Keep the wiring clean and free from debris.
Maintaining your RV slide-out switch wiring diagram is crucial. Proper care ensures longevity and functionality. Follow these maintenance tips to keep everything in top shape.
Regular Inspections
Inspect the wiring regularly. Look for any visible damage. Check for loose connections. Ensure wires are not frayed. Pay attention to any unusual signs. This can prevent bigger issues later.
Cleaning And Upkeep
Keep the area clean. Dust and debris can affect wiring. Use a soft brush to remove dirt. Make sure the connections stay dry. Moisture can cause corrosion. Always clean gently to avoid damage. “`

Credit: answers.rvupgradestore.com
Expert Tips And Tricks
Working with RV slide-out switch wiring diagrams can be challenging. But with expert tips and tricks, the process becomes easier. Knowing the right techniques can save time and effort. Below are some valuable insights to help you.
Efficiency Hacks
Efficiency is key in wiring. Here are some hacks to streamline your work:
- Label each wire: Use labels to identify each wire. This helps to avoid confusion and errors.
- Use color-coded wires: Different colors for different connections make it easier to follow the diagram.
- Keep tools handy: Have all necessary tools within reach. This saves time and keeps you organized.
- Follow a step-by-step approach: Break down the diagram into smaller steps. This makes the process manageable.
Professional Recommendations
Experts recommend the following for a smooth wiring experience:
- Double-check connections: Before powering up, ensure all connections are secure and correct.
- Refer to the manual: The manual often provides detailed instructions. Use it as a guide.
- Test the system: After wiring, test the slide-out switch. This ensures everything works as expected.
- Seek professional help if needed: Don’t hesitate to consult an electrician. This can prevent costly mistakes.
By following these expert tips and tricks, you can handle RV slide-out switch wiring with ease. Use these insights to improve your efficiency and accuracy.
Frequently Asked Questions
How Does An Rv Slide-out Switch Work?
An RV slide-out switch controls the movement of the slide-out room. It activates the motor to extend or retract the slide-out, ensuring smooth operation. Proper wiring and functioning of the switch are essential for the slide-out’s reliability.
What Are The Common Issues With Slide-out Switches?
Common issues with slide-out switches include faulty wiring, blown fuses, and worn-out switches. Regular maintenance and inspection can prevent these problems. Always consult the RV manual for troubleshooting tips.
How Do You Wire An Rv Slide-out Switch?
Wiring an RV slide-out switch involves connecting the switch to the motor and power supply. Follow the manufacturer’s wiring diagram. Ensure all connections are secure and insulated to prevent short circuits.
Can I Replace An Rv Slide-out Switch Myself?
Yes, you can replace an RV slide-out switch yourself. Ensure you have the correct replacement part and follow the wiring diagram. Disconnect the power before starting to avoid electric shocks.
Conclusion
Understanding RV slide out switch wiring diagrams is crucial for every RV owner. Proper wiring ensures smooth operation and prevents potential issues. With the right tools and guidance, anyone can tackle this task. Remember to always double-check connections and follow safety measures.
A well-wired slide out switch enhances your RV experience. Happy travels and safe adventures await with a well-maintained RV!


