Are you setting up an RV lithium battery? Getting the wiring right is crucial.
A well-planned wiring diagram ensures safety and efficiency. RV lithium batteries are popular for their long life and efficiency. But wiring them can seem complex. In this guide, we will simplify the process. We will discuss the basics of RV lithium battery wiring diagrams.
You will learn how to connect your batteries properly. This will help you avoid common mistakes and ensure your RV runs smoothly. So, let’s dive in and make your RV setup easier and safer.
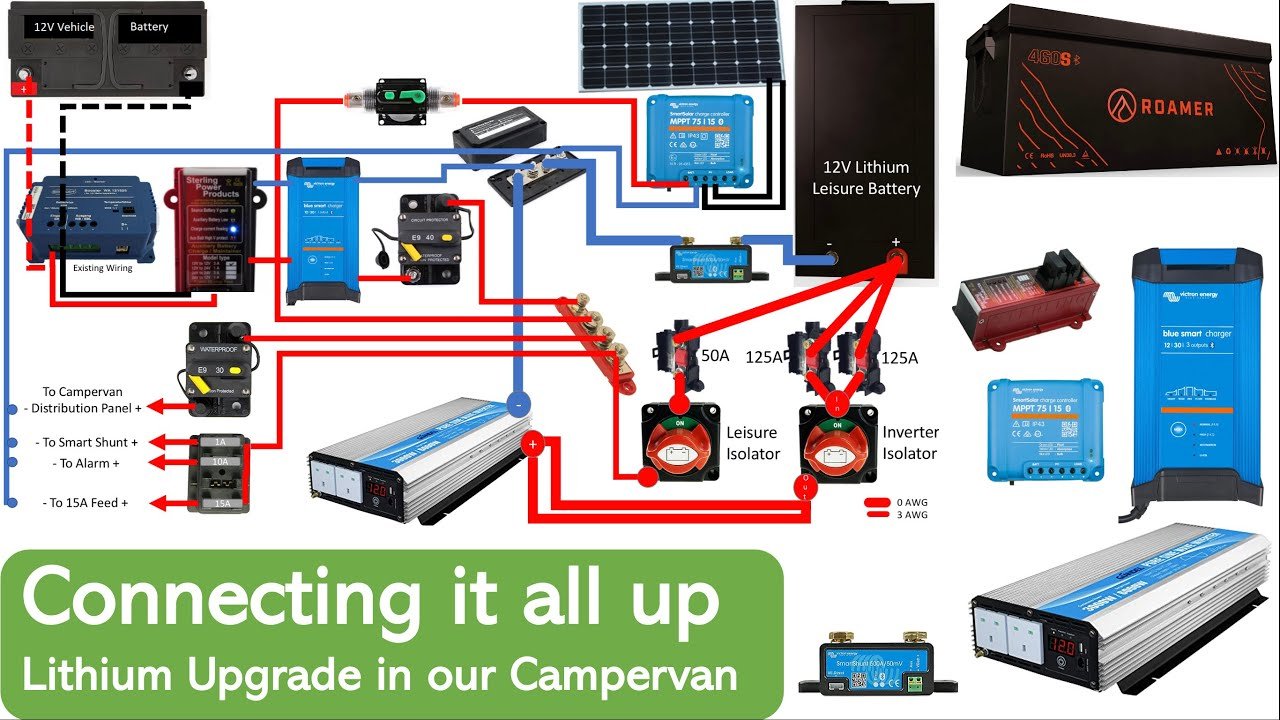
Credit: ca.renogy.com
Introduction To Rv Lithium Batteries
Understanding the RV lithium battery wiring diagram is essential. It ensures safe and efficient power distribution in your RV. Proper wiring can extend battery life and improve overall performance.
RV lithium batteries are gaining popularity among RV owners. These batteries offer several advantages over traditional lead-acid batteries. They provide longer life, higher efficiency, and better performance. Understanding how to wire RV lithium batteries is crucial for maximizing their benefits.
Benefits Of Lithium Batteries
Lithium batteries have a longer lifespan than lead-acid batteries. They can last up to 10 years or more. This means fewer replacements and lower long-term costs. Lithium batteries are lighter. This reduces the overall weight of your RV. A lighter RV means better fuel efficiency. These batteries charge faster. You can get back on the road quicker. They also have a higher energy density. This means more power in a smaller package.
Why Rv Owners Prefer Lithium
RV owners like lithium batteries for their reliability. These batteries perform well in various temperatures. They are less prone to damage from overcharging. Lithium batteries also require less maintenance. There is no need to check water levels or clean terminals. This makes them more convenient for long trips. Furthermore, lithium batteries provide consistent power. This is important for running appliances and other electronics. They ensure a smooth and comfortable RV experience. “`
Basic Components Of Rv Lithium Battery Systems
Understanding the basic components of RV lithium battery systems is crucial for any RV enthusiast. The right setup ensures your RV runs efficiently and safely. A well-structured system can make your travels more enjoyable. Here, we will break down the main parts of these systems.
Battery Types And Specifications
Not all RV batteries are the same. Lithium batteries are a popular choice due to their long lifespan and lightweight design. They can handle deep discharges better than lead-acid batteries. This makes them ideal for RV use.
When choosing a lithium battery, consider its voltage and capacity. The most common voltage for RV lithium batteries is 12V. Capacity is measured in amp-hours (Ah). A higher Ah rating means the battery can store more energy.
Key System Components
The heart of any RV lithium battery system is the battery itself. But other components are also important. A battery management system (BMS) monitors the health of the battery. It ensures the battery does not overcharge or overheat.
Inverters are another key component. They convert the battery’s DC power into AC power. This allows you to use standard household appliances in your RV.
Solar panels can also be part of the system. They provide a renewable source of energy. This is great for off-grid adventures.
Wiring and connectors are essential for linking all these components. Quality wiring ensures efficient power transfer. Proper connectors help prevent power loss and ensure safety.
Understanding these components can help you maintain and optimize your RV’s power system. This knowledge is crucial for any RV owner.
Tools Needed For Wiring
Wiring an RV lithium battery requires specific tools to ensure a safe and efficient setup. Having the right tools can make the process easier and prevent potential issues. Below, we discuss the essential tools and safety equipment needed for wiring your RV lithium battery.
Essential Tools
First, gather all necessary tools before starting. A wire stripper is a must for removing insulation from wires. You will also need crimping tools to secure connectors to the wires. A multimeter is essential for measuring voltage and ensuring proper connections. Keep a set of screwdrivers handy for securing terminals and mounting components. Finally, use a wrench set to tighten battery terminals and other connections.
Safety Equipment
Safety should always come first. Wear insulated gloves to protect your hands from electrical shocks. Use safety goggles to guard your eyes from sparks and debris. A fire extinguisher is crucial in case of any accidents. Keep it nearby and ensure it is rated for electrical fires. Lastly, work in a well-ventilated area to avoid inhaling any harmful fumes.
Planning Your Wiring Diagram
Planning your RV lithium battery wiring diagram ensures efficiency and safety. A well-thought-out plan helps you avoid issues. It also maximizes your power usage. Let’s explore essential steps in planning your wiring diagram.
Assessing Your Power Needs
First, list all electrical devices in your RV. Determine their power requirements. Calculate total power consumption. This step helps you choose the right battery size. It also ensures you have enough power for all devices.
Consider how long you use each device daily. This will affect your battery capacity. You need to know peak power demands. This information is crucial for planning your wiring diagram.
Designing Your Layout
Next, plan where to place your batteries and devices. Keep wiring routes as short as possible. This reduces power loss. Also, shorter wires are easier to manage.
Group devices by their power needs. High-power devices should have thicker wires. Low-power devices can use thinner wires. Label each wire clearly. This will help during installation and future troubleshooting.
Remember to include fuses and circuit breakers. They protect your system from damage. Your wiring diagram should show their locations. Proper planning ensures a safe and efficient setup.
Step-by-step Wiring Instructions
Installing an RV lithium battery system can feel daunting. But with clear, step-by-step wiring instructions, the process becomes manageable. Follow these detailed guidelines to ensure your setup is safe and efficient.
Connecting The Batteries
Begin by placing the batteries in their designated compartment. Ensure they are secure and stable. Connect the positive terminal of the first battery to the positive terminal of the second battery. Use appropriate battery cables for this connection. Repeat this for the negative terminals, ensuring a solid connection.
Next, connect the battery bank to the RV’s main power system. Use a heavy-duty cable for this step. Attach the positive cable to the positive terminal on the battery bank. Then, connect the negative cable to the negative terminal. Double-check all connections for stability.
Wiring The Inverter
Locate the inverter in a well-ventilated area. Connect the positive cable from the inverter to the positive terminal on the battery bank. Ensure a tight and secure connection. Then, connect the negative cable from the inverter to the negative terminal on the battery bank.
Install a fuse close to the positive terminal of the battery bank. This adds an extra layer of safety. Check all connections for any signs of wear or loose fittings. Once everything is secure, power on the inverter. Ensure the system runs smoothly and the inverter shows the correct readings.
Safety Tips For Installation
Installing an RV lithium battery involves many steps. Following safety tips ensures the process is smooth and risk-free. Let’s delve into some key safety measures.
Preventing Short Circuits
Short circuits can damage batteries and pose serious risks. Here are some steps to prevent them:
- Use insulated tools during the installation.
- Avoid loose connections by tightening all terminals properly.
- Double-check the wiring diagram before connecting the battery.
- Ensure all wires are intact and not frayed.
By following these steps, you can reduce the risk of short circuits and ensure a safer setup.
Proper Ventilation
Proper ventilation is crucial for maintaining a safe environment. It prevents overheating and ensures your battery operates efficiently.
Consider these tips for proper ventilation:
- Install the battery in a well-ventilated area.
- Avoid enclosed spaces that trap heat.
- Ensure there is enough space around the battery for air circulation.
- Use fans or vents if necessary to improve airflow.
Good ventilation helps in prolonging the battery’s life and preventing potential hazards.
Maintenance Of Lithium Battery Systems
Proper maintenance of your RV lithium battery system ensures a long lifespan. Regular care prevents issues and keeps the system running efficiently. This section covers regular inspection and troubleshooting of common issues.
Regular Inspection
Regularly inspecting your RV lithium battery system is crucial. Here are some key points to check:
- Visual Inspection: Look for any signs of wear or damage. Check the battery casing for cracks or leaks.
- Connections: Ensure all connections are tight and free from corrosion. Clean connections with a wire brush if needed.
- Voltage Levels: Use a multimeter to check the battery voltage. A healthy lithium battery should maintain a steady voltage.
- Temperature: Lithium batteries should not be exposed to extreme temperatures. Use a thermometer to monitor the battery temperature.
Perform these inspections monthly to ensure your battery system remains in good condition.
Troubleshooting Common Issues
Sometimes, issues can arise with your RV lithium battery system. Here are some common problems and how to troubleshoot them:
| Issue | Cause | Solution |
|---|---|---|
| Battery Not Charging | Loose connections or faulty charger | Tighten connections or replace the charger |
| Battery Drains Quickly | High power consumption or damaged cells | Reduce power usage or replace the battery |
| Overheating | Poor ventilation or faulty components | Improve ventilation or replace faulty parts |
Address these issues promptly to prevent further damage. Regular maintenance and troubleshooting keep your RV lithium battery system reliable and efficient.
Common Mistakes To Avoid
When setting up an RV lithium battery system, certain mistakes can cause issues. Understanding these common mistakes can help ensure a smooth installation. This section will highlight key errors to avoid.
Overloading The System
Many people connect too many devices to their RV battery. This overloads the system. The battery can only handle so much power. Overloading can cause the battery to overheat. It can also lead to battery damage. Always check the battery’s maximum load capacity. This ensures you do not exceed it.
Using Incorrect Wire Sizes
Wire size is crucial for a safe battery setup. Many choose wires that are too small. Small wires cannot handle high currents. This can cause overheating. It can also lead to wire damage. Always use the correct wire size. Check the battery manufacturer’s recommendations. This ensures you use the right wires.

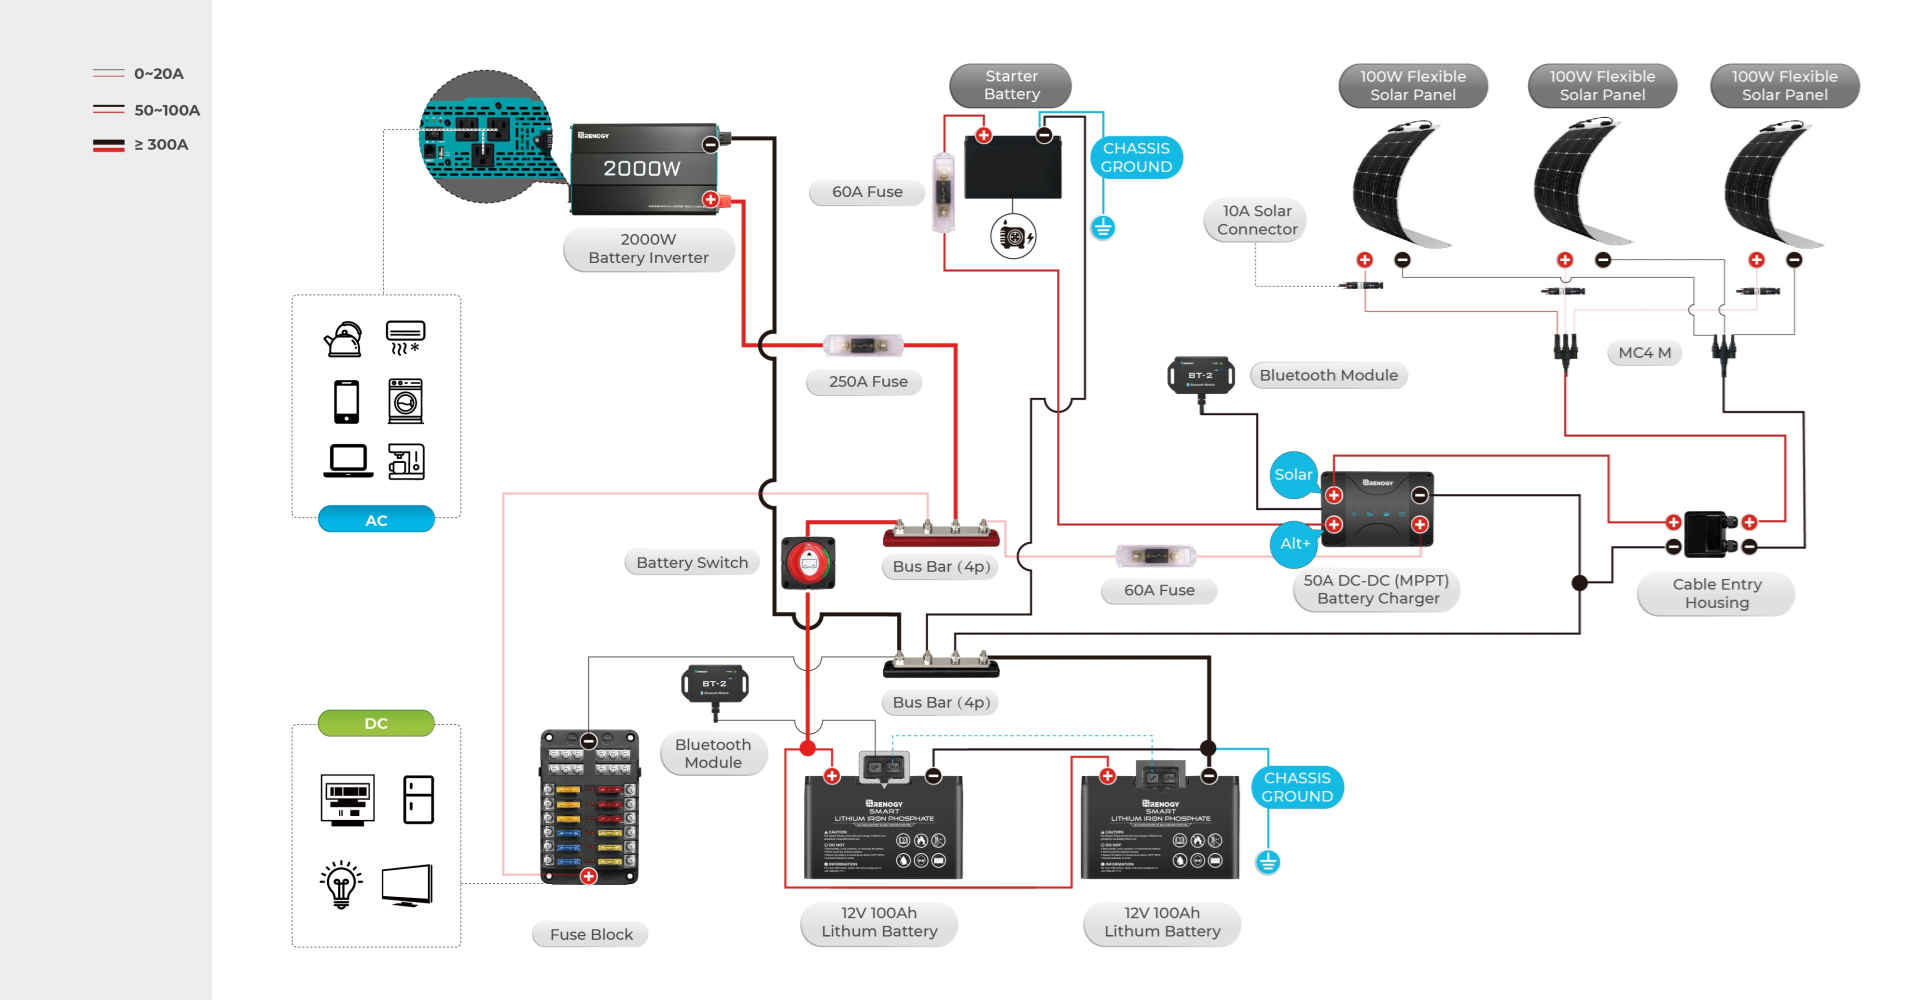
Credit: communityarchive.victronenergy.com
Frequently Asked Questions
What Is An Rv Lithium Battery Wiring Diagram?
An RV lithium battery wiring diagram shows the connections of batteries, chargers, and inverters. It ensures proper setup and safe operation.
How Do You Wire Rv Lithium Batteries?
To wire RV lithium batteries, connect positive terminals to positive and negative to negative. Follow the manufacturer’s instructions for safety.
Can I Use A Regular Charger For Lithium Batteries?
No, you need a charger compatible with lithium batteries. Regular chargers may not provide the correct voltage and can damage the batteries.
Why Are Lithium Batteries Better For Rvs?
Lithium batteries are better because they have a longer lifespan, higher efficiency, and lower weight compared to traditional batteries.
Conclusion
Understanding your RV lithium battery wiring diagram is essential for safe travels. It ensures your power system runs smoothly. Proper wiring prevents issues and extends battery life. Take time to learn the basics and follow the guidelines. Consult a professional if needed.
Having a clear diagram helps with troubleshooting. Stay safe and enjoy your RV adventures. With the right setup, your trips will be hassle-free. Happy travels and power on!


