An RV inverter not charging the battery can be frustrating. It disrupts your travel plans and comfort.
What causes this common issue? How can you fix it? In this blog post, we will explore why your RV inverter might not be charging the battery. Understanding the reasons behind this problem can save you time and stress on the road.
We’ll cover the basics of how an RV inverter works, common issues that may arise, and practical solutions to get your battery charging again. Whether you’re a new RV owner or a seasoned traveler, this guide will help you troubleshoot and resolve your inverter problems. Let’s dive in and ensure your next trip is smooth and worry-free.
Credit: www.boondoctor.com
Common Causes
Experiencing issues with your RV inverter not charging the battery? It can be frustrating, especially if you’re on the road. Understanding the common causes can help you troubleshoot and fix the problem. Let’s dive into the potential reasons for this issue.
Battery Issues
Batteries can cause charging problems. Old or damaged batteries may not hold a charge. Check for corrosion on the terminals. This can block the flow of electricity. Clean terminals can improve connections.
Inverter Problems
The inverter itself might be faulty. Internal components can wear out over time. Ensure the inverter is compatible with your battery. Incorrect settings can also prevent charging. Resetting the inverter might fix the issue.
Wiring Faults
Wiring faults are a common cause of charging problems. Loose connections can disrupt the flow of power. Inspect all wiring for visible damage. Frayed or broken wires need replacement. Secure all connections tightly.

Credit: www.reddit.com
Initial Checks
Experiencing issues with your RV inverter not charging the battery? Start with some initial checks. These basic steps can help you identify and resolve common problems quickly.
Inspect Connections
First, inspect all connections. Ensure the wires between the inverter and battery are tight. Look for signs of corrosion or damage. Clean any dirty terminals with a wire brush. This helps maintain a good electrical connection.
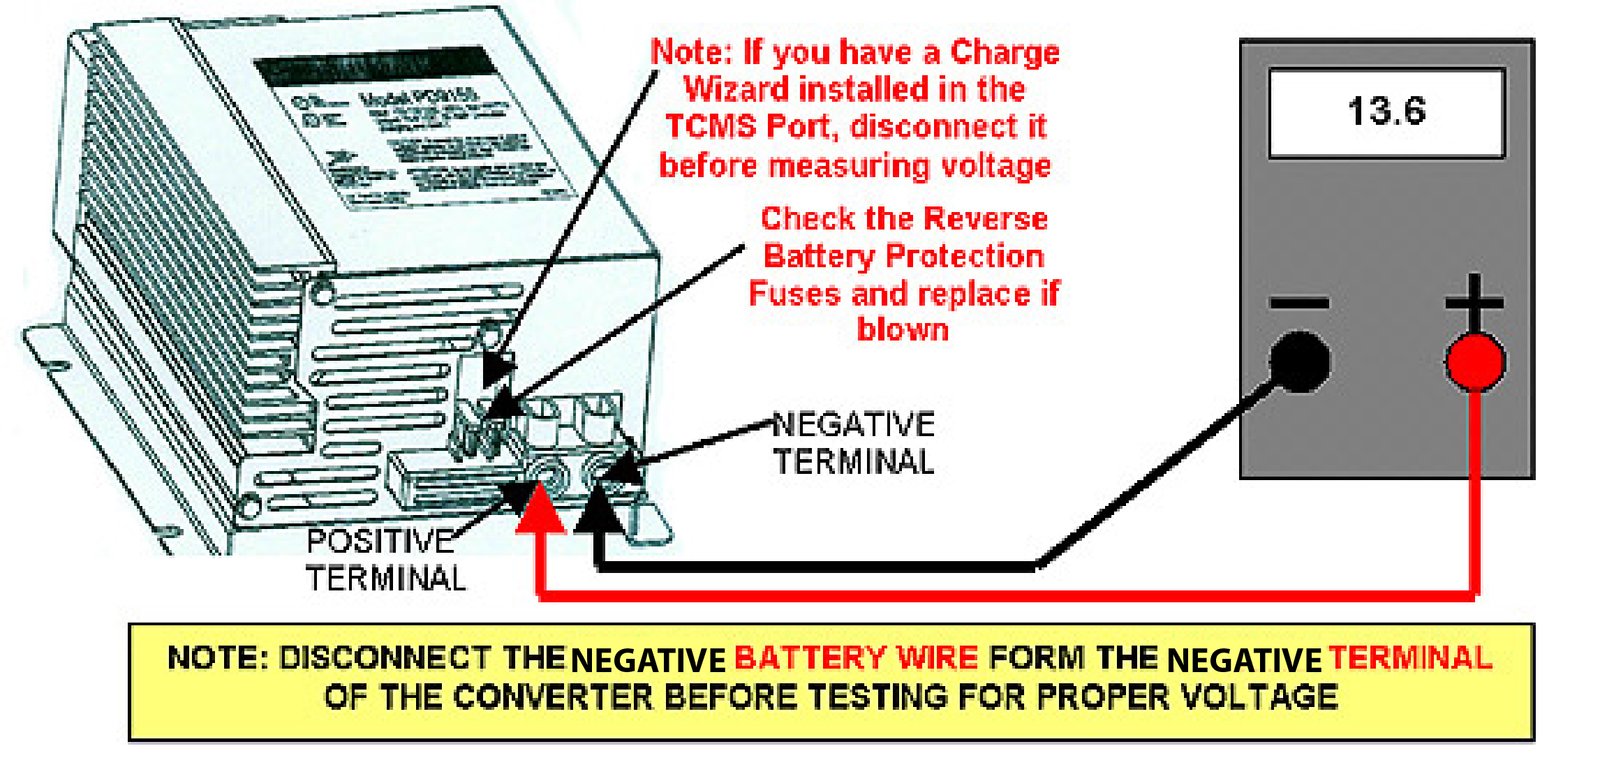
Check Battery Voltage
Next, check the battery voltage. Use a multimeter to measure the voltage. A fully charged battery should read around 12.6 volts or higher. If the voltage is low, the battery may need charging or replacement.
Battery Maintenance
Maintaining the battery in your RV is crucial. Proper care ensures your RV inverter charges the battery efficiently. Neglecting battery maintenance can lead to performance issues and even damage. Regular checks keep everything running smoothly.
Clean Terminals
Dirty terminals can prevent your RV battery from charging. Corrosion builds up over time. This creates a barrier. Use a wire brush to clean the terminals. Make sure to disconnect the battery first. This prevents any accidents.
After cleaning, apply a terminal protector. This helps reduce future corrosion. Regular cleaning keeps the connection strong. Your battery will charge better and last longer.
Check Fluid Levels
Fluid levels in the battery are important. Low levels can reduce efficiency. Check the fluid every few months. If the level is low, add distilled water. This maintains optimal performance.
Overfilling can cause damage. Only fill to the designated mark. Proper fluid levels help the battery charge fully. They also extend the battery’s life. Remember to wear safety gear when handling battery fluids.
Inverter Inspection
Inspecting your RV inverter is crucial if it is not charging the battery. A detailed inspection can identify issues, ensuring the inverter functions properly. Let’s dive into the essential steps of inverter inspection.
Verify Settings
Begin by verifying the inverter settings. Incorrect settings can lead to charging issues. Follow these steps:
- Check the voltage settings. Ensure they match the battery’s requirements.
- Ensure the inverter mode is set to charge.
- Inspect the power source input settings. They should be correct and stable.
Use the inverter manual for guidance. Incorrect settings are a common cause of charging issues.
Check For Overheating
Overheating can prevent the inverter from charging the battery. Here’s how to check for overheating:
- Turn off the inverter. Allow it to cool for a few minutes.
- Inspect the inverter’s ventilation system. Ensure there are no blockages.
- Feel the inverter’s surface. If it is excessively hot, it may be overheating.
Overheating can damage the inverter. Ensure it has proper ventilation.
| Problem | Solution |
|---|---|
| Incorrect Settings | Adjust settings according to manual |
| Overheating | Improve ventilation, allow cooling |
Regular inverter inspection can prevent issues. Keep your RV battery charged and ready for your next adventure.
Wiring Examination
If your RV inverter is not charging the battery, a wiring examination is essential. This step-by-step guide will help you spot common wiring issues. Focus on potential problems like corrosion and loose connections.
Look For Corrosion
Corrosion can interrupt the flow of electricity. This is a common issue in RV electrical systems. Inspect the battery terminals and wires for any signs of corrosion. Green or white powdery substances are clear indicators. Use a wire brush or a special cleaner to remove corrosion. Always wear safety gloves and goggles during this process.
Check For Loose Wires
Loose wires can hinder the charging process. Inspect all wiring connections. Pay special attention to the connections at the battery and inverter. Gently tug on each wire to ensure it is secure. If you find any loose wires, tighten the connections. Use a screwdriver or wrench to secure them properly. If the wires are damaged, replace them immediately.
Ensuring proper connections is key to maintaining your RV’s electrical system. Regular inspections will help prevent future issues.

Credit: www.youtube.com
Testing Components
Testing the components of your RV inverter is crucial to ensure it charges the battery properly. Faulty connections or components can disrupt the charging process. Here, you will learn how to test these components effectively.
Use A Multimeter
A multimeter helps identify if your inverter is working correctly. Set the multimeter to measure DC voltage. Connect the probes to the inverter’s output terminals. A working inverter should show a steady voltage reading. If the reading fluctuates, the inverter may be faulty.
Test Battery Output
Testing the battery output ensures it receives the charge. Set the multimeter to measure DC voltage. Connect the probes to the battery terminals. A fully charged battery should read around 12.6 volts or higher. If the reading is lower, the battery might not be charging properly.
By using a multimeter and testing the battery output, you can diagnose common issues. These simple tests help ensure your RV inverter charges the battery efficiently.
Troubleshooting Tips
Experiencing issues with your RV inverter not charging the battery can be frustrating. Fortunately, there are several troubleshooting tips you can try to resolve the problem. Follow these steps to get your inverter and battery back in working order.
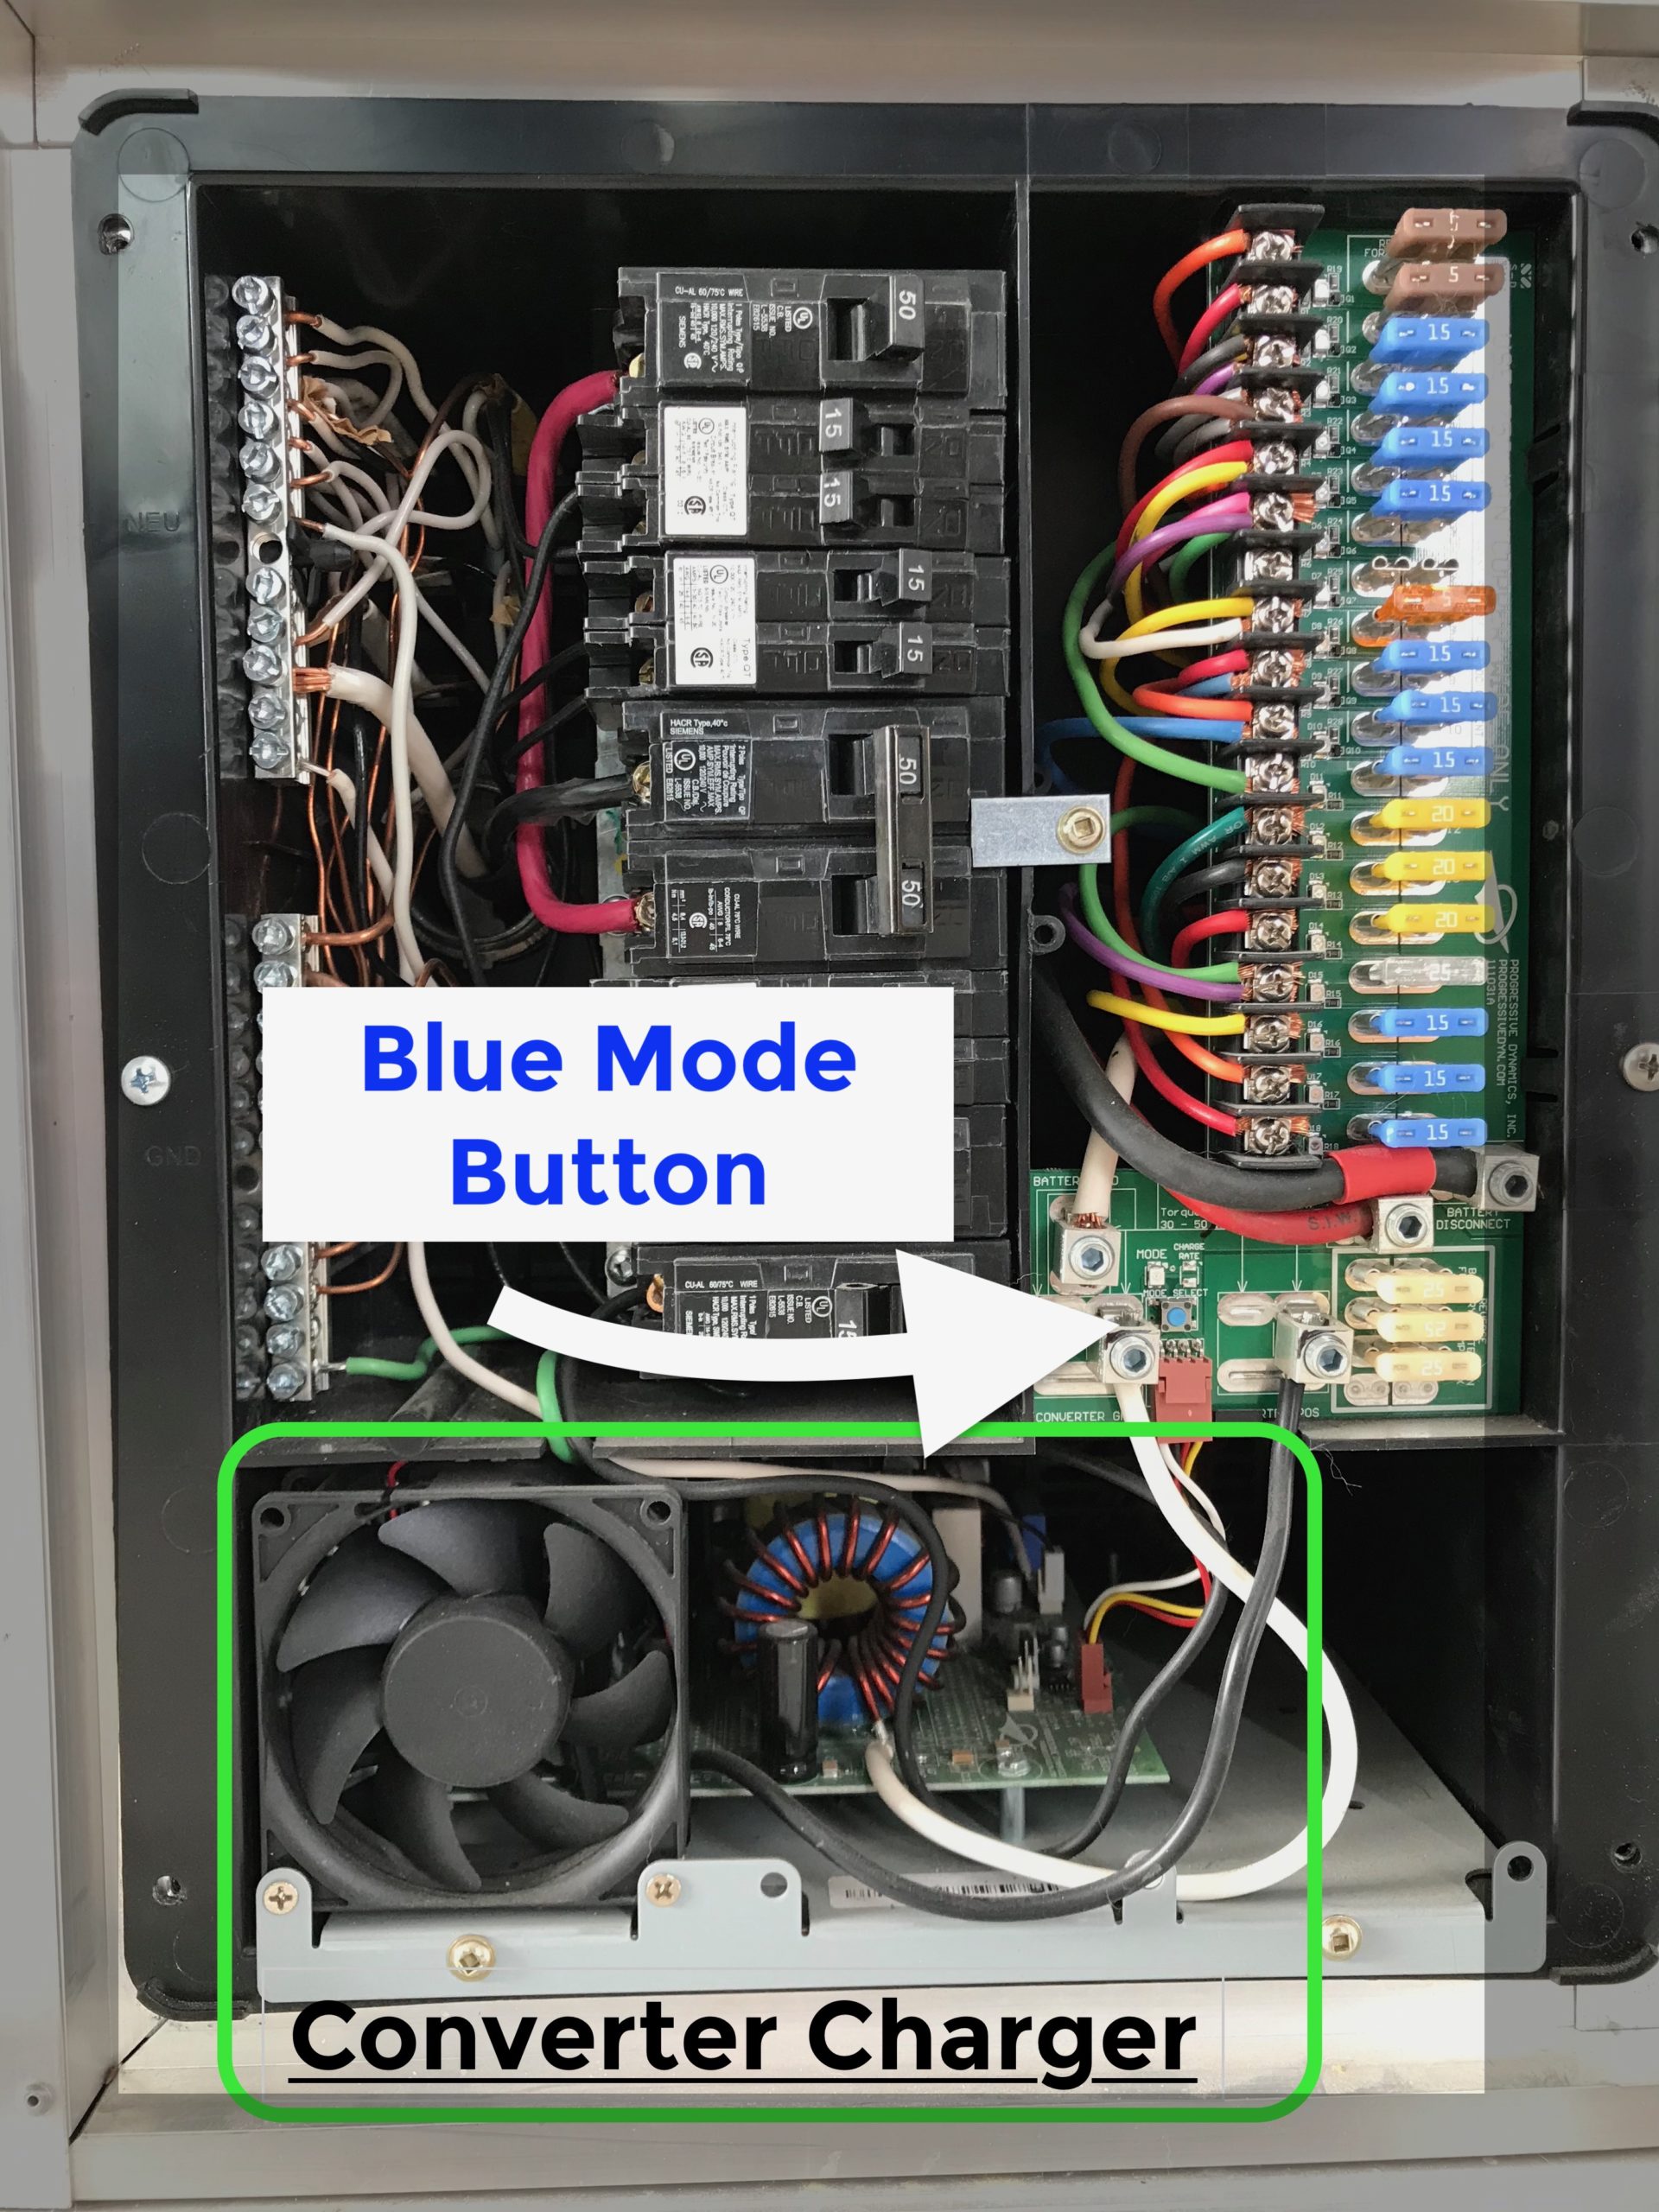
Reset The Inverter
Sometimes, a simple reset can fix the issue. To reset your inverter, locate the reset button on the device. Press and hold the reset button for a few seconds. Release the button and wait for the inverter to restart. Check if the inverter is now charging the battery.
Inspect The Fuse
A blown fuse can prevent the inverter from charging the battery. First, turn off the inverter. Locate the fuse box and check each fuse. Look for any fuses that appear blackened or broken. Replace any blown fuses with new ones of the same rating. Turn the inverter back on and see if it charges the battery.
Professional Help
When your RV inverter isn’t charging the battery, it can be frustrating. Sometimes, you need professional help to solve the issue. An expert can identify and fix problems quickly and efficiently. This can save you time and hassle.
When To Call A Technician
If your RV inverter still won’t charge the battery after basic troubleshooting, it’s time for a technician. Strange noises or burning smells are also red flags. These signs suggest something serious that needs expert attention.
Another indicator is if you see error codes on the inverter display. This often points to issues that require professional tools and knowledge to fix.
What To Expect
A technician will first inspect your RV inverter and battery setup. They will check for loose connections, damaged cables, and other visible issues. Next, they will use specialized tools to test the inverter and battery performance.
The technician may also look into the RV’s electrical system. They will ensure that everything is working correctly and safely. Once the problem is found, they will explain it to you clearly. Then, they will provide a solution or repair the faulty parts.
In some cases, replacing parts or even the entire inverter may be necessary. The technician will guide you through the best options for your RV. Trusting a professional ensures your RV stays in top shape and your adventures continue smoothly.
Frequently Asked Questions
Why Is My Rv Inverter Not Charging The Battery?
Your RV inverter may not charge the battery due to loose connections or a faulty inverter. Check connections and inverter functionality.
How Do I Troubleshoot Rv Inverter Charging Issues?
To troubleshoot, check battery connections, inspect fuses, and ensure the inverter is properly configured. Consult the manual.
Can A Faulty Inverter Affect Battery Charging?
Yes, a faulty inverter can prevent the battery from charging. Test the inverter and consider replacing it if needed.
What Are Common Signs Of Inverter Problems?
Common signs include no power output, error codes, or unusual noises. Regularly inspect your inverter for these issues.
Conclusion
Fixing your RV inverter is crucial for a smooth adventure. Regular checks can save you headaches. Understand the basics to avoid common issues. Ensure connections are secure and batteries are in good condition. This proactive approach keeps your inverter and battery working well.
Enjoy your travels without power worries. Keep your RV ready for the road ahead. Happy camping!


