Understanding the RV Comfort ZC thermostat wiring diagram is essential. It ensures your RV’s climate control functions properly.
Whether you’re a new RV owner or a seasoned traveler, knowing how to wire your thermostat can save you time and money. The RV Comfort ZC thermostat is a popular choice due to its reliability and user-friendly design. But, the wiring process can seem daunting at first glance.
This guide will break down the wiring diagram in simple terms. You’ll feel confident handling this task on your own. No more guesswork or costly technician visits. Dive in, and learn how to wire your RV Comfort ZC thermostat like a pro. Let’s make your RV trips more comfortable and stress-free.
Introduction To Rv Comfort Zc Thermostat
The RV Comfort ZC Thermostat wiring diagram helps users understand connections. It ensures proper installation and smooth operation. This guide simplifies the wiring process for your RV thermostat.
The RV Comfort ZC Thermostat ensures a comfortable environment in your RV. It’s an essential component for temperature control. This advanced device helps maintain your desired climate. The thermostat is user-friendly. It offers precise temperature settings. It’s designed for easy installation and use. You can replace your old thermostat with the RV Comfort ZC.
Benefits Of Upgrading
Upgrading to the RV Comfort ZC Thermostat offers many benefits. First, it improves temperature accuracy. The advanced sensors provide precise readings. This ensures a consistent climate. Second, it’s energy efficient. It reduces power consumption. This saves money on energy bills. Third, the interface is intuitive. You can easily adjust settings. It makes controlling your RV’s climate simple.
Common Issues With Old Thermostats
Old thermostats often have calibration issues. They may give inaccurate temperature readings. This leads to discomfort. Another problem is wear and tear. Mechanical parts degrade over time. This affects performance and reliability. Old thermostats may lack energy-saving features. They can increase energy consumption. This results in higher costs. Finally, outdated models can be harder to use. They may lack modern interfaces. This makes adjusting settings more difficult. Upgrading to the RV Comfort ZC Thermostat solves these issues. It ensures a comfortable and efficient environment in your RV. “`
Tools And Materials Needed
Setting up your Rv Comfort Zc Thermostat Wiring Diagram can be simple with the right tools and materials. This guide will help you gather everything you need before starting.
Essential Tools
- Screwdrivers – A set of both Phillips and flathead screwdrivers.
- Wire Strippers – Necessary for stripping the wires for connections.
- Multimeter – To test the electrical connections and ensure safety.
- Drill – For making any necessary holes for mounting.
- Heat Shrink Tubing – To cover exposed wires and connections.
Required Materials
- Rv Comfort Zc Thermostat – The main unit you will be installing.
- Wiring Harness – To connect the thermostat to your RV’s electrical system.
- Electrical Tape – For securing connections and wires.
- Mounting Screws – To fix the thermostat onto the wall.
- Instruction Manual – Provides detailed steps for wiring and installation.
Having these tools and materials ready will make the installation process smoother and quicker. Use the table below for a quick reference checklist.
| Tool | Purpose |
|---|---|
| Screwdrivers | For securing and loosening screws |
| Wire Strippers | To strip insulation from wires |
| Multimeter | Testing electrical connections |
| Drill | Creating holes for mounting |
| Heat Shrink Tubing | Covering and protecting connections |
Ensure you have all these essential tools and required materials before you begin. This will help you avoid interruptions and ensure a smooth installation process.
Safety Precautions
When working with an Rv Comfort Zc Thermostat Wiring Diagram, safety should be your top priority. Proper precautions can prevent injuries and ensure your project runs smoothly. This section will cover essential safety measures to follow.
Electrical Safety
Handling electrical components requires care. Always turn off the power supply before starting your work. Use a voltage tester to ensure no power is running through the wires. This step is crucial to avoid electric shocks.
Keep water and other liquids away from your workspace. Wet conditions can lead to short circuits or serious injuries. Make sure your hands are dry when handling wires.
If you are unsure about any wiring step, consult a professional. Mistakes can cause electrical fires or damage your thermostat.
Protective Gear
Wear the right protective gear to stay safe. Use insulated gloves to protect your hands from electric shocks. They also provide a better grip on wires and tools.
Safety glasses are a must. They shield your eyes from sparks and debris. This is especially important when cutting or stripping wires.
Proper footwear is also essential. Wear shoes with rubber soles to minimize the risk of electric shock.
Here’s a quick checklist of protective gear:
- Insulated gloves
- Safety glasses
- Rubber-soled shoes
Following these safety precautions ensures a secure and efficient wiring process. Stay safe and work smart.
Removing The Old Thermostat
Removing the old thermostat is a crucial step in the installation process. Doing it properly ensures safety and prepares the area for the new unit. Follow these steps to remove the old thermostat without issues.
Disconnecting Power
First, cut off the power supply to the thermostat. This is vital for safety. Go to your circuit breaker panel and switch off the power to the HVAC system. Confirm the power is off by trying to turn on the old thermostat. It should not respond. Now, you can safely work on removing the thermostat.
Detaching The Unit
Next, detach the old thermostat from the wall. Start by removing the cover. Most covers simply snap off. Use a screwdriver to take out the screws holding the base plate. Carefully pull the base plate away from the wall. Note the wiring configuration and take a picture for reference. Label each wire with tape to match the terminal it was connected to. This will help you during the installation of the new thermostat. Gently pull the wires through the back of the base plate. Your old thermostat is now detached and ready to be replaced.
Wiring The New Thermostat
Wiring a new RV Comfort ZC thermostat can seem daunting. But it’s a straightforward process. This guide will help you understand and complete it. Let’s dive into the steps for wiring the new thermostat.
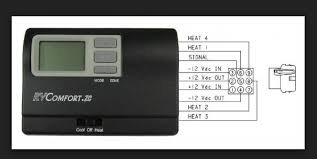
Identifying Wires
First, identify all the wires coming from the wall. Each wire controls a different function of your thermostat. Common wires include power, heating, cooling, and fan. Refer to your old thermostat’s wiring diagram. This will help you understand which wire does what.
Connecting Wires
Next, connect the identified wires to the new thermostat. Match each wire to the corresponding terminal. Tighten the screws to secure the wires in place. Ensure that each connection is firm and secure.
Once all wires are connected, double-check your work. Make sure no wires are loose or incorrectly placed. This ensures your thermostat will function correctly.

Credit: www.winnieowners.com
Mounting The New Thermostat
Mounting the new thermostat can seem challenging, but with the right steps, it becomes straightforward. Follow this guide to securely mount your RV Comfort Zc Thermostat. The process involves securing the base and attaching the cover.
Securing The Base
Start by choosing the right spot for the thermostat. Make sure it’s away from direct sunlight and drafts. Hold the base plate against the wall. Mark the screw holes with a pencil. Drill pilot holes at the marked spots. Use screws to attach the base plate to the wall. Ensure the base is level before tightening the screws.
Attaching The Cover
Once the base is secure, connect the wires to the terminals. Follow the wiring diagram closely. Match each wire to the correct terminal. Carefully tuck the wires into the base. Align the cover with the base. Gently snap the cover into place. Ensure it fits snugly.
Testing The Setup
After completing the wiring of your RV Comfort ZC thermostat, it is crucial to test the setup. This ensures that everything works as expected, and you can enjoy a comfortable environment in your RV. Follow these steps to test your thermostat setup.
Restoring Power
Before you can test the thermostat, you need to restore power to the system. Ensure all connections are secure and there are no exposed wires. Then, carefully turn the power back on to your RV’s electrical system. This step is vital for activating the thermostat and other connected devices.
- Check all connections.
- Ensure there are no exposed wires.
- Restore power carefully.
Checking Functionality
Once the power is restored, it’s time to check if the thermostat functions correctly. Start by setting the desired temperature on the thermostat. Observe if the system responds appropriately.
| Temperature Setting | Expected Response |
|---|---|
| Cool Mode | Air conditioner should start. |
| Heat Mode | Heater should start. |
If the system does not respond, recheck the wiring diagram. Look for any loose connections or incorrect wiring. Ensure the thermostat is set to the correct mode (cool or heat). Double-check the power supply and connections. If issues persist, consult the RV Comfort ZC manual for troubleshooting tips.
By following these steps, you can ensure your RV Comfort ZC thermostat is wired correctly and functions as intended. Enjoy a comfortable and well-regulated environment in your RV.
Troubleshooting Common Issues
Dealing with RV Comfort ZC Thermostat problems can be frustrating. Understanding common issues helps in quick fixes. Let’s dive into some common problems and their solutions.
Incorrect Wiring
Incorrect wiring is a common problem in RV thermostats. It happens during installation or replacement. Check if the wires are connected correctly. Follow the wiring diagram carefully. Loose or crossed wires can cause malfunctions. Ensure each wire is in its correct place. Double-check the connections to avoid any issues.
Unresponsive Thermostat
An unresponsive thermostat can be a real hassle. First, check the power source. Ensure the thermostat is receiving power. Replace the batteries if needed. Sometimes, the thermostat settings might be the issue. Reset the thermostat to its default settings. This often resolves unresponsiveness. If the problem persists, consult the manual or seek professional help.
Maintenance Tips
Maintaining your RV Comfort ZC Thermostat ensures it operates efficiently. Regular maintenance prolongs its life and improves your RV’s comfort. Here are some essential maintenance tips to keep your thermostat in top shape.
Regular Inspections
Performing regular inspections is crucial. Check your thermostat at least once a month. Look for any loose wires or connections. Ensure the display is working correctly. If you notice any issues, address them immediately to avoid further damage.
Cleaning The Thermostat
Dust and dirt can accumulate on your thermostat over time. Use a soft, dry cloth to clean the surface. Avoid using water or liquid cleaners, as they can damage the electronic components. Keeping the thermostat clean helps it function accurately and efficiently.
Frequently Asked Questions
How To Wire An Rv Comfort Zc Thermostat?
To wire an RV Comfort ZC thermostat, follow the manufacturer’s wiring diagram. Connect the corresponding wires to their labeled terminals. Double-check connections for accuracy.
What Color Wires Go To Rv Thermostat?
Typically, the wires are color-coded: red for power, white for heat, yellow for cooling, green for fan, and blue for common. Verify with your specific model.
Can I Install Rv Comfort Zc Thermostat Myself?
Yes, you can install it yourself if you have basic electrical knowledge. Follow the wiring diagram and safety guidelines.
Why Is My Rv Thermostat Not Working?
Check the power supply, wiring connections, and ensure the thermostat is set correctly. Replace batteries if necessary. Consult troubleshooting guide.
Conclusion
Understanding the RV Comfort ZC thermostat wiring diagram is essential. It ensures your RV’s comfort system works efficiently. Proper wiring helps maintain a stable temperature, enhancing your travel experience. Following the diagram closely prevents issues and keeps your system running smoothly.
Enjoy a comfortable RV journey with a well-wired thermostat. For any questions or help, always refer to the user manual or consult a professional. Safe travels and happy camping!


