Using an RV water pump to fill your tank is straightforward. First, connect the pump to the water source.
Then, turn on the pump and let it fill the tank. Traveling in an RV offers freedom and adventure. But, keeping your water tank filled is essential. Knowing how to use your RV water pump can make this task easy.
This skill ensures you always have fresh water during your trips. In this guide, we’ll explain each step clearly. You will learn how to connect, operate, and monitor your pump. Soon, filling your RV tank will become second nature. Ready to make your RV experience smoother? Let’s dive in.
Gather Necessary Tools
Before you start using your RV water pump to fill the tank, it is essential to gather all the necessary tools. Proper preparation will ensure a smooth and efficient process.
Required Equipment
To fill your RV tank using a water pump, you need the following equipment:
- RV water pump: Ensure it is in good working condition.
- Water hose: Preferably a food-grade hose for safe drinking water.
- Water source: A reliable and clean water source.
- Power source: Make sure your RV’s battery or a generator is available.
- Adapters: These may be necessary to connect the hose to the water source.
- Water filter (optional): To ensure clean water, especially in areas with questionable water quality.
Safety Precautions
Safety is crucial when working with water and electrical equipment. Follow these precautions:
- Turn off the pump before connecting or disconnecting any hoses.
- Check connections for leaks to avoid water damage.
- Wear gloves to protect your hands from dirt and debris.
- Avoid electrical hazards: Keep electrical components dry and away from water.
- Inspect hoses for any cracks or damages before use.
By gathering the necessary tools and taking the appropriate safety precautions, you ensure a smooth and efficient process when using your RV water pump to fill your tank. Proper preparation is key to a hassle-free experience.
Locate The Water Pump
Before you can fill your RV water tank, you need to locate the water pump. This is a crucial step as the water pump is the heart of your RV’s water system. It helps move water from the tank to your faucets, shower, and toilet. Finding and identifying the connections to the water pump will make the filling process straightforward.
Finding The Pump
Most RV water pumps are located near the water tank. Common places include:
- Under the bed
- Inside a cabinet
- Behind a panel
Consult your RV’s manual if you are unsure. It usually has a diagram showing the pump’s location.
Identifying Connections
Once you find the pump, you need to identify the connections. The water pump usually has:
- An inlet pipe that draws water from the tank
- An outlet pipe that sends water to the RV’s water system
Ensure the connections are secure. Loose connections can cause leaks or air to enter the system.
Understanding these connections is important for troubleshooting. It also helps in maintenance tasks like replacing the pump or winterizing the system.
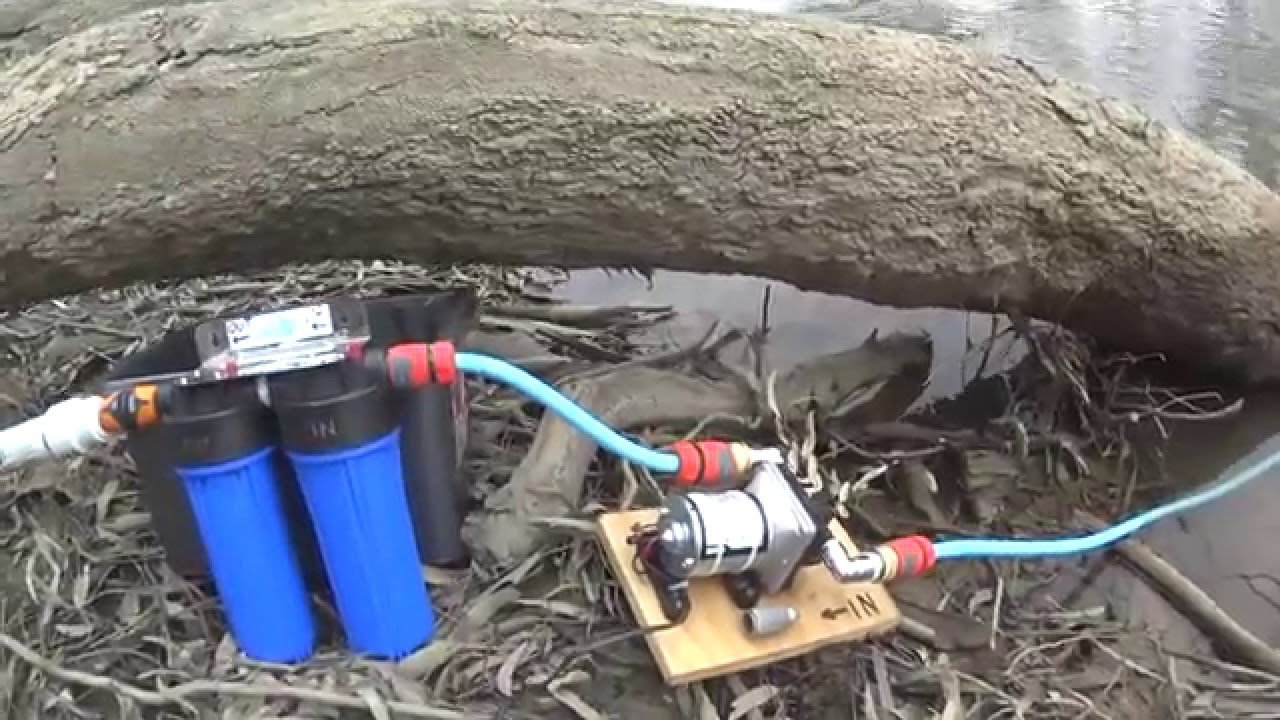
Prepare The Water Source
Preparing the water source is a crucial step in using your RV water pump to fill the tank. This process ensures that the water you are using is clean and safe. It also involves setting up the necessary connections to make the filling process smooth and efficient.
Selecting A Water Source
First, choose a clean and reliable water source. Look for a potable water tap or a safe water hookup. This ensures that the water is safe for drinking and using in your RV. Avoid sources that seem dirty or are not labeled as potable. Safety first!
Connecting The Hose
Next, connect the hose to the water source. Make sure the hose is clean and free of debris. Attach one end of the hose to the water tap. Secure the connection to avoid leaks. Once connected, run the hose to your RV’s water inlet. Ensure the hose is long enough to reach without stretching.
Turn on the water tap slowly. This helps to avoid a sudden rush of water. Check for any leaks at the connections. If there are leaks, tighten the connections. Now, your hose is ready to fill the RV water tank.
Prime The Water Pump
Priming your RV water pump ensures it works efficiently. It helps avoid problems like airlocks and irregular water flow. Proper priming will keep your water system running smoothly. Let’s dive into the steps you need to follow to prime your RV water pump.
Steps To Prime
Begin by turning off the water supply. This prevents any water from entering the system during the priming process. Locate the water pump and the priming plug. The priming plug is usually on top of the pump.
Remove the priming plug carefully. Fill the pump housing with water using a funnel. Replace the priming plug tightly. This step ensures the pump has enough water to start creating suction.
Next, turn on the water pump. Allow it to run for a few seconds. Turn it off and wait. This helps the pump build pressure. Repeat this process until the pump runs smoothly without sputtering.
Avoiding Airlocks
Airlocks can disrupt the water flow in your RV. To avoid them, ensure the pump housing is full of water before starting the pump. Check for leaks in the system. Leaks can allow air to enter the lines, causing airlocks.
Open all faucets in your RV to release trapped air. Start with the faucet closest to the pump. Then move to the furthest one. This process helps push any air out of the system.
By following these steps, you can prime your RV water pump effectively. This will ensure a steady water flow and a hassle-free camping experience. Happy travels!
Fill The Water Tank
Filling your RV water tank is essential for a comfortable trip. The process involves using the RV water pump effectively. This guide will help you understand each step to fill your tank with ease.
Activating The Pump
First, locate the water pump switch in your RV. It’s usually near the control panel. Turn the switch to the “on” position. This activates the pump, making it ready to draw water.
Monitoring Water Levels
Keep an eye on your water tank gauge. It shows the current water level. Ensure the tank doesn’t overflow. If your RV has no gauge, listen for changes in the pump sound. A higher pitch often means the tank is full.
Turn off the pump when the tank is full. Overfilling can damage your tank. Using the water pump properly ensures a smooth filling process. Enjoy your trip with a well-filled water tank.
Credit: www.youtube.com
Check For Leaks
Ensuring your RV water pump setup is leak-free is crucial. Leaks can cause damage and reduce efficiency. Check for leaks before and after filling the tank. This ensures your system remains intact and functioning well.
Inspecting Connections
Start by inspecting all connections. Look at the pump, hoses, and fittings. Ensure everything is tightly secured. Loose connections are a common source of leaks.
Use a flashlight to see hidden areas. Sometimes leaks are not visible in plain sight. Check under the sink, near the tank, and around the pump.
Addressing Leaks
If you find a leak, address it immediately. Small leaks can become big problems. Use a wrench to tighten any loose fittings. Replace damaged hoses or seals.
Here is a simple table to help you:
| Problem | Solution |
|---|---|
| Loose fittings | Tighten with a wrench |
| Damaged hoses | Replace the hose |
| Worn seals | Replace the seal |
After fixing, check again for leaks. Turn on the pump and observe all connections. If there are no leaks, your system is good to go.
Maintenance Tips
Proper maintenance of your RV water pump is essential for reliable performance. Regular upkeep ensures efficient operation and extends the pump’s lifespan. This section covers key maintenance tips to keep your RV water pump in top shape.
Regular Inspection
Frequent inspections are vital for maintaining your RV water pump. Check for leaks, loose connections, and any signs of wear. A quick visual inspection can prevent bigger issues down the road.
- Look for any visible cracks or damages.
- Ensure all connections are tight and secure.
- Listen for unusual noises during pump operation.
By catching small problems early, you can avoid costly repairs and ensure your pump works efficiently.
Proper Storage
Storing your RV water pump correctly, especially during off-season, helps preserve its condition. Follow these steps to store your pump properly:
- Drain all water from the pump and tank.
- Disconnect the pump and clean it thoroughly.
- Store the pump in a dry, cool place.
Proper storage reduces the risk of rust and damage, ensuring your pump is ready for the next adventure.
| Inspection Task | Frequency |
|---|---|
| Check for leaks | Monthly |
| Inspect connections | Monthly |
| Listen for noises | Each use |
| Clean and store | End of season |
Following these simple maintenance tips can keep your RV water pump in excellent working condition.

Credit: liveworkdream.com
Troubleshooting
Sometimes, using your RV water pump to fill the tank doesn’t go smoothly. You may encounter problems that can be frustrating. But don’t worry. Troubleshooting is often simpler than it seems.
Common Issues
Several common issues could arise. The pump may not turn on. It might run but not pump water. Or, it could make noise without moving water.
Another issue is the pump running continuously. This might indicate a leak or air in the system. Low water pressure can also be a problem.
Quick Fixes
First, check the power supply. Ensure the pump’s switch is on. Check the fuse or circuit breaker.
If the pump runs but no water flows, check the water source. Ensure the tank has water. Look for any kinks in the hose.
For pumps that run non-stop, inspect for leaks. Tighten any loose connections. If there is air, try priming the pump. Turn it off and on several times.
Low water pressure might need a filter clean. Check the pump’s filter and clean it if needed. Make sure there are no blockages in the lines.
If all else fails, consult your RV manual. It might have specific troubleshooting tips for your model.

Credit: learntorv.com
Frequently Asked Questions
How Do I Turn On My Rv Water Pump?
To turn on your RV water pump, locate the pump switch, typically found inside the RV. Flip the switch to the “On” position. This will activate the pump, allowing water to flow from the tank to your faucets.
How Do I Know If My Water Pump Is Working?
Listen for the sound of the pump running. Check if water flows from your faucets. If the pump is silent and no water flows, it might not be working.
Can I Fill My Rv Tank Using The Water Pump?
Yes, you can use the RV water pump to fill your tank. Connect a water source to the intake, turn on the pump, and it will transfer water into the tank.
Why Is My Rv Water Pump Not Filling The Tank?
Ensure the pump is switched on and connected correctly. Check for any blockages or leaks. Ensure there is enough water in the source you’re using to fill the tank.
Conclusion
Filling your RV tank with a water pump is simple. Follow the steps outlined for a smooth experience. Always check connections and ensure your pump works properly. This will save you time and prevent issues. Remember to turn off the pump after filling the tank.
Regular maintenance keeps your RV running efficiently. Enjoy your travels with a well-prepared water system. Happy camping and safe journeys!


