Removing the grey water tank from your RV can seem daunting. But with the right steps, it’s doable for any RV owner.
Grey water tanks collect wastewater from sinks and showers in your RV. Over time, these tanks need cleaning or replacement. Understanding how to remove them ensures your RV remains clean and functional. In this guide, we’ll walk you through the process step-by-step.
By the end, you’ll know exactly what to do. Whether you’re a seasoned traveler or new to RV life, this information is essential. Let’s get started on making your RV maintenance easier!
Credit: www.happilyrv.com
Introduction To Grey Water Tanks
Removing a grey water tank from an RV can be done with basic tools. First, disconnect the hoses and clamps. Then, carefully remove the tank.
Grey water tanks are essential in RVs. They store used water from sinks and showers. This helps keep the RV clean and hygienic. Understanding their purpose and common issues can simplify maintenance.
Purpose Of Grey Water Tanks
Grey water tanks hold the wastewater from daily activities. This includes washing dishes and taking showers. They prevent this water from mixing with fresh water. They also ensure proper disposal.
Common Issues With Grey Water Tanks
Clogs are a frequent problem in grey water tanks. Food particles and soap scum can block pipes. This can cause water to back up. Odors can also develop if the tank is not cleaned regularly. Leaks may occur due to wear and tear. These issues need regular checks and maintenance. “`
Gather Necessary Tools
Gathering the necessary tools before starting a task is crucial. Removing the grey water tank from your RV is no different. Having the right tools ensures a smooth and safe process. Let’s dive into the essential tools you need.
Required Tools List
- Adjustable Wrench: Useful for loosening and tightening bolts.
- Screwdriver Set: Needed for removing screws of various types.
- Socket Set: Essential for handling different sizes of nuts and bolts.
- Pliers: Handy for gripping and turning objects.
- Drain Pan: Catches any residual water from the tank.
- Gloves: Protects your hands from dirt and sharp edges.
- Flashlight: Illuminates dark areas under the RV.
- Plastic Sheeting: Keeps the work area clean.
Safety Gear
- Safety Glasses: Protects your eyes from debris and splashes.
- Work Gloves: Shields your hands from sharp objects and dirt.
- Protective Clothing: Keeps your clothes clean and provides extra protection.
Ensure you have all these tools and safety gear before starting. This preparation will make the removal process easier and safer.
Preparing The Rv
Removing the grey water tank from your RV might seem daunting. But, with the right preparation, it can be a smooth process. Start by preparing your RV. This ensures safety and ease of access. Follow these steps to get started.
Parking And Leveling The Rv
First, park your RV on a flat surface. This prevents any movement. Use wheel chocks to secure the RV in place. After parking, check the level of your RV. Use a bubble level for this. Place it on a flat surface inside the RV. Adjust the leveling jacks to make the RV even. An even RV ensures that the grey water tank empties properly.
Disconnecting Power And Water
Before you start, disconnect the power. Unplug the RV from any external power source. Turn off the breaker to ensure safety. Next, disconnect the water supply. This means turning off the water pump. Detach the water hose from the RV. This prevents any water from flowing into the system during the process.
Double-check both connections. Make sure there is no power or water running to the RV. Now, you are ready to remove the grey water tank.
Locating The Grey Water Tank
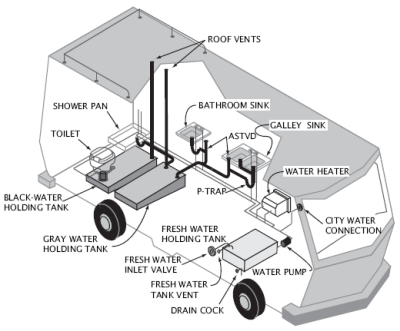
The grey water tank in an RV collects water from sinks and showers. Knowing its location is crucial for maintenance and removal. This guide will help you locate the grey water tank in your RV.
Tank Location In Different Rv Models
Different RV models have tanks in different spots. Understanding your RV’s layout can make this task easier.
| RV Model | Grey Water Tank Location |
|---|---|
| Class A | Under the bathroom or kitchen |
| Class B | Near the rear axle |
| Class C | Below the chassis, near the center |
| Fifth Wheel | Near the rear or center |
| Travel Trailer | Below the trailer, often under the kitchen |
Access Points
Access points vary by RV model. Knowing where to look can save you time and effort.
- Service Panels: Many RVs have service panels outside. These panels provide access to the tank.
- Under the RV: Some tanks are accessible by crawling underneath. Look for visible pipes or a tank.
- Inside Cabinets: In some models, access is inside. Check under sinks or in bathroom cabinets.
- Floor Access: Floor hatches or removable panels can provide access. Look for these in the kitchen or bathroom.
Understanding the access points will help you locate and remove the grey water tank. Follow these tips and you will find the tank in no time.
Draining The Grey Water Tank
Draining the grey water tank is a crucial task for RV owners. It helps maintain hygiene and prevents unpleasant odors. This section will guide you through the process of draining your grey water tank safely and efficiently.
Steps To Drain The Tank
- Park Your RV in a suitable location. Ensure the ground is level.
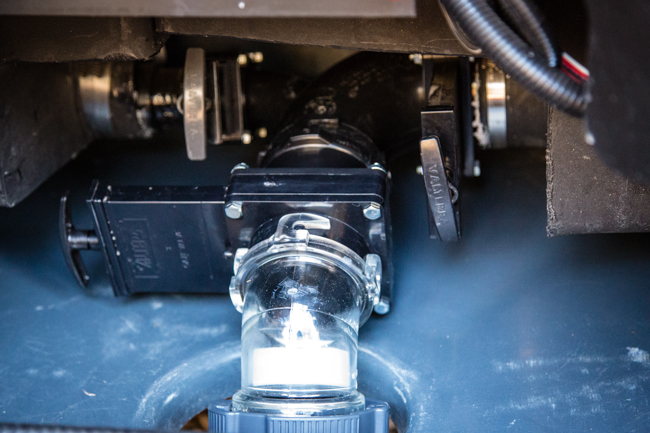
- Locate the grey water valve under your RV.
- Connect a sewer hose to the valve. Ensure it is tightly secured.
- Place the other end of the sewer hose into a proper sewer inlet.
- Slowly open the grey water valve. Allow the water to drain completely.
- Once drained, close the valve and disconnect the sewer hose.
Disposal Of Grey Water
Proper disposal of grey water is essential. Dumping grey water in unauthorized areas can harm the environment.
- Use designated dump stations. They are available at most campgrounds and RV parks.
- Follow local regulations and guidelines. Each area may have different rules.
- Rinse your sewer hose with clean water after use. This helps prevent contamination.
Remember to always dispose of grey water responsibly. It keeps the environment clean and ensures a pleasant experience for everyone.
Detaching Connections
Removing the grey water tank from your RV involves detaching several connections. This process can seem complicated, but with the right steps, it becomes manageable. Follow these guidelines to make the task simpler and ensure the tank is disconnected properly.
Removing Hoses And Fittings
First, ensure the RV is parked on a level surface. This will prevent any accidental spills. Locate the grey water tank under the RV. You will see hoses connected to it.
Use a wrench to loosen the clamps holding the hoses. Carefully detach the hoses from the tank. Some water might still be inside, so have a bucket ready. Check the fittings for any wear or damage. Replace them if needed.
Handling Electrical Components
Some grey water tanks have sensors or electrical components. Disconnect the power supply to the RV to ensure safety. Locate the wires connected to the tank sensors.
Use a screwdriver to remove the screws holding the sensor in place. Gently pull the wires away from the tank. Make sure to label the wires for easy reassembly. Store the screws and sensors in a safe place.
By following these steps, you ensure a smooth removal process. Always handle components with care to avoid damage.
Removing The Tank
Removing the grey water tank from your RV can be a daunting task. But with the right steps, it becomes manageable. This guide will help you through the process. Follow these steps carefully to ensure safety and ease. Let’s dive in.
Loosening Fasteners
The first step is to loosen the fasteners holding the tank. These fasteners are usually bolts or screws. Use a wrench or screwdriver to remove them. Ensure you keep the fasteners in a safe place. You will need them for reinstallation later. Check for any hidden fasteners. Sometimes, they are covered with grime.
Safely Lowering The Tank
Once the fasteners are loose, you can lower the tank. Be cautious while doing this. The tank may still have some grey water inside. Use a jack or a helper to support the tank. This prevents any sudden drops. Slowly lower the tank to the ground. Ensure it is empty before moving it. Dispose of any remaining water properly.
Inspecting And Cleaning The Area
Before you remove the grey water tank from your RV, it is crucial to inspect and clean the area. This ensures that the mounting area is free from any debris and damage. A thorough inspection also helps in identifying any potential issues that need fixing. Follow these steps to make sure everything is in top condition.
Checking For Damage
Begin by examining the grey water tank and its surroundings. Look for any signs of leaks, cracks, or rust. Check the mounting brackets and hardware for wear and tear.
- Inspect the tank for any visible damage.
- Check the mounting brackets for rust and wear.
- Look for any signs of leaks around the tank.
If you notice any damage, it is essential to address it before proceeding. Repair or replace any faulty parts to avoid future issues.
Cleaning The Mounting Area
Once you have checked for damage, it’s time to clean the mounting area. Remove any dirt, debris, or buildup that might interfere with the tank’s removal.
- Use a brush to scrub the mounting area.
- Wipe down the area with a damp cloth.
- Ensure all debris is removed from the mounting brackets.
Cleaning the area not only makes the removal process easier but also ensures that the new tank or repaired tank fits correctly.
By inspecting and cleaning the area, you prepare your RV for a smooth and efficient tank removal process. This step is vital for maintaining the longevity and functionality of your grey water tank.
Reinstalling Or Replacing The Tank
Replacing or reinstalling the grey water tank in your RV can seem daunting. But with the right steps, you can do it efficiently. Whether you are reinstalling an existing tank or upgrading to a new one, having a clear guide is essential. Let’s walk through the steps to ensure your RV’s grey water system is in top shape.
Reinstallation Steps
To reinstall the grey water tank, follow these steps:
- Inspect the Tank: Check for any cracks or damage on the tank.
- Clean the Tank: Remove any residue or build-up inside the tank.
- Position the Tank: Place the tank back in its original location.
- Secure the Tank: Use brackets or straps to hold the tank in place.
- Reconnect the Hoses: Attach the inlet and outlet hoses securely.
- Check for Leaks: Fill the tank with water to check for leaks.
Upgrading To A New Tank
Sometimes, it’s better to upgrade to a new tank. Here’s how you can do it:
- Select the Right Tank: Choose a tank that fits your RV’s specifications.
- Remove the Old Tank: Disconnect the hoses and unbolt the old tank.
- Install the New Tank: Place the new tank in the same position as the old one.
- Secure the Tank: Use new brackets or straps if needed.
- Reconnect the Hoses: Ensure all hoses are tightly connected.
- Test the System: Fill the tank and check for any leaks or issues.
Following these steps will ensure your grey water tank is properly reinstalled or upgraded. Your RV’s plumbing system will function smoothly, providing you with peace of mind during your travels.
Testing And Final Checks
After removing the grey water tank from your RV, testing and final checks are crucial. These steps ensure everything works properly. Missing a step might lead to future issues. Let’s dive into the essential checks.
Leak Tests
Check for leaks around all connections. Use a flashlight to see better. Look for any drips or moisture. Run water through the system to test thoroughly. Leaks can cause severe damage. Fix any issues immediately to avoid bigger problems later.
Securing All Connections
Ensure all connections are tight and secure. Loose connections can lead to leaks or system failure. Use wrenches to tighten any loose fittings. Double-check every connection for security. A secure setup keeps your RV in top shape.
Maintenance Tips
Maintaining your RV’s grey water tank is crucial for smooth operation. Proper care ensures your tank works efficiently and lasts longer. Here are some essential maintenance tips to follow.
Regular Inspection
Check your grey water tank often. Look for cracks or leaks. Ensure all connections are tight. A quick inspection can prevent bigger problems later. Pay attention to any unusual smells. This could indicate a problem inside the tank. Regular checks keep your tank in good condition.
Proper Cleaning Techniques
Clean your grey water tank after every trip. Use a mild detergent and warm water. Avoid harsh chemicals that can damage the tank. Rinse the tank thoroughly to remove all soap. A clean tank prevents clogs and reduces odors. Also, consider using a tank cleaner designed for RVs. These products help break down waste and keep your tank smelling fresh.
Credit: www.gonewiththewynns.com

Credit: www.youtube.com
Frequently Asked Questions
How Do I Locate The Grey Water Tank?
First, consult your RV’s manual for the tank’s location. It’s usually underneath, near the center or rear. Look for a large, rectangular container with a drain valve.
What Tools Do I Need To Remove The Tank?
You’ll need basic hand tools like wrenches and screwdrivers. Additionally, have safety gloves, a bucket, and possibly a jack or support stands ready.
Is It Safe To Remove The Grey Water Tank Myself?
Yes, it’s generally safe if you follow proper steps. Ensure the tank is empty, wear safety gear, and work on a stable surface.
How Do I Empty The Grey Water Tank?
Connect a sewer hose to the tank’s outlet valve. Open the valve and let the water drain completely into a designated disposal area.
Conclusion
Removing a grey water tank from your RV can seem daunting. Follow the steps carefully. This process ensures a clean and functional RV. Remember to gather all necessary tools first. Disconnect the tank properly to avoid spills. Clean up thoroughly after removal.
Regular maintenance keeps your RV in top shape. Always consult your RV’s manual for specifics. With some patience, you’ll manage this task successfully. Enjoy your travels with a well-maintained RV!


