Recharging an RV air conditioner might seem complex. But it’s simpler than you think.
Understanding how to recharge your RV air conditioner can save you time and money. Imagine being on a summer trip and your AC stops working. Learning how to recharge it can keep your travel comfortable. This guide will walk you through the steps.
You don’t need to be an expert to do it. With some basic tools and knowledge, you can handle it yourself. Stay cool on your adventures by knowing how to recharge your RV air conditioner. It’s easier than you might think. Let’s get started!
Gather Necessary Tools
Before starting the process of recharging your RV air conditioner, it’s crucial to gather all the necessary tools and materials. This ensures a smooth and efficient workflow. With the right tools at hand, you can avoid unnecessary interruptions and complete the task safely. Let’s explore what you’ll need.
Tools And Materials Needed
To recharge your RV air conditioner, you will need specific tools and materials. Here’s a list:
- Refrigerant: Ensure it matches your AC’s specifications.
- Manifold gauge set: Essential for measuring pressure levels.
- Hose: Used to connect the refrigerant canister to the AC unit.
- Wrench set: For loosening and tightening connections.
- Thermometer: To check the temperature output.
Safety Equipment
Safety should be your priority. Equip yourself with the following safety gear:
- Safety goggles: Protect your eyes from refrigerant leaks.
- Gloves: Shield your hands from cold refrigerant burns.
- Face mask: Prevent inhalation of harmful refrigerant fumes.
With the right tools and safety equipment ready, you are well-prepared. This ensures a safer and more efficient recharging process.
Preparation Steps
Before diving into recharging your RV air conditioner, it’s essential to prepare properly. Proper preparation ensures safety and efficiency. Follow these steps to get started.
Turn Off The Power
First, turn off the power supply to your RV. This step is crucial for safety. Locate the main power switch or breaker. Turn it off completely. This prevents electrical hazards while you work.
Access The Air Conditioner Unit
Next, access the air conditioner unit. Usually, the unit is on the roof of the RV. Use a sturdy ladder to reach it safely. Check for screws or clips holding the cover in place. Remove them carefully to expose the unit.
Check For Leaks
Ensuring your RV air conditioner is leak-free is crucial for optimal performance. Leaks can cause your AC to underperform, leading to discomfort during your travels. This section will guide you through the process of checking for leaks, which is a key step in recharging your RV air conditioner.
Visual Inspection
Start with a thorough visual inspection of your RV air conditioner. Look for any obvious signs of damage or wear. Check the condenser coils, evaporator coils, and all visible connections.
Use a flashlight to inspect hard-to-see areas. Look for any oil stains or residue, which can be a sign of a refrigerant leak. If you see any signs of leakage, note the location for further inspection.
Using A Leak Detector
If the visual inspection does not reveal any leaks, use a leak detector. These devices can help you find leaks that are not visible to the naked eye. There are two common types of leak detectors: electronic and dye-based.
- Electronic Leak Detectors: These devices beep or light up when they detect refrigerant. Move the detector around the AC unit, focusing on connections and coils.
- Dye-Based Leak Detectors: Add a UV dye to the refrigerant. Use a UV light to check for dye escaping from any leaks. This method can be very effective in finding small leaks.
After finding a leak, repair it before recharging the AC. This ensures the refrigerant stays in the system and the AC runs efficiently.
Credit: www.youtube.com
Releasing Old Refrigerant
Releasing old refrigerant from your RV air conditioner is a crucial step. This process ensures the system works efficiently. Proper disposal is vital for both performance and environmental safety.
Proper Disposal Methods
Disposing of old refrigerant properly is essential. There are specific methods to follow:
- Recycling Centers: Many centers accept old refrigerants.
- Certified Technicians: Hire professionals to handle removal safely.
- Special Equipment: Use recovery machines designed for refrigerants.
Always use the proper equipment. This prevents harmful releases into the environment.
Environmental Considerations
Releasing refrigerants improperly harms the environment. They contribute to ozone depletion and global warming. Follow these tips to stay eco-friendly:
| Action | Impact |
|---|---|
| Use certified recovery machines | Prevents leakage of harmful gases |
| Hire certified professionals | Ensures safe handling and disposal |
| Dispose at approved centers | Recycles refrigerant safely |
Following these steps helps protect our planet. It also ensures your RV air conditioner runs smoothly.
Adding New Refrigerant
Adding new refrigerant to your RV air conditioner can seem like a daunting task. But with the right guidance, it becomes simple and straightforward. This section will guide you through choosing the right refrigerant and the step-by-step recharging process.
Choosing The Right Refrigerant
Choosing the correct refrigerant for your RV air conditioner is crucial. Using the wrong type can damage the unit. Always check the manufacturer’s recommendations. Most RV air conditioners use R-134a refrigerant. It’s vital to stick to this type unless specified otherwise.
Step-by-step Recharging Process
Once you have the right refrigerant, follow these steps to recharge your RV air conditioner:
- Turn off the power: Ensure your RV’s air conditioner is off. Unplug the power source to avoid any accidents.
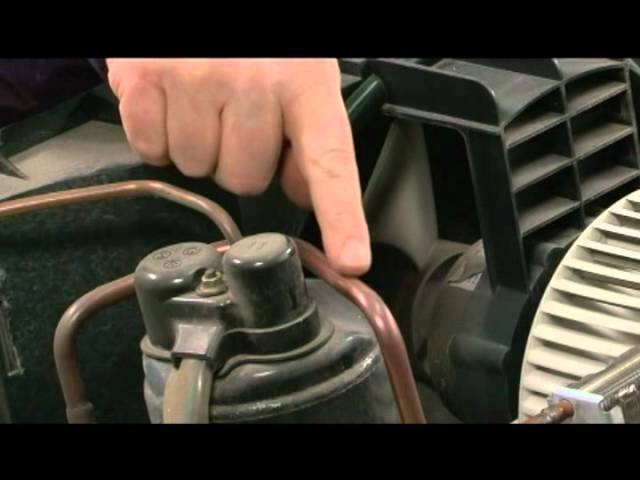
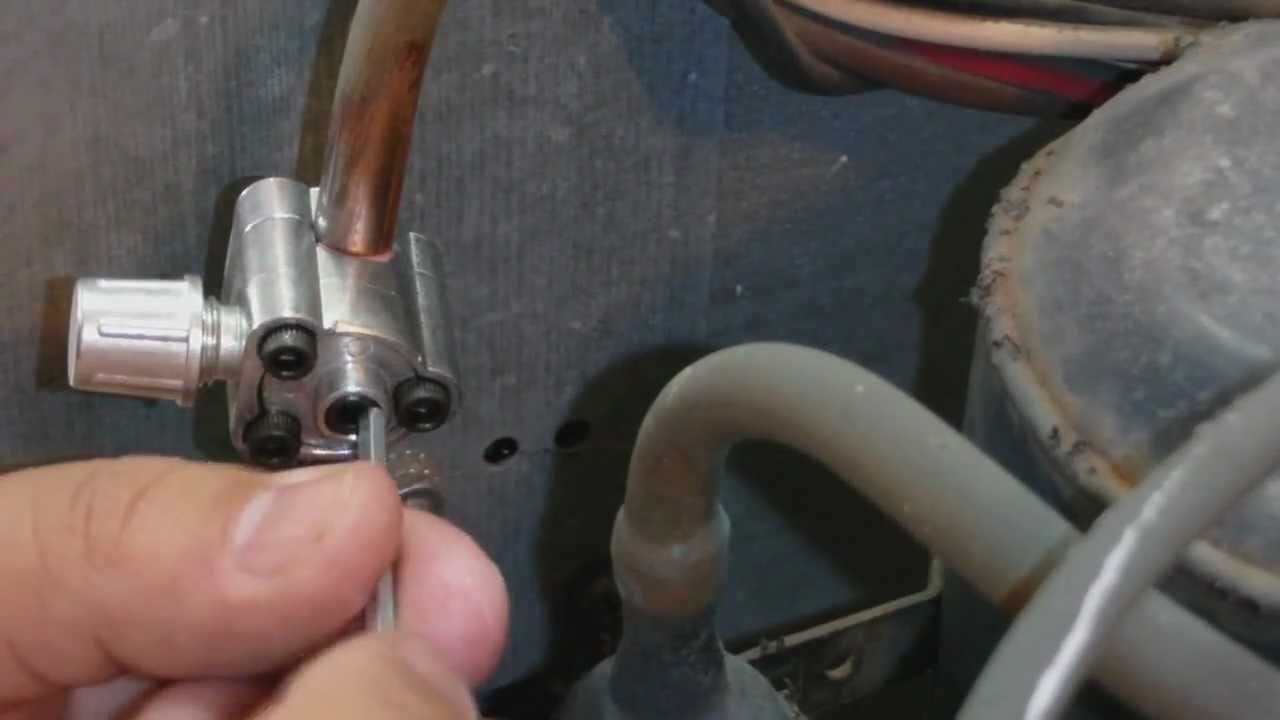
- Locate the low-pressure port: Find the low-pressure service port. It’s usually near the compressor.
- Attach the refrigerant can: Connect the refrigerant can to the low-pressure port. Follow the instructions on the can.
- Start the engine: Turn on your RV and set the air conditioner to its highest setting.
- Release the refrigerant: Slowly release the refrigerant into the system. Keep an eye on the pressure gauge.
- Monitor the pressure: Make sure the pressure stays within the recommended range. Overcharging can damage the system.
- Close the valve: Once the system is charged, close the valve on the refrigerant can. Remove the can carefully.
- Test the air conditioner: Turn off your RV. Wait a few minutes, then restart the air conditioner. Check if it’s cooling properly.
Following these steps ensures your RV air conditioner works efficiently. Keeping it in top shape will make your travels comfortable and pleasant.

Credit: www.rvtravel.com
Testing The Air Conditioner
Before recharging your RV air conditioner, you must test the unit. This step ensures the unit works properly. You can identify potential issues before adding refrigerant. Below are the steps to follow:
Powering On The Unit
First, connect your RV to a power source. Turn on the air conditioner. Set it to the coldest setting. Listen for any unusual noises. The unit should start blowing air within a few minutes.
Checking Cooling Efficiency
Next, check the cooling efficiency. Use a thermometer to measure the air temperature. Place it near the air vents. Allow the unit to run for at least 10 minutes. Compare the vent air temperature to the room temperature. The air should be at least 20 degrees cooler.
If the cooling is not sufficient, the unit may need a recharge. Ensure the air filters are clean. Dirty filters can reduce cooling efficiency. Also, check the outdoor unit for debris. Clear any obstructions around it.
Maintenance Tips
Proper maintenance keeps your RV air conditioner running smoothly. Regular check-ups and preventive actions ensure optimal performance. Follow these tips to make sure your RV stays cool.
Regular Inspections
Inspect the air filter monthly. A clean filter ensures good airflow. Replace dirty filters promptly. Check the evaporator and condenser coils. These should be clean and free of debris. Clean coils enhance cooling efficiency. Look for any signs of wear or damage. Address issues before they escalate.
Preventive Measures
Keep the outside unit clear of obstructions. Trim nearby vegetation regularly. Ensure proper ventilation around the unit. Blocked vents can cause overheating. Use a soft brush to clean the fins. Bent fins reduce airflow and efficiency. Check the electrical connections. Tighten any loose connections. Inspect the thermostat for accuracy. An inaccurate thermostat affects cooling performance.
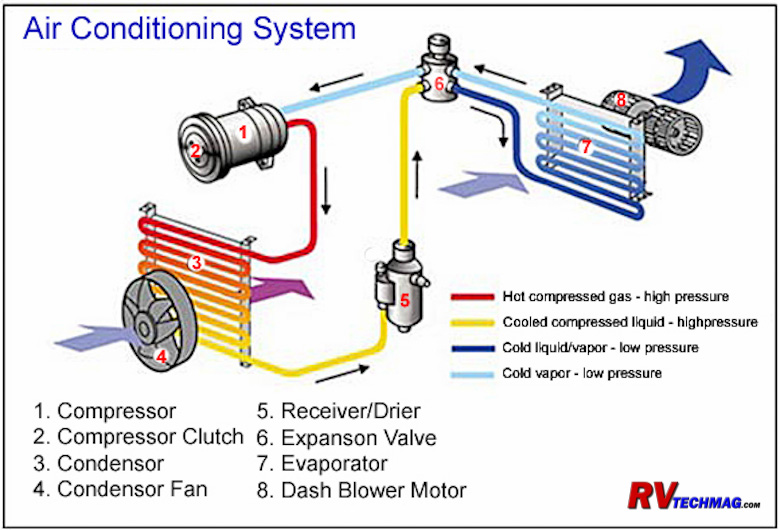
Credit: www.rvtechmag.com
Common Issues And Solutions
Recharging your RV air conditioner can sometimes be tricky. It’s important to understand the common issues that can arise and how to address them effectively. This section will guide you through troubleshooting tips and when to seek professional help.
Troubleshooting Tips
Before you start, make sure to check these common issues:
- Low Refrigerant Levels: The most common issue. Use a gauge to check levels.
- Dirty Coils: Clean the coils regularly to ensure efficient cooling.
- Blocked Vents: Make sure vents are clear of obstructions. This can improve air flow.
- Thermostat Issues: Ensure your thermostat is working correctly. Replace if necessary.
Follow these steps to troubleshoot:
- Turn off the air conditioner.
- Inspect the coils and clean if dirty.
- Check the refrigerant levels using a gauge.
- Ensure all vents are clear and unobstructed.
- Test the thermostat and replace if it’s faulty.
When To Seek Professional Help
Some issues may require professional assistance. If you encounter any of the following, it’s time to call a professional:
- Persistent Leaks: If you notice continuous leaking, it could indicate a serious issue.
- Electrical Problems: Any electrical issue should be handled by a certified technician.
- Compressor Failure: A broken compressor needs professional repair or replacement.
- Unusual Noises: Strange noises often indicate a deeper problem that needs expert attention.
| Issue | DIY Solution | Professional Solution |
|---|---|---|
| Low Refrigerant Levels | Use a gauge to check levels | Recharge refrigerant |
| Dirty Coils | Clean the coils | Deep cleaning |
| Blocked Vents | Clear obstructions | Inspect ductwork |
| Thermostat Issues | Replace thermostat | Calibrate system |
| Persistent Leaks | Check for visible leaks | Seal or replace parts |
| Electrical Problems | Check fuse box | Electrical repair |
| Compressor Failure | Test compressor | Repair or replace |
| Unusual Noises | Inspect for loose parts | Diagnose and fix |
Frequently Asked Questions
How Do I Know If My Rv Ac Needs Recharging?
If your RV AC blows warm air or takes longer to cool, it needs recharging. Unusual noises or frequent cycling on and off are also indicators. Regular maintenance checks can help identify these issues early.
Can I Recharge My Rv Ac Myself?
Yes, you can recharge your RV AC yourself with the right tools and instructions. Ensure you follow safety guidelines. If you’re unsure, consult a professional to avoid potential hazards.
What Tools Are Needed To Recharge An Rv Ac?
You’ll need a refrigerant refill kit, a pressure gauge, and safety gloves. Follow the manufacturer’s instructions. Some kits come with detailed guidelines to help you through the process.
How Often Should Rv Ac Be Recharged?
Typically, RV AC units need recharging every 2-3 years. However, the frequency can vary based on usage and maintenance. Regular checks can help maintain efficiency and extend the lifespan of your unit.
Conclusion
Recharging your RV air conditioner isn’t hard. Follow the steps carefully. Safety is key. Always wear protective gear. Gather the right tools. Check your AC’s manual. Ensure the refrigerant is correct. Recharge slowly. Monitor pressure levels. Test the AC after recharging.
Enjoy cool air on your trips. Regular maintenance helps. Keep your RV comfortable. Happy travels!


