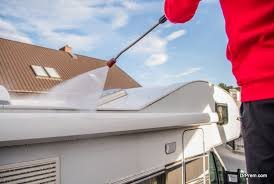
To keep your RV in top shape, cleaning the roof is essential. Before sealing, a clean roof ensures better adhesion and longevity.
Cleaning your RV roof might sound daunting, but it’s a crucial step in maintaining your vehicle. Dirt, debris, and mildew can damage the roof and shorten its lifespan. A thorough cleaning helps protect your investment and ensures a strong seal.
In this guide, we’ll walk you through the steps to clean your RV roof effectively. You’ll learn about the tools needed and techniques to get the job done right. Follow these steps to keep your RV roof in pristine condition before sealing it. Let’s dive in and start cleaning!
Gathering Supplies
Gather necessary supplies like a soft brush, mild detergent, and a hose for cleaning your RV roof. Proper tools ensure effective cleaning before sealing.
Before you start cleaning your RV roof, you need the right supplies. Proper tools and cleaning solutions make the job easier and more effective. Gathering everything beforehand saves time and ensures you are prepared for every step.
Essential Cleaning Tools
To clean your RV roof, you need a few basic tools. A sturdy ladder is essential for reaching the roof safely. A long-handled brush helps scrub dirt and debris without straining yourself. Use a sponge for gentle cleaning of delicate areas. A bucket is also necessary to hold water and cleaning solutions. Don’t forget a hose to rinse off the roof once you’ve scrubbed it clean.
Recommended Cleaning Solutions
Choosing the right cleaning solution is important for an effective clean. Mild soap and water work well for most roofs. Specialized RV roof cleaners are available for tougher stains. Always check the cleaner’s label to ensure it is safe for your roof material. Avoid harsh chemicals that can damage the roof surface. If your roof has mold or mildew, use a cleaner with a fungicide. Gathering these supplies ensures you are ready to clean your RV roof thoroughly and safely.
Safety Precautions
Cleaning your RV roof is essential before sealing. Safety should always come first. Taking the right safety measures can prevent accidents and injuries. Let’s look at the key safety precautions to follow.
Protective Gear
Wearing the right gear is crucial. Always wear non-slip shoes to avoid slipping. Gloves protect your hands from chemicals and rough surfaces. Use safety goggles to keep debris and cleaning agents out of your eyes. A hat or helmet can protect your head from potential bumps or falls. Ensure the protective gear fits well for maximum safety.
Safe Practices
Start by checking the weather forecast. Avoid cleaning on windy or rainy days. Make sure the ladder you use is sturdy and in good condition. Always have someone nearby to assist if needed. Keep the cleaning area free of clutter. Move slowly and cautiously to maintain your balance. Never rush the process.
Check the roof’s surface for weak spots. Avoid stepping on soft or unstable areas. Use a harness if the roof is particularly high or sloped. Follow the manufacturer’s guidelines for cleaning products. Some chemicals can be harmful if used incorrectly. Always read labels and instructions carefully.
Initial Inspection
Before sealing your RV roof, performing an initial inspection is crucial. This step helps identify any issues that need attention. A thorough inspection ensures that the sealing process will be effective and long-lasting.
Checking For Damage
Start by checking for damage on the RV roof. Look for cracks, tears, or punctures. Use a ladder to access the roof safely. Examine the entire surface carefully. Pay attention to areas around vents and seams. Damage in these areas can lead to leaks.
Check for soft spots on the roof. Soft spots indicate water damage. Press gently with your hand to test for softness. If you find any damage, mark these areas for repair. Proper repair ensures a smooth sealing process.
Identifying Problem Areas
Next, identify problem areas that need special attention. Look for mold, mildew, or algae growth. These can cause serious damage if not treated. Clean these areas thoroughly before sealing.
Inspect the seals around vents, antennas, and skylights. Old or cracked seals need replacement. Check for loose or missing screws. Tighten or replace them to secure the roof components.
Look for pooling water or dirt buildup. These areas can weaken the roof structure. Ensure proper drainage to prevent future issues. A clean and well-maintained roof will ensure a successful sealing job.

Credit: flexsealproducts.com
Removing Debris
Maintaining your RV’s roof is crucial for its longevity. Before sealing, it’s important to clean the roof thoroughly. The first step is removing debris. This ensures a clean surface for the sealant to adhere to. Let’s break down the process into manageable steps.
Clearing Leaves And Branches
Start by removing large debris like leaves and branches. Use your hands or a plastic rake to gently clear them away. Avoid using metal tools, which can damage the roof. This step helps you see the surface clearly and identify any areas needing special attention.
Sweeping The Roof
Next, it’s time to sweep. Use a soft-bristled broom to sweep the entire roof. Work from one end to the other. Ensure all small debris and dirt are removed. This step is crucial for a smooth sealing process. Pay extra attention to the edges and corners, where dirt often accumulates.
Washing The Roof
Cleaning the RV roof is essential before sealing. Start by sweeping off loose debris. Then, scrub gently with a soft brush and mild soap. Rinse thoroughly and let it dry completely.
Before sealing your RV roof, you must clean it properly. Washing the roof ensures a smooth, dirt-free surface. This helps the sealant adhere better and last longer. Follow these steps to make sure your RV roof is spotless.
Applying Cleaning Solution
Choose a cleaner made for RV roofs. Mix it with water as the instructions say. Pour the solution into a spray bottle or a bucket. Apply it evenly across the roof. Ensure every part is covered. This step will loosen the dirt and grime.
Using A Soft Brush
Get a soft-bristled brush for scrubbing. Hard brushes can damage the roof. Gently scrub the roof in a circular motion. Focus on areas with stubborn stains. Rinse the brush often to avoid spreading dirt. Work systematically to cover the entire roof. After scrubbing, rinse the roof with clean water. Use a hose or a bucket. Make sure no soap remains. Leftover soap can affect the sealant. Let the roof dry completely before moving on to sealing. “`
Rinsing The Roof
Before you seal your RV roof, it is crucial to rinse it properly. A thorough rinse removes any loose dirt or debris. This step ensures a clean surface for sealing. Follow these tips for an effective rinse.
Using A Hose
Using a hose is the easiest way to rinse your RV roof. Make sure the hose has a strong water pressure. This helps to wash away dirt and grime effectively.
- Start at one end of the roof.
- Work your way towards the other end.
- Hold the hose at an angle to avoid splashing.
- Focus on areas with more dirt buildup.
Be careful near roof vents and other openings. Ensure water does not seep into these areas.
Ensuring No Residue
After rinsing, check for any remaining residue. Even small amounts of dirt can affect the sealing process. Use a soft brush to scrub away any stubborn spots.
- Inspect the entire roof for dirt or grime.
- Re-rinse any areas with visible residue.
- Use a sponge for more delicate spots.
Make sure the roof is completely clean. This guarantees a strong and lasting seal.
These steps are essential for a clean RV roof before sealing. Following them will help ensure your sealant adheres properly and lasts longer. A clean roof is a well-protected roof.
Drying The Roof
Drying your RV roof is a crucial step before sealing. Any moisture left can lead to a less effective seal, causing problems later. This step ensures the roof is ready for the sealant to adhere properly. Here are some effective ways to dry your RV roof.
Allowing Time To Air Dry
After cleaning, let the roof air dry completely. This method is simple and requires no tools. If the weather is sunny and dry, this can be a quick process. It’s essential to ensure no moisture remains. A thorough drying process prevents mold and mildew growth.
Using Towels For Faster Drying
If you’re short on time, use towels to dry the roof. This method speeds up the drying process. Use large, absorbent towels to soak up the water. Make sure to cover every area, including corners and seams. This manual drying method ensures every part of the roof is dry.
Final Inspection
Inspecting your RV roof thoroughly is crucial before sealing. This ensures a perfect seal. A clean roof prevents future leaks and damage. Follow these steps for a successful inspection.
Ensuring Cleanliness
Before sealing, make sure the roof is spotless. Any dirt or debris can cause sealing issues. Use a soft brush or cloth. Clean every nook and cranny.
For stubborn dirt, use a mild cleaner. Avoid harsh chemicals. They can damage the roof material. Rinse thoroughly with clean water. Let the roof dry completely.
Preparing For Sealing
Once the roof is clean, inspect it for damage. Look for cracks, holes, or worn areas. Use a flashlight to see hidden spots.
- Check around vents and AC units.
- Inspect all seams and edges.
- Examine any previous repairs.
Mark any problem areas with chalk. This makes them easy to find later. Repair these areas before sealing.
Finally, gather your sealing materials. You will need sealant, a caulking gun, and a putty knife. Make sure you have enough sealant for the entire roof.
Now, you are ready to start sealing your RV roof.
Credit: www.reddit.com
Frequently Asked Questions
How Often Should You Clean An Rv Roof?
You should clean your RV roof at least twice a year. Regular cleaning helps prevent damage and extends the roof’s lifespan.
What Tools Do You Need To Clean An Rv Roof?
You need a soft brush, mild detergent, water hose, and a ladder. These tools ensure effective and safe cleaning.
Can You Use Bleach To Clean An Rv Roof?
Avoid using bleach as it can damage the roof material. Opt for mild, RV-specific cleaners instead for safe and effective cleaning.
How Long Does It Take To Clean An Rv Roof?
Cleaning an RV roof typically takes about 1-2 hours. The time can vary based on roof size and dirt level.
Conclusion
Cleaning your RV roof before sealing is essential. It ensures a strong seal. Follow the steps carefully. Use appropriate cleaning tools and solutions. Be thorough but gentle to avoid damage. Regular maintenance prolongs your RV’s lifespan. Enjoy a leak-free, durable roof.
Happy travels!


