Having trouble with your GE RV air conditioner? Don’t worry, you’re not alone.
Many RV owners face issues with their air conditioning units. Traveling in an RV should be a comfortable experience. But when the air conditioner stops working, it can turn your trip into a nightmare. Understanding common problems and their solutions can save you time and stress.
This blog will guide you through troubleshooting steps for your GE RV air conditioner. We’ll cover typical issues, from lack of cooling to strange noises. By the end, you’ll have the knowledge to fix minor problems on your own. Let’s get started and make sure your RV stays cool and comfortable.
Common Issues
Having trouble with your GE RV air conditioner can be frustrating. Understanding common issues helps you troubleshoot effectively. This section covers frequent problems you might face.
Unit Not Cooling
One common issue is the unit not cooling. Start by checking the thermostat settings. Ensure it’s set to ‘cool’ mode. Verify the temperature is set lower than the current room temperature.
If the thermostat settings are correct, inspect the air filters. Dirty filters restrict airflow and reduce cooling efficiency. Clean or replace the filters if they are dirty.
Also, check for obstructions around the external unit. Ensure the unit has proper ventilation. Clear any debris or objects blocking the airflow.
If the problem persists, the issue might be with the refrigerant levels. Low refrigerant can affect cooling performance. In this case, you may need to contact a professional for a refill.
Strange Noises
Strange noises can indicate different problems. If you hear rattling, it might be loose parts. Check for any loose screws or components.
If you hear a buzzing sound, it could be an electrical issue. Inspect the unit for any signs of damage or wear. Ensure all electrical connections are secure.
A grinding noise usually indicates a problem with the fan motor. Turn off the unit and inspect the fan. Ensure the blades are not obstructed and can move freely.
Regular maintenance can prevent many noise issues. Keep the unit clean and inspect it regularly.
Initial Checks
Experiencing issues with your GE RV air conditioner? Start with these initial checks. They often resolve common problems quickly. Let’s dive into the essential steps to troubleshoot your unit effectively.
Power Supply
First, ensure the power supply is connected and functioning. Check the RV’s battery and fuse box. Look for any blown fuses or tripped breakers. Use a multimeter to test the power outlet’s voltage. Make sure it matches the air conditioner’s requirements.
If the power supply is stable, verify the power cord. Inspect it for any visible damage or wear. Replace it if necessary. Sometimes, a loose connection can cause the unit to malfunction. Tighten any loose plugs or connections.
Thermostat Settings
Next, check the thermostat settings. Ensure it is set to “cool” mode. Verify the temperature setting is lower than the current room temperature. This will prompt the unit to start cooling.
Consult the user manual for any specific instructions. Make sure the thermostat is not in “fan-only” mode. Sometimes, cleaning the thermostat can help. Dust and dirt can affect its functionality. Use a soft cloth to clean it gently.
If the thermostat is battery-operated, replace the batteries. Low battery power can cause incorrect readings. Ensure the thermostat is level and securely mounted on the wall.
| Initial Check | Action |
|---|---|
| Power Supply | Check connections, fuses, and voltage |
| Thermostat Settings | Set to “cool” mode, adjust temperature, clean, replace batteries |
Airflow Problems
Experiencing airflow problems with your GE RV air conditioner can be frustrating. Poor airflow can lead to inefficient cooling and increased energy consumption. Addressing common issues like blocked vents and dirty filters can help restore proper airflow and improve your RV’s comfort.
Blocked Vents
Blocked vents are a common cause of airflow problems. Ensure all vents are open and unobstructed. Furniture, curtains, or other objects can block airflow. Move any items that might be blocking the vents. Check the exterior vents as well. Debris or dirt can accumulate and cause blockages. Clean these areas regularly to maintain proper airflow.
Filter Cleaning
Dirty filters can significantly reduce airflow. Filters trap dust and particles, keeping the air clean. Over time, these filters can become clogged. This restricts airflow and reduces the system’s efficiency. Clean or replace the filters every month. Doing so ensures optimal performance and better air quality.
Electrical Issues
Electrical issues can cause your GE RV air conditioner to malfunction. Identifying and resolving these problems can save you from unnecessary headaches. Let’s explore some common electrical issues and their solutions.
Circuit Breaker
A tripped circuit breaker can stop your air conditioner from working. Check the breaker in your RV’s electrical panel. If it’s tripped, reset it by switching it off and then on again. If the breaker trips again, there may be a deeper issue.
Here are some possible causes:
- Overloaded circuit
- Short circuit
- Faulty breaker
To solve this, reduce the load on the circuit. Unplug other devices and try again. If the problem persists, consult a professional electrician.
Loose Connections
Loose connections can cause intermittent power issues. Inspect the wiring connections in your RV.
Follow these steps:
- Turn off the power to avoid shocks.
- Check the connections at the breaker panel.
- Tighten any loose wires.
If you find damaged wires, replace them immediately. Loose connections can lead to overheating and potential fire hazards.
Note: Always ensure that the power is off before working on electrical connections. If unsure, seek professional help.
Refrigerant Levels
Maintaining the correct refrigerant levels in your GE RV air conditioner is crucial. The refrigerant is the lifeblood of your cooling system. It absorbs and releases heat to keep your RV cool. If the refrigerant level is low, your air conditioner will not work efficiently. This can lead to higher energy bills and discomfort.
Signs Of Low Refrigerant
Low refrigerant levels show clear signs. The air conditioner may blow warm air. You might hear a hissing or bubbling noise. Ice may form on the evaporator coil. The cooling cycle may run longer than usual. These symptoms indicate that your air conditioner needs attention.
Recharging Tips
Recharging your RV air conditioner with refrigerant is important. First, turn off the air conditioner. Locate the service port. Attach the refrigerant canister to the service port. Slowly add refrigerant while monitoring the pressure gauge. Do not overfill. Check for leaks after recharging. If unsure, seek professional help.
Credit: www.youtube.com
Component Failures
Component failures in a GE RV air conditioner can cause many problems. These failures can affect cooling efficiency and overall performance. It’s important to know the common issues and how to address them. Below, we will discuss two main areas: compressor issues and fan motor problems.
Compressor Issues
The compressor is the heart of your air conditioner. If it fails, the whole system can shut down. One common problem is overheating. This can happen due to low refrigerant levels or dirty coils. Check the refrigerant levels and clean the coils to fix this issue.
Another problem is a faulty start capacitor. This part helps the compressor start up. If it’s broken, the compressor won’t run. Test the capacitor with a multimeter. If it’s bad, replace it.
Fan Motor Problems
The fan motor circulates air through the system. If it stops working, the air conditioner won’t cool. One common issue is a broken fan belt. Check the belt for wear and tear. Replace it if needed.
Another issue is motor overheating. This can be due to dirt buildup or a lack of lubrication. Clean the motor and lubricate the bearings. If the problem persists, the motor may need replacement.
Maintenance Tips
Maintaining your GE RV air conditioner is crucial for its longevity and efficiency. Regular care ensures that it runs smoothly and keeps your RV cool. Below are some essential maintenance tips to help you keep your air conditioner in top shape.
Routine Cleaning
Routine cleaning is vital for the optimal performance of your GE RV air conditioner. Dust and debris can clog the system, reducing its efficiency.
- Clean the filters: Check and clean the filters every two weeks. Dirty filters can block airflow, causing the unit to work harder.
- Wipe the exterior: Dust off the exterior of the air conditioner regularly. Use a damp cloth to remove any accumulated dirt.
- Clear the vents: Ensure that the air vents are free of obstructions. This allows for proper airflow and cooling.
Seasonal Inspections
Seasonal inspections help catch potential issues before they become major problems. Performing these checks can save you time and money.
- Check for leaks: Inspect the unit for any signs of refrigerant leaks. A leak can reduce cooling efficiency and damage the unit.
- Examine the coils: Look at the evaporator and condenser coils. Clean them if they are dirty to maintain good airflow.
- Test the thermostat: Ensure that the thermostat is functioning correctly. An inaccurate thermostat can lead to uneven cooling.
- Inspect wiring: Check all electrical connections for wear and tear. Damaged wires can cause malfunctions or safety hazards.
Following these maintenance tips will keep your GE RV air conditioner running efficiently. Regular upkeep ensures a cool and comfortable RV environment.
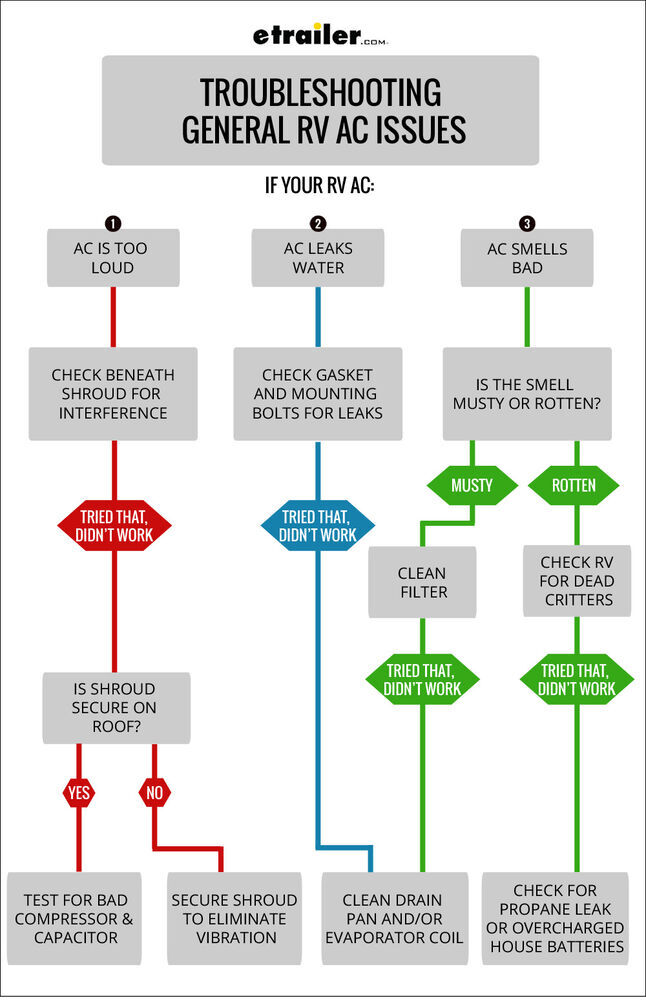
Credit: www.etrailer.com
When To Seek Professional Help
Sometimes, troubleshooting your GE RV air conditioner becomes overwhelming. You might face issues that persist despite your best efforts. Understanding when to call a professional can save you time and frustration. Let’s explore key signs indicating it’s time to get expert help.
Persistent Problems
If your air conditioner frequently malfunctions, it’s time to seek help. Recurring issues like strange noises or poor cooling signal deeper problems. A technician can diagnose and fix these persistent issues efficiently.
DIY fixes might not address underlying problems. Persistent issues often require professional tools and expertise. Addressing them early can prevent more serious damage.
Warranty Considerations
Before attempting any major repair, check your warranty. Some repairs might void your warranty if not done by a certified technician. A professional ensures repairs comply with warranty terms, protecting your investment.
Manufacturers often recommend professional service to maintain the warranty. It’s a smart move to follow these recommendations. This ensures you get the most out of your warranty protection.
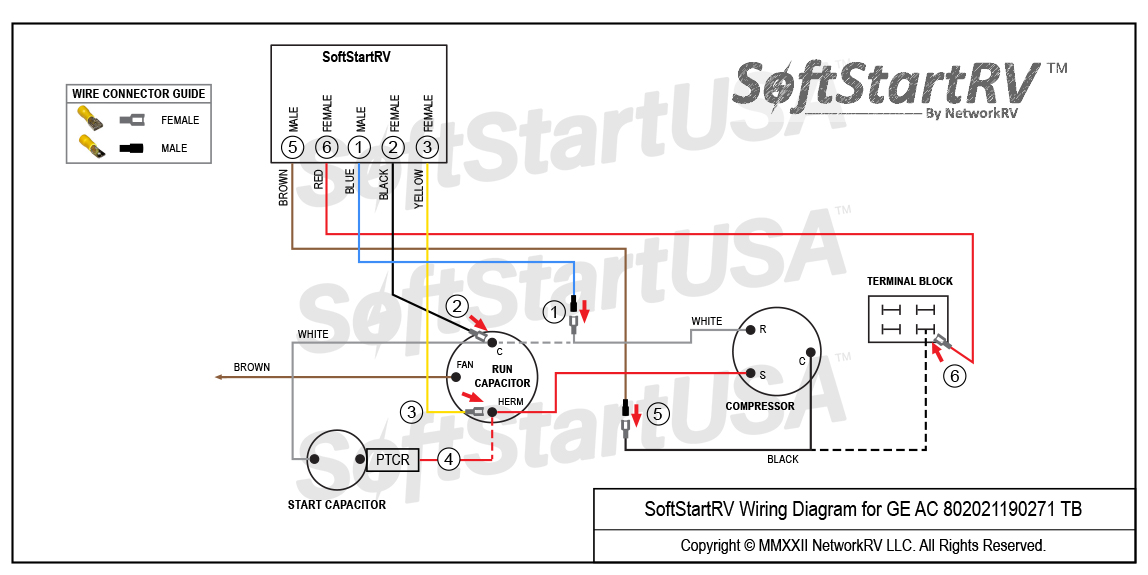
Credit: www.softstartrv.com
Frequently Asked Questions
How Do I Reset My Ge Rv Air Conditioner?
To reset your GE RV air conditioner, turn off the unit and disconnect it from power. Wait for about 5 minutes, then reconnect it and turn it back on. This can help resolve minor issues.
Why Is My Ge Rv Ac Not Cooling?
If your GE RV AC is not cooling, check the thermostat settings first. Ensure the air filters are clean and not clogged. Also, inspect the condenser coils for dirt or debris.
What Does The Error Code On My Ge Rv Ac Mean?
Error codes on GE RV air conditioners indicate specific issues. Refer to the user manual for the error code explanation. Common codes might relate to temperature sensors, power issues, or refrigerant levels.
How Often Should I Clean The Air Filters?
Clean the air filters of your GE RV air conditioner every two weeks. Regular cleaning ensures optimal performance and efficiency. Dirty filters can restrict airflow and reduce cooling effectiveness.
Conclusion
Troubleshooting your GE RV air conditioner doesn’t have to be hard. Follow these steps to identify and fix common issues. Regular maintenance can prevent many problems. Keep your unit clean and check for wear. If issues persist, consult a professional.
Your comfort on the road is worth the effort. Stay cool and enjoy your travels!


