Installing an RV power pedestal ensures a reliable electricity source. It might seem daunting, but it’s manageable with the right guidance.
An RV power pedestal is crucial for providing a stable power supply to your recreational vehicle. Whether you’re setting up at a campsite or your own property, understanding the installation process can save you time and hassle. This guide will walk you through each step, from choosing the right pedestal to ensuring proper connections.
By following these instructions, you can enjoy a safe and efficient power setup for your RV adventures. Ready to get started? Let’s dive into the details of installing your RV power pedestal.
Gather Necessary Tools
Before starting the installation of your RV power pedestal, gather all the necessary tools. Having everything ready will make the process smoother and safer. This ensures you do not have to stop midway to find a missing tool. Let’s dive into the essential tools and materials you’ll need, as well as the safety gear required.
Tools And Materials List
Here are the tools and materials you will need:
- Power pedestal unit
- Screwdrivers (both flathead and Phillips)
- Wire strippers
- Voltage tester
- Drill with bits
- Electrical tape
- Wire connectors
- Mounting hardware
- Level
- Measuring tape
Each item on this list plays a crucial role in the installation process. For example, screwdrivers will help you secure connections. Wire strippers will prepare the electrical wires. The voltage tester ensures there is no live current during installation.
Safety Gear
Safety is paramount during any electrical installation. Wear the following safety gear:
- Insulated gloves
- Safety glasses
- Protective footwear
Insulated gloves protect your hands from electrical shocks. Safety glasses shield your eyes from debris. Protective footwear keeps your feet safe from heavy or sharp objects. Always prioritize your safety by using the right gear.
Choose Installation Location
Choosing the right installation location for your RV power pedestal is crucial. It ensures safe and efficient use. This section will help you understand the factors to consider and the optimal positioning for your RV power pedestal.
Factors To Consider
When selecting an installation location, consider these key factors:
- Accessibility: Ensure the pedestal is easy to reach for all users.
- Safety: Avoid placing it near water or flammable objects.
- Distance: Keep it close to your RV to minimize cable length.
- Regulations: Check local codes and regulations for electrical installations.
Optimal Positioning
Proper positioning of the RV power pedestal enhances convenience and safety:
- Near Parking Spot: Position the pedestal close to your RV’s parking spot.
- Away from Pathways: Avoid placing it in walkways to prevent tripping hazards.
- Shaded Area: Place it in a shaded area to protect it from direct sunlight.
- Stable Ground: Ensure the ground is level and stable to support the pedestal.
By considering these factors and positioning tips, you can ensure a safe and convenient setup for your RV power pedestal.
Prepare The Site
Installing an RV power pedestal requires careful preparation of the site. This ensures a smooth and successful installation. Before you begin, it’s essential to clear and mark the area. This will help you avoid any obstacles and make the process easier.
Clearing The Area
Start by removing any debris, rocks, or vegetation. This will provide a clear working space. Ensure the area is level and free from any hazards. A clear site makes it easier to install the power pedestal correctly.
Check for any underground utilities before you dig. Use a utility locator service if needed. This helps prevent damage to existing utilities. Safety should always be a priority.
Marking The Spot
Once the area is clear, mark the spot where the pedestal will go. Use stakes or spray paint to outline the location. This helps ensure accuracy during the installation process.
Measure the distance from the RV to the pedestal location. Make sure the power cord will reach comfortably. Double-check your measurements to avoid any issues later.
Mark the positions for the mounting holes. These marks will guide you during installation. Precise marking ensures that the pedestal is installed securely and safely.
Install The Pedestal Base
Installing the pedestal base is crucial for your RV power pedestal. It ensures stability and safety. Before you begin, gather all necessary tools and materials. This includes the pedestal, concrete mix, and a shovel.
Digging The Hole
First, mark the spot where you want to install the pedestal. Use a shovel to dig a hole. The hole should be about 24 inches deep and 12 inches wide. This depth gives the pedestal a firm foundation. Remove any rocks and debris. Make sure the hole is level at the bottom.
Securing The Base
Place the pedestal base into the hole. Ensure it stands straight. Use a level to check. Mix the concrete as per the instructions on the bag. Pour the concrete into the hole around the base. Fill it up to ground level. Allow the concrete to set. This usually takes 24 hours. Once set, double-check the level. Make adjustments if needed.
Connect Electrical Wiring
Connecting the electrical wiring to your RV power pedestal is a crucial step. It ensures a reliable power supply for your recreational vehicle. This process involves some basic knowledge of wiring and safety precautions.
Wiring Basics
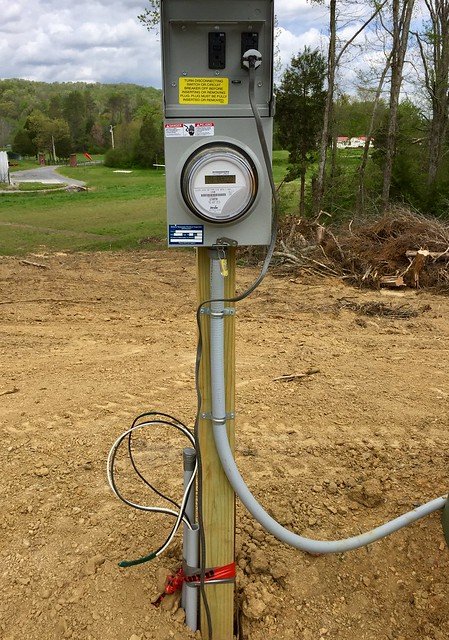
Before you start, understand the wiring basics. Typically, an RV power pedestal has three main wires. These are the hot wire, neutral wire, and ground wire. The hot wire carries the current from the power source. The neutral wire completes the electrical circuit. The ground wire provides a safe path for electricity in case of a short circuit.
Connecting To Power Source
First, ensure the power pedestal is turned off. Safety first. Identify the connection points for each wire. Usually, the hot wire connects to the black or red terminal. The neutral wire connects to the white terminal. The ground wire connects to the green terminal.
Strip the insulation off the ends of each wire. Insert each wire into its respective terminal. Tighten the screws to secure the wires. Double-check the connections to ensure they are tight and secure. Turn on the power pedestal to test the connections. Your RV should now have a stable power supply.
Mount The Pedestal
Once you have chosen the perfect spot for your RV power pedestal, it’s time to mount it. This step is crucial for ensuring stability and safety. Follow these steps to make sure the pedestal is securely placed and aligned correctly.
Aligning The Pedestal
Begin by placing the pedestal in the desired location. Use a level to check the alignment. Adjust until the pedestal is perfectly vertical. This step is essential for proper function and longevity.
Ensuring the pedestal is level prevents future issues. A tilted pedestal can cause electrical problems. Always double-check your alignment before moving on.
Securing The Structure
Once aligned, it’s time to secure the pedestal. Use anchor bolts to attach it to the ground. Drill holes for the bolts at the base of the pedestal. Insert the bolts and tighten them firmly.
This process keeps the pedestal stable. Weather conditions and external forces can’t easily move it. Use the appropriate tools for the best results. A wrench or socket set works well for tightening bolts.
For added stability, consider adding a concrete base. Pour the concrete and let it set. Then, mount the pedestal on the concrete. This method provides extra security.
| Steps | Description |
|---|---|
| 1. Place Pedestal | Position the pedestal in the chosen spot. |
| 2. Level the Pedestal | Use a level to ensure it is vertical. |
| 3. Drill Holes | Drill holes for anchor bolts at the base. |
| 4. Insert Bolts | Insert and tighten the anchor bolts. |
| 5. Add Concrete (Optional) | Pour concrete for extra stability. |
Following these steps ensures a secure and stable RV power pedestal. Proper installation prevents issues down the road.
Test The Installation
Testing your RV power pedestal installation is vital. It ensures everything functions correctly and safely. This part of the process involves several steps. Each is crucial to guarantee a smooth operation. Below, we will go through the necessary checks and procedures.
Safety Checks
Begin by inspecting the wiring connections. Ensure all wires are secure. Look for exposed wires or any signs of damage. If you find any, fix them immediately. Use a voltage tester to check for live wires. This step is important to avoid electrical shocks.
Next, verify that the circuit breaker is off. Double-check this before proceeding. Confirm that all protective covers are in place. They shield the electrical components from the elements. Also, make sure there are no foreign objects inside the pedestal. These can cause short circuits or other issues.
Powering Up
Once the safety checks are complete, it’s time to power up. Start by turning on the circuit breaker. Observe the power pedestal for any unusual sounds or smells. These can indicate a problem. If all seems well, plug in a simple electrical device. A lamp or a small fan works well for this test.
Check if the device powers up without issues. If it does, your installation is likely correct. For a final test, plug in your RV. Ensure all systems are functioning. Pay attention to the main appliances. They should operate smoothly without flickering or power loss.

Credit: www.youtube.com
Maintenance Tips
Maintaining your RV power pedestal ensures it works reliably and safely. Regular upkeep prevents unexpected issues and extends its lifespan. Here are some essential maintenance tips to keep your power pedestal in top shape.
Regular Inspections
Inspect your power pedestal regularly. Check for any signs of wear or damage. Look for frayed wires, loose connections, and rust. Make sure all outlets are clean and dry. These checks help identify potential problems early.
Troubleshooting Common Issues
If you experience power issues, start with a basic check. Ensure the power source is active. Verify that all connections are secure. If the power pedestal trips, reset the circuit breakers. If the problem persists, consult the user manual or a professional. Don’t attempt complex repairs yourself. Safety first.
Credit: aluminumcamperforum.com
Frequently Asked Questions
What Tools Do I Need To Install An Rv Power Pedestal?
To install an RV power pedestal, you need a shovel, wrench set, screwdriver, level, and concrete mix. These tools ensure a secure and level installation.
How Deep Should The Power Pedestal Be Buried?
The power pedestal should be buried at least 2 feet deep. This depth ensures stability and compliance with safety standards.
Can I Install An Rv Power Pedestal Myself?
Yes, you can install an RV power pedestal yourself. Follow the manufacturer’s guidelines and local electrical codes for a safe installation.
How Do I Connect The Pedestal To The Power Source?
Connect the power pedestal to the power source using appropriate electrical wiring. Ensure connections are secure and meet local electrical codes.
Conclusion
Installing an RV power pedestal is easier than you think. Follow the steps carefully. You’ll ensure a smooth and safe installation. Remember to double-check connections. Safety first. Your RV will be ready for power. Enjoy your travels with peace of mind.
Proper installation means no surprises on the road. Now, you’re set for your next adventure. Have fun and stay safe!


