RV slide-outs add valuable space to your RV, but they can suffer water damage. Fixing this issue quickly is essential to avoid further problems.
RV slide-out water damage is a common issue many RV owners face. Water can seep into the slide-out through seams, seals, or cracks, leading to wood rot, mold, and structural damage. Ignoring this damage can result in costly repairs and even compromise the safety of your RV.
In this blog post, we will guide you through the steps to identify, repair, and prevent water damage in your RV slide-out. By understanding the signs and knowing how to tackle the repairs, you can protect your investment and ensure your RV remains in top condition for your adventures.
Identifying Water Damage
Water damage in RV slide-outs is a common issue. Identifying it early can save you from costly repairs. Knowing what to look for is key. Here, we will discuss the signs of water damage and the tools needed for inspection.
Signs Of Water Damage
Signs of water damage include soft spots on walls or floors. Stains or discoloration on walls and ceilings are also red flags. Peeling wallpaper or bubbling paint can indicate water issues. A musty smell inside the RV is another warning sign.
Look for mold or mildew growth. It often appears in damp areas. Warped or swollen wood is a clear sign of water damage. Rust on metal components suggests prolonged moisture exposure.
Tools Needed For Inspection
Several tools can help identify water damage. A flashlight is essential for inspecting dark areas. A moisture meter measures the amount of water in materials. It can detect hidden moisture. A screwdriver can check for soft spots in wood.
Have a camera or smartphone handy. Take pictures of any damage you find. This can help with repairs or insurance claims. A ladder is useful for inspecting high areas. Ensure it is stable and safe to use.
Lastly, a magnifying glass can help spot small signs of damage. Use it to inspect seams and corners closely.
Preparing For Repair
Water damage in your RV slide out can cause major issues. Preparing for the repair is the first step to restore your RV to its best condition. This section provides a detailed guide to help you get ready.
Gathering Necessary Tools
Before you start the repair, gather all the tools you’ll need. This ensures a smooth process and avoids unnecessary delays.
- Screwdriver set
- Utility knife
- Sealant or caulking gun
- Replacement seals
- Plastic sheeting
- Buckets and towels
- Wood filler
- Sandpaper
- Protective gloves and goggles
Organize these tools in a convenient place. This makes the repair process faster and more efficient.
Safety Precautions
Taking safety precautions is crucial. Water damage repair can be hazardous if not done properly.
- Turn off all electrical appliances in the RV. Water and electricity are a dangerous mix.
- Wear protective gloves and goggles. This protects your hands and eyes from harmful substances.
- Ensure proper ventilation. Open windows and doors to avoid inhaling harmful fumes from sealants and cleaners.
- Use a ladder safely. Make sure it is stable and someone is nearby to assist if needed.
Following these safety measures can prevent accidents and injuries during the repair process.
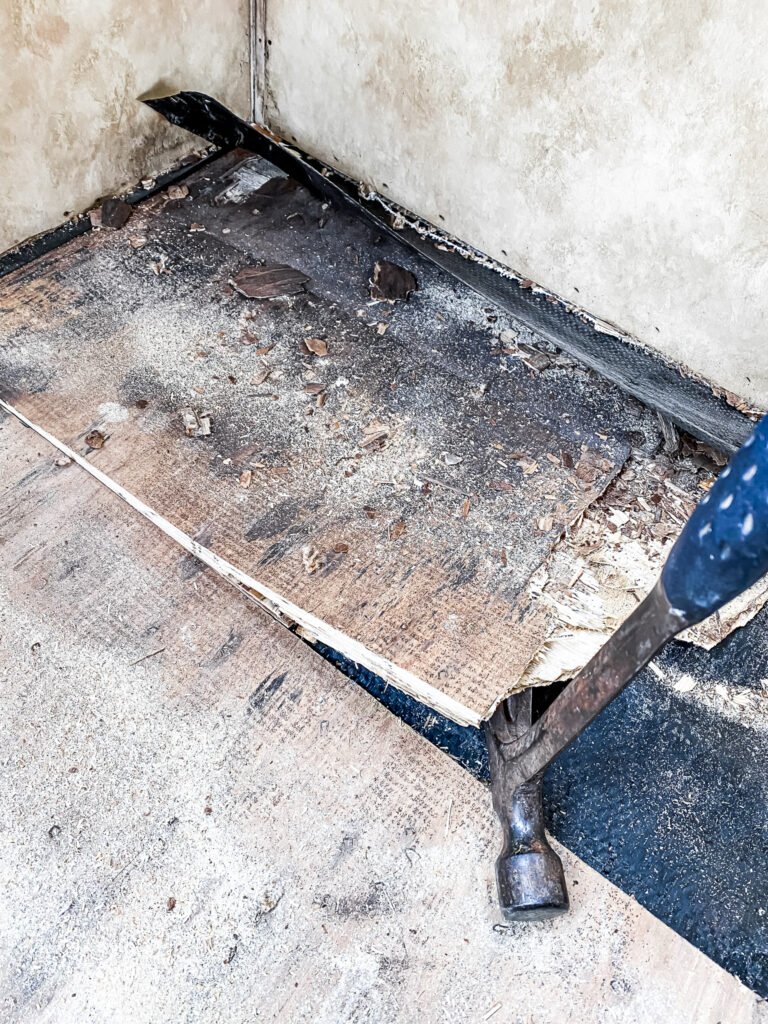
Removing Damaged Materials
Removing damaged materials is a crucial step in repairing RV slide out water damage. It involves getting rid of wet and moldy materials to prevent further harm. This process is vital to ensure the integrity of your RV. Below, we will discuss two key areas: Taking Out Wet Carpeting and Removing Moldy Wood.
Taking Out Wet Carpeting
Wet carpeting can lead to serious issues. It can cause mold and mildew growth. Here is how you can remove it:
- Use a utility knife to cut the carpet into manageable sections.
- Pull up the carpet, starting from a corner.
- Check the padding underneath and remove it if it is wet.
- Dispose of the wet carpet and padding properly.
Once you have removed the carpet, allow the area to dry completely. Use fans and dehumidifiers to speed up the drying process. This helps prevent further water damage and mold growth.
Removing Moldy Wood
Moldy wood is a health hazard. It needs to be removed carefully. Follow these steps:
- Identify the moldy areas. Look for discoloration and a musty smell.
- Use a pry bar to remove the damaged wood panels.
- Wear protective gear, such as gloves and a mask, to avoid mold exposure.
- Dispose of the moldy wood safely. Seal it in plastic bags before disposal.
After removing the moldy wood, clean the area with a mold-killing solution. This ensures that all mold spores are eliminated. Allow the area to dry completely before replacing any materials.
Drying The Affected Area
Drying the affected area is crucial in repairing RV slide-out water damage. Without proper drying, moisture can cause further damage. Mold and mildew can also develop. This section will cover essential techniques to dry the affected area.
Using Dehumidifiers
Dehumidifiers are effective in removing moisture from the air. Place a dehumidifier in the affected area. Ensure it runs continuously until the area is completely dry. Check the water tank regularly. Empty it as needed to maintain efficiency.
Proper Ventilation Techniques
Ventilation is key in drying out the moisture. Open all windows and doors to allow air to circulate. Use fans to increase airflow in the affected area. Position fans to direct air towards the damaged spot. This helps speed up the drying process.
Ensure that ventilation continues until the area is completely dry. This prevents mold and mildew from forming. Regular checks will help you know when drying is complete.
Repairing Structural Damage
Water damage in RV slide-outs can lead to serious structural issues. Repairing this damage is essential to maintain your RV’s integrity. Addressing structural damage involves several steps. Each step ensures that your RV remains safe and functional.
Replacing Damaged Wood
Begin by identifying the damaged wood. Remove any rotten or weakened wood sections. Use a saw to cut out the damaged areas. Ensure you cut carefully to avoid further damage.
Replace the removed wood with new, treated lumber. Measure the space accurately before cutting the new wood. Secure the new wood in place with screws and waterproof adhesive. This prevents future water damage.
Reinforcing Slide-out Frame
Next, check the slide-out frame for any signs of weakness. Reinforce the frame to ensure stability. Use metal brackets and braces to strengthen the frame. Attach these with screws for a secure fit.
Inspect the corners and joints of the slide-out. Apply sealant to these areas to prevent leaks. Regular maintenance of the frame can help avoid future damage.
Reinforcing the frame adds durability to your RV slide-out. This step is crucial for long-term maintenance and safety.

Credit: bkamericanodyssey.com
Sealing And Waterproofing
Water damage in your RV slide out can cause serious issues. Sealing and waterproofing your RV slide out can prevent such damage. This involves applying a waterproof sealant and installing new weatherstripping. These steps ensure your RV remains dry and safe.
Applying Waterproof Sealant
Applying a waterproof sealant is crucial. First, clean the area thoroughly. Remove any old sealant and dirt. This ensures the new sealant adheres properly.
Next, choose a high-quality waterproof sealant. Apply the sealant evenly along the edges of the slide out. Use a caulking gun for precise application. Make sure to cover all seams and joints. This prevents water from seeping into the slide out.
Let the sealant dry completely. This usually takes 24 hours. Check the manufacturer’s instructions for the exact drying time. Once dry, inspect the sealant. Ensure there are no gaps or missed spots. Apply a second coat if necessary.
Installing New Weatherstripping
Weatherstripping is essential for waterproofing. It creates a tight seal around the slide out. Begin by removing old weatherstripping. Clean the area thoroughly. This ensures the new weatherstripping sticks properly.
Measure the length of the edges where the weatherstripping will be applied. Cut the new weatherstripping to the appropriate lengths. Peel off the backing and press the weatherstripping into place. Make sure it adheres well.
Check for any gaps or loose sections. Press down firmly to secure the weatherstripping. This step is crucial for preventing water from entering your RV.
Regularly inspect and maintain the weatherstripping. Replace it if it becomes worn or damaged. This will ensure your RV slide out remains protected from water damage.
Reassembling The Slide-out
Reassembling the slide-out after addressing water damage is a crucial step. It ensures your RV’s functionality and comfort. Carefully follow these steps to avoid further issues and ensure a smooth operation.
Reinstalling Interior Fixtures
Start by reinstalling any removed interior fixtures. Secure cabinets, shelves, and other built-in items. Make sure they are properly aligned and tightened. Check for any signs of damage. Replace any broken parts to maintain structural integrity.
Reconnect any electrical components. Ensure all wiring is intact and secure. Test lights, outlets, and switches to confirm proper functioning. This step is essential for safety and convenience.
Testing Slide-out Mechanism
After reassembling, test the slide-out mechanism. Slowly extend and retract the slide-out. Listen for unusual noises. Observe its movement for any signs of resistance or misalignment.
Check the seals and gaskets for proper placement. They should form a tight seal to prevent future water damage. Address any issues immediately to maintain a watertight and smooth operation.
Regular testing ensures the slide-out remains functional. It helps catch potential problems early. This proactive approach saves time and money in the long run.
Preventive Maintenance Tips
Preventive maintenance can save your RV from costly slide out water damage repairs. Simple steps can help keep your slide out in top condition. Regular checks and cleaning are vital. Here are some essential tips for maintaining your RV slide out.
Regular Inspections
Inspect your RV slide out often. Look for any signs of leaks or wear. Check the seals and edges for cracks. Small issues can turn into big problems. Inspecting every few months can prevent damage.
Proper Cleaning And Sealing
Clean your slide out regularly. Dirt and debris can damage seals. Use mild soap and water. Rinse thoroughly and let it dry. After cleaning, check the seals. Re-seal any cracks or gaps. Proper sealing keeps water out. It also extends the life of your slide out.

Credit: www.doityourselfrv.com
Frequently Asked Questions
What Causes Water Damage In Rv Slide Outs?
Water damage in RV slide outs can occur due to worn-out seals, improper installation, or leaks. Regular maintenance helps prevent these issues.
How Can I Detect Water Damage Early?
Early signs include musty smells, soft walls, or discolored spots. Regular inspections can help identify these signs quickly.
Can I Repair Rv Slide Out Water Damage Myself?
Yes, minor water damage can be repaired by a DIY approach. For extensive damage, professional help is recommended.
What Tools Do I Need For Water Damage Repair?
Basic tools include a moisture meter, sealant, replacement materials, and protective gear. These tools help in effective repair.
Conclusion
Repairing RV slide out water damage can seem daunting. Follow the steps mentioned to ensure effective repairs. Regular checks help prevent future issues. Keep your RV in top condition for your travels. Address water damage quickly to avoid bigger problems.
Safe travels and happy camping!


