Understanding how to hook up a 12-volt RV battery can be daunting. But it’s crucial for your RV’s power needs.
A proper hookup diagram can make the process simpler and safer. Whether you’re new to RVing or an experienced traveler, knowing your way around a 12-volt battery hookup is essential. This guide will help you understand the basics and ensure your RV runs smoothly.
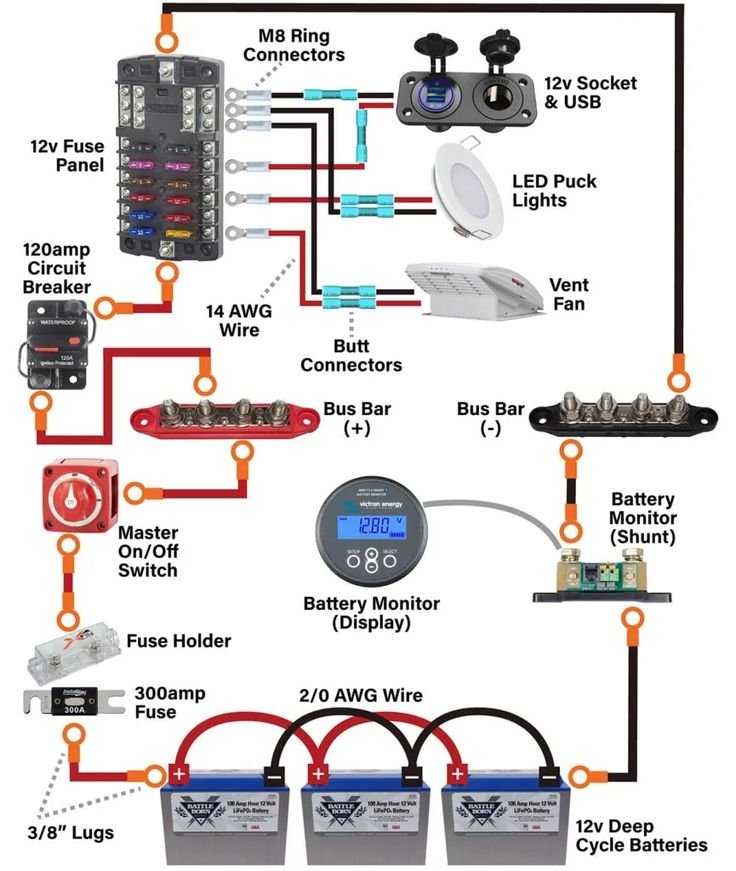
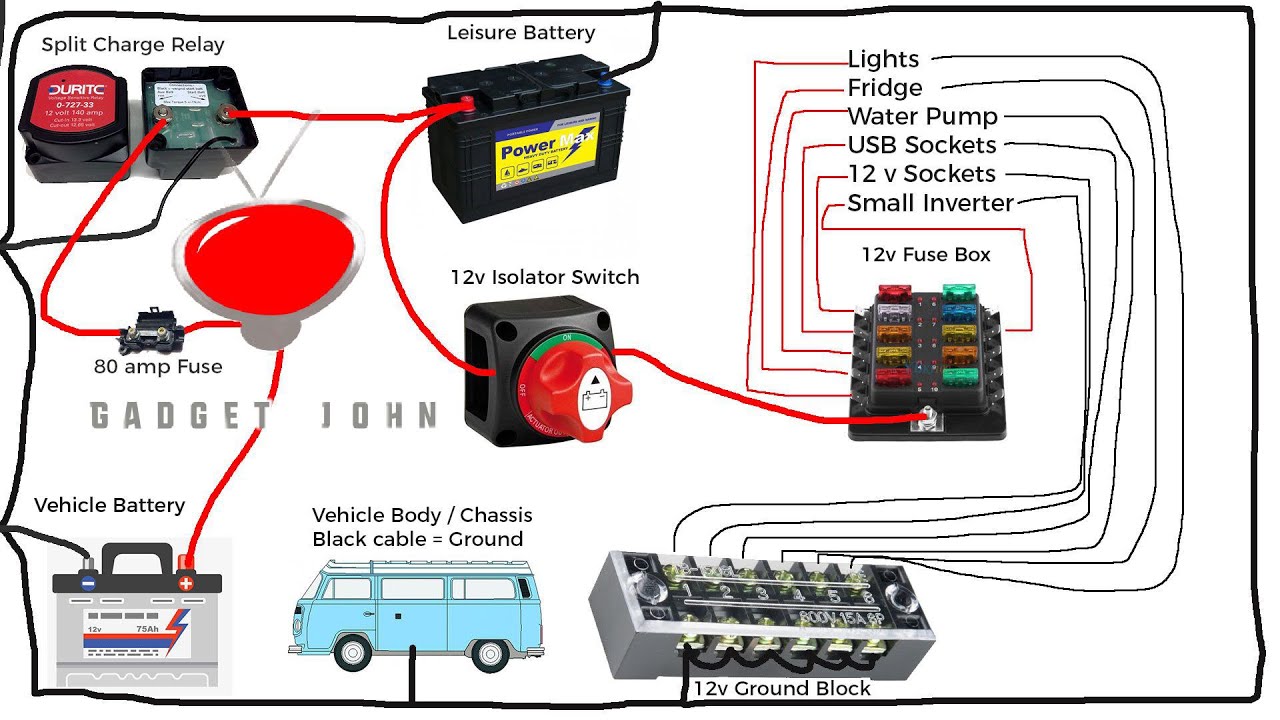
From connecting the battery to ensuring safety, a clear diagram can be your best friend. Let’s dive into the essentials of a 12-volt RV battery hookup diagram, making your next adventure worry-free and enjoyable.

Credit: www.youtube.com
Tools And Materials
Setting up a 12-volt RV battery system can seem challenging. With the right tools and materials, the task becomes manageable. This section provides a detailed list of what you need.
Essential Tools
Having the right tools ensures a smooth installation process. Below are the essential tools you will need:
- Multimeter: For checking voltage and continuity.
- Wire Cutters: To cut wires to the required length.
- Wire Strippers: To strip the insulation from the wires.
- Crimping Tool: For securing connectors to the wires.
- Screwdrivers: Both flathead and Phillips for various screws.
- Wrenches: For tightening nuts and bolts.
- Safety Gloves: To protect your hands during the installation.
- Safety Glasses: To shield your eyes from debris.
Required Materials
Gathering the right materials is crucial for a successful hookup. Here are the materials you need:
- 12-Volt Battery: The primary power source for your RV.
- Battery Cables: To connect the battery to the RV’s electrical system.
- Battery Terminals: For attaching the cables to the battery.
- Fuse Box: To protect the electrical system from overload.
- Fuses: Appropriate fuses for the fuse box.
- Connectors: Various connectors for secure connections.
- Electrical Tape: To insulate and protect wire connections.
- Zip Ties: To organize and secure wires.
With these tools and materials, you can confidently set up your RV’s 12-volt battery system. Ensure you follow safety guidelines throughout the process.
Choosing The Right Battery
Choosing the right battery for your RV is crucial. A proper battery ensures efficient power supply and enhances your RV experience. This section will guide you through the different types of 12-volt batteries and the factors to consider when making your choice.
Types Of 12 Volt Batteries
There are various types of 12-volt batteries available for RVs. Each type has its own advantages and disadvantages.
- Lead-Acid Batteries: These are the most common type. They are affordable and reliable. However, they require regular maintenance.
- AGM (Absorbent Glass Mat) Batteries: These are a type of lead-acid battery. They are maintenance-free and have a longer lifespan. They are more expensive than regular lead-acid batteries.
- Gel Batteries: These are also a type of lead-acid battery. They are maintenance-free and can handle extreme temperatures. They are more expensive than AGM batteries.
- Lithium-Ion Batteries: These are the most advanced type. They are lightweight, have a long lifespan, and require no maintenance. They are the most expensive option.
Factors To Consider
When choosing a 12-volt battery for your RV, consider the following factors:
- Capacity: This is measured in amp-hours (Ah). A higher capacity means the battery can store more energy.
- Size: Ensure the battery fits in the designated space in your RV.
- Weight: Some batteries are heavier than others. Consider the weight if you have weight restrictions.
- Maintenance: Some batteries require regular maintenance. Others are maintenance-free.
- Cost: Consider your budget. More advanced batteries are more expensive.
Here is a table summarizing the key features of each type of battery:
| Type | Maintenance | Lifespan | Cost |
|---|---|---|---|
| Lead-Acid | Regular | 3-5 years | Low |
| AGM | None | 5-7 years | Medium |
| Gel | None | 5-7 years | High |
| Lithium-Ion | None | 10-15 years | Very High |
Understanding these factors will help you choose the right battery. This ensures your RV is powered efficiently and reliably.
Preparing The Battery
Before you start connecting your 12-volt RV battery, preparation is key. A well-prepared battery ensures a smooth hookup process and enhances safety. Follow these simple steps to get your battery ready.
Inspecting The Battery
First, inspect the battery for any signs of damage. Look for cracks, leaks, or corrosion. If you spot any issues, replace the battery immediately. A damaged battery can be dangerous and unreliable.
Check the battery’s voltage with a multimeter. Ensure it meets the manufacturer’s specifications. This step confirms the battery is in good working condition. Write down the voltage for reference.
Cleaning The Terminals
Next, clean the battery terminals. Dirty terminals can lead to poor connections. Use a wire brush or terminal cleaner. Gently scrub away any dirt or corrosion.
Make sure the terminals are shiny and clean. This step improves the connection between the battery and the cables. Clean terminals ensure efficient power transfer.
After cleaning, apply a thin layer of petroleum jelly. This prevents future corrosion. Your battery is now ready for the hookup process.
Credit: m.youtube.com
Wiring Basics
Connecting a 12-volt RV battery is essential for the power system. The wiring process can seem complex. But with the right guide, it becomes manageable. This section covers the basic steps to hook up your RV battery. Let’s dive into the key aspects of wiring basics.
Understanding Positive And Negative Terminals
First, identify the positive and negative terminals on your battery. The positive terminal usually has a red cover or a “+” sign. The negative terminal often has a black cover or a “-” sign.
Connecting the terminals correctly is crucial. Incorrect connections can cause damage or hazards. Always connect the positive terminal first. Then, connect the negative terminal.
Connecting Multiple Batteries
Sometimes, you may need to connect multiple batteries. This can increase the capacity or voltage of your power system. There are two main ways to connect batteries: series and parallel.
Series Connection:
- Increases voltage
- Connect the positive terminal of one battery to the negative terminal of the next
- Example: Two 12V batteries in series give 24V
Parallel Connection:
- Increases capacity
- Connect all positive terminals together, and all negative terminals together
- Example: Two 12V batteries in parallel give double the capacity
Use the right type of cables for your connections. Ensure they are thick enough to handle the current flow.
| Connection Type | Effect | Example |
|---|---|---|
| Series | Increases voltage | Two 12V batteries = 24V |
| Parallel | Increases capacity | Two 12V batteries = double capacity |
By understanding these basics, you can ensure a safe and efficient battery setup for your RV.
Step-by-step Hookup
Hooking up a 12 Volt RV battery can be simple. Follow these steps to ensure a secure and safe connection. Each step is crucial for proper operation and longevity of your RV’s electrical system.
Connecting The Positive Cable
First, locate the positive terminal on your battery. It is usually marked with a red color or a plus sign (+). Attach the positive cable securely to this terminal.
- Ensure the cable is clean and free of corrosion.
- Use a wrench to tighten the connection.
- Make sure the terminal is tightly fastened to avoid loose connections.
Connecting The Negative Cable
Next, find the negative terminal on the battery. This is typically marked with a black color or a minus sign (-). Connect the negative cable to this terminal.
- Check that the cable is clean and corrosion-free.
- Use a wrench to secure the connection.
- Ensure the terminal is tightly fastened.
Securing The Connections
Finally, make sure all connections are secure. Loose connections can lead to power loss or damage.
- Double-check both the positive and negative terminals.
- Look for any signs of wear or corrosion.
- Use a battery terminal protector to prevent corrosion.
By following these steps, you can ensure a safe and effective 12 Volt RV battery hookup.

Credit: www.pinterest.com
Testing The Setup
After setting up your 12 Volt RV battery, testing the setup is crucial. This ensures your system works efficiently and safely. Follow these steps to check your setup and confirm everything is functioning correctly.
Checking Voltage Levels
Start by checking the voltage levels of your RV battery. Use a multimeter for this task. Follow these steps:
- Set the multimeter to DC volts.
- Connect the red probe to the positive terminal.
- Connect the black probe to the negative terminal.
- Read the voltage on the multimeter.
The voltage should be around 12.6 volts for a fully charged battery. If the voltage is lower, the battery may need charging or replacement.
Ensuring Proper Functionality
Next, ensure the proper functionality of the entire setup. Check the following:
- All connections are secure and tight.
- There are no loose wires or frayed cables.
- The battery terminals are clean and free of corrosion.
Turn on the RV appliances one by one. Ensure each device functions properly without any issues. If any device does not work, check its connections and wiring.
It’s also important to check the battery’s charging system. Ensure the battery is charging when the RV is connected to shore power or the engine is running.
By following these steps, you can ensure your 12 Volt RV battery setup is working properly. This will help avoid potential issues while on the road and keep your RV powered reliably.
Troubleshooting Tips
Connecting a 12 Volt RV battery can be tricky. Problems can arise. Knowing how to troubleshoot these issues is essential. Here, we provide tips to solve common issues and their fixes.
Common Issues
- Battery Not Charging: The battery does not hold charge.
- Connections Loose: The wires and terminals are not tight.
- Corroded Terminals: Corrosion on battery terminals.
- Blown Fuses: Fuses in the circuit are blown.
Solutions And Fixes
Below are solutions to the common issues:
| Problem | Solution |
|---|---|
| Battery Not Charging |
|
| Connections Loose |
|
| Corroded Terminals |
|
| Blown Fuses |
|
Regular maintenance can prevent many of these issues. Always inspect your battery and connections. Keep terminals clean and connections tight.
Maintenance And Care
Maintaining and caring for your 12 Volt RV battery is crucial. Proper maintenance ensures your battery lasts longer and performs better. Understanding how to inspect and store your battery can prevent issues and save money.
Regular Inspections
Regular inspections of your RV battery are essential. Check the battery terminals for corrosion. Clean them with a mixture of baking soda and water. Ensure connections are tight and secure. Inspect the battery case for any cracks or leaks. A damaged battery can be dangerous. Always wear gloves and safety glasses during inspections.
Test the battery voltage regularly. Use a digital voltmeter for accurate readings. A healthy 12-volt battery should read around 12.6 volts when fully charged. If the voltage is low, recharge the battery. Regular inspections help catch problems early.
Battery Storage Tips
Proper storage can extend the life of your RV battery. Store the battery in a cool, dry place. Extreme temperatures can damage the battery. Disconnect the battery when not in use. This prevents slow discharge over time.
Charge the battery before storing it. A fully charged battery is less likely to freeze in cold weather. Check the battery’s charge every month. If the charge drops, recharge it. A battery left discharged can sulfate and lose capacity.
Use a battery maintainer or trickle charger if possible. These devices keep the battery at an optimal charge level. Proper storage and regular maintenance keep your RV battery ready for use.
Frequently Asked Questions
How To Connect A 12-volt Rv Battery?
To connect a 12-volt RV battery, first, ensure the RV is off. Connect the positive cable to the battery’s positive terminal. Then, connect the negative cable to the negative terminal. Ensure all connections are secure.
Can I Use Multiple 12-volt Batteries In My Rv?
Yes, you can use multiple 12-volt batteries in your RV. Connect them in parallel to maintain 12 volts while increasing capacity. This setup provides more power for longer periods.
What Gauge Wire For 12-volt Rv Battery?
For a 12-volt RV battery, use 4 to 6 gauge wire. The wire gauge depends on the distance and current draw. Thicker wires reduce voltage drop and improve efficiency.
How To Maintain A 12-volt Rv Battery?
To maintain a 12-volt RV battery, regularly check the water level and keep terminals clean. Charge it fully before storing and avoid deep discharges. Proper maintenance prolongs battery life.
Conclusion
Understanding a 12-volt RV battery hookup diagram is crucial. It ensures your RV runs smoothly. Always double-check connections for safety. Proper setup prevents future issues. Refer to your RV manual for specific details. Enjoy worry-free RV adventures with a well-connected battery.
Happy travels!


