Connecting a battery to an RV converter is essential for powering your RV’s electrical system. This connection ensures your RV can use battery power when not plugged into shore power.
RVs rely on a strong electrical system for comfort and convenience. Knowing how to connect the battery to the converter is a valuable skill. It allows you to enjoy your travels without worrying about power issues. This guide will walk you through the process, ensuring you understand each step clearly.
Even if you’re not an expert, this introduction will help you get started. Let’s dive into the basics and make your RV adventures smoother and more enjoyable.
Introduction To Rv Power Systems
Understanding your RV’s power system is crucial for a smooth journey. It ensures your vehicle’s electrical components work properly. Proper knowledge helps you avoid potential issues. This guide will help you connect your battery to an RV converter safely and effectively.
Importance Of Proper Connections
Proper connections are vital for your RV’s electrical system. Incorrect connections can cause serious damage. They may also pose safety risks, like electrical fires or short circuits. Ensuring correct connections keeps your RV running smoothly. It also prolongs the life of your electrical components.
Basic Components Overview
Your RV’s power system includes several key components. Each plays a role in delivering power to your vehicle.
- Battery: Stores electrical energy for your RV.
- Converter: Converts AC power to DC power.
- Inverter: Converts DC power to AC power.
- Fuse Box: Protects your electrical system from overloads.
Let’s take a closer look at these components:
| Component | Function |
|---|---|
| Battery | Stores energy to power your RV’s devices. |
| Converter | Converts AC power to DC power for battery charging. |
| Inverter | Converts DC power to AC power for appliances. |
| Fuse Box | Protects your system from electrical overloads. |
Knowing these components helps you connect your battery to the converter correctly. Always follow safety guidelines. Use proper tools and equipment.

Credit: weekendervanlife.com
Safety Precautions
Connecting a battery to an RV converter is a crucial task. Safety is the top priority during this process. Follow these safety precautions to ensure a safe and successful connection.
Wearing Protective Gear
Always wear protective gear before starting any electrical work. This includes:
- Safety goggles: Protect your eyes from sparks or debris.
- Insulated gloves: Prevent electrical shocks and burns.
- Long-sleeved clothing: Cover your skin to avoid injuries.
Disconnecting Power Sources
Before connecting the battery to the RV converter, disconnect all power sources. This includes:
- Shutting off the RV’s main power switch: This prevents any accidental current flow.
- Unplugging the RV from any external power sources: Ensure there’s no live current.
- Disconnecting the battery: Remove any previous connections to avoid short circuits.
Double-check that all power sources are disconnected before proceeding. Safety first.
Tools And Materials Needed
Connecting a battery to an RV converter requires specific tools and materials. Having these on hand will make the process smoother. It ensures safety and efficiency.
Essential Tools
A few essential tools are needed for this task. First, a wrench set is crucial. It helps in tightening and loosening nuts and bolts. Second, wire strippers are necessary. They help in removing insulation from wires. Third, a multimeter is useful. It checks the battery voltage. Fourth, screwdrivers are needed. Both flathead and Phillips types are important. Lastly, electrical tape is essential. It helps in securing connections.
Required Materials
Several materials are also required for connecting the battery. The first is the battery itself. Ensure it is compatible with the RV converter. Second, battery cables are needed. These connect the battery to the converter. Third, cable connectors are important. They join different sections of wire. Fourth, heat shrink tubing is useful. It provides insulation for wire connections. Lastly, fuses and fuse holders are necessary. They protect the electrical system from overloads.
Preparing The Battery
Before connecting your battery to the RV converter, you must ensure the battery is in good condition. Proper preparation prevents issues and extends the battery life. Follow these steps for a smooth setup.
Cleaning Battery Terminals
Dirt and corrosion on battery terminals can cause poor connections. This affects the performance of the battery.
- Gather necessary items: gloves, baking soda, water, a wire brush, and a cloth.
- Wear gloves to protect your hands from chemicals.
- Mix baking soda and water to create a cleaning solution.
- Disconnect the battery cables starting with the negative terminal.
- Dip the wire brush in the solution and scrub the terminals.
- Wipe the terminals clean with a cloth.
- Reattach the battery cables starting with the positive terminal.
Inspecting Battery Condition
Check the battery’s condition to ensure it is fit for use. A damaged battery can be unsafe and inefficient.
- Examine the battery case for any cracks or bulges.
- Inspect the battery fluid level. It should be above the minimum mark.
- Use a voltmeter to check the battery voltage. A fully charged battery should read around 12.6 volts.
- Check for any loose connections or worn-out cables.
If you find any issues, consider replacing the battery before proceeding.
Locating The Rv Converter
Connecting a battery to your RV converter can seem daunting. Knowing where to find the converter simplifies this task. This section will guide you through locating the RV converter.
Understanding Converter Placement
RV converters are usually near the power distribution panel. This panel is where circuit breakers and fuses are located. Converters need ventilation, so they are often installed in accessible areas. Common locations include under seats, in storage compartments, or in cabinets.
Accessing The Converter
Once you know the general area, access the converter. Remove any covers or panels carefully. Look for screws or latches holding them in place. Keep track of these parts to reassemble later. Gently pull the panel away to reveal the converter.
Ensure the RV is not connected to shore power before proceeding. This prevents electrical hazards. Verify the converter by checking for labels or model numbers. These are usually on the unit’s surface. Now, you can proceed with connecting the battery.

Credit: www.youtube.com
Connecting The Battery To The Converter
Connecting your RV battery to the converter is an essential step. It ensures that your RV electrical systems run smoothly. This process may seem challenging, but it’s quite straightforward. By following these steps, you’ll have your RV powered up in no time.
Identifying Positive And Negative Terminals
First, locate the battery terminals. One terminal is positive, and the other is negative. The positive terminal is usually marked with a plus sign (+). It may also be red. The negative terminal is marked with a minus sign (-) and is typically black.
Make sure you identify these terminals correctly. Connecting the wrong terminal can cause damage. It may also be dangerous. Double-check the markings before proceeding.
Securing Connections
Next, connect the positive terminal of the battery to the positive terminal on the converter. Use a suitable cable. Ensure a firm and secure connection. Loose connections can cause power loss or sparks.
Now, connect the negative terminal of the battery to the negative terminal on the converter. Again, use a proper cable. Ensure this connection is also tight and secure. This step is crucial for proper function.
After securing both connections, inspect your work. Ensure there are no loose wires. Check that all connections are firm. This ensures safety and reliable operation of your RV’s electrical system.
Testing The Connection
Connecting a battery to an RV converter is an essential task. But ensuring the connection works properly is crucial. This section will guide you through testing the connection. We will focus on using a multimeter and checking for proper voltage.
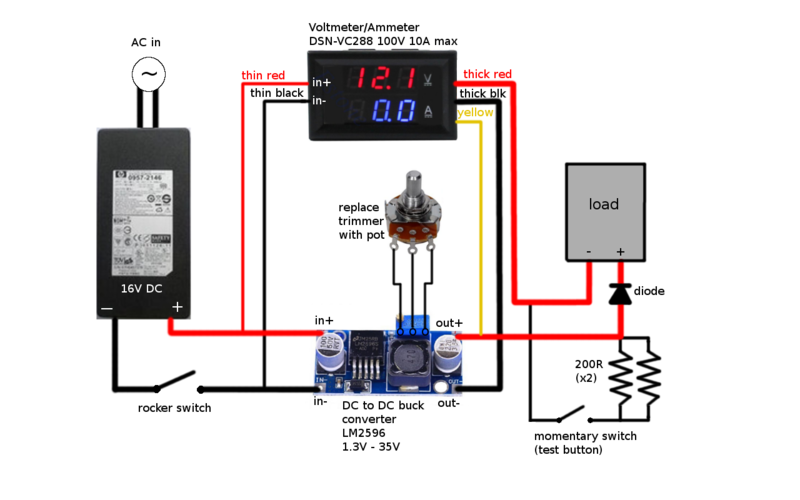
Using A Multimeter
A multimeter is a handy tool for testing electrical connections. First, set your multimeter to the DC voltage setting. This is important because RV batteries use direct current.
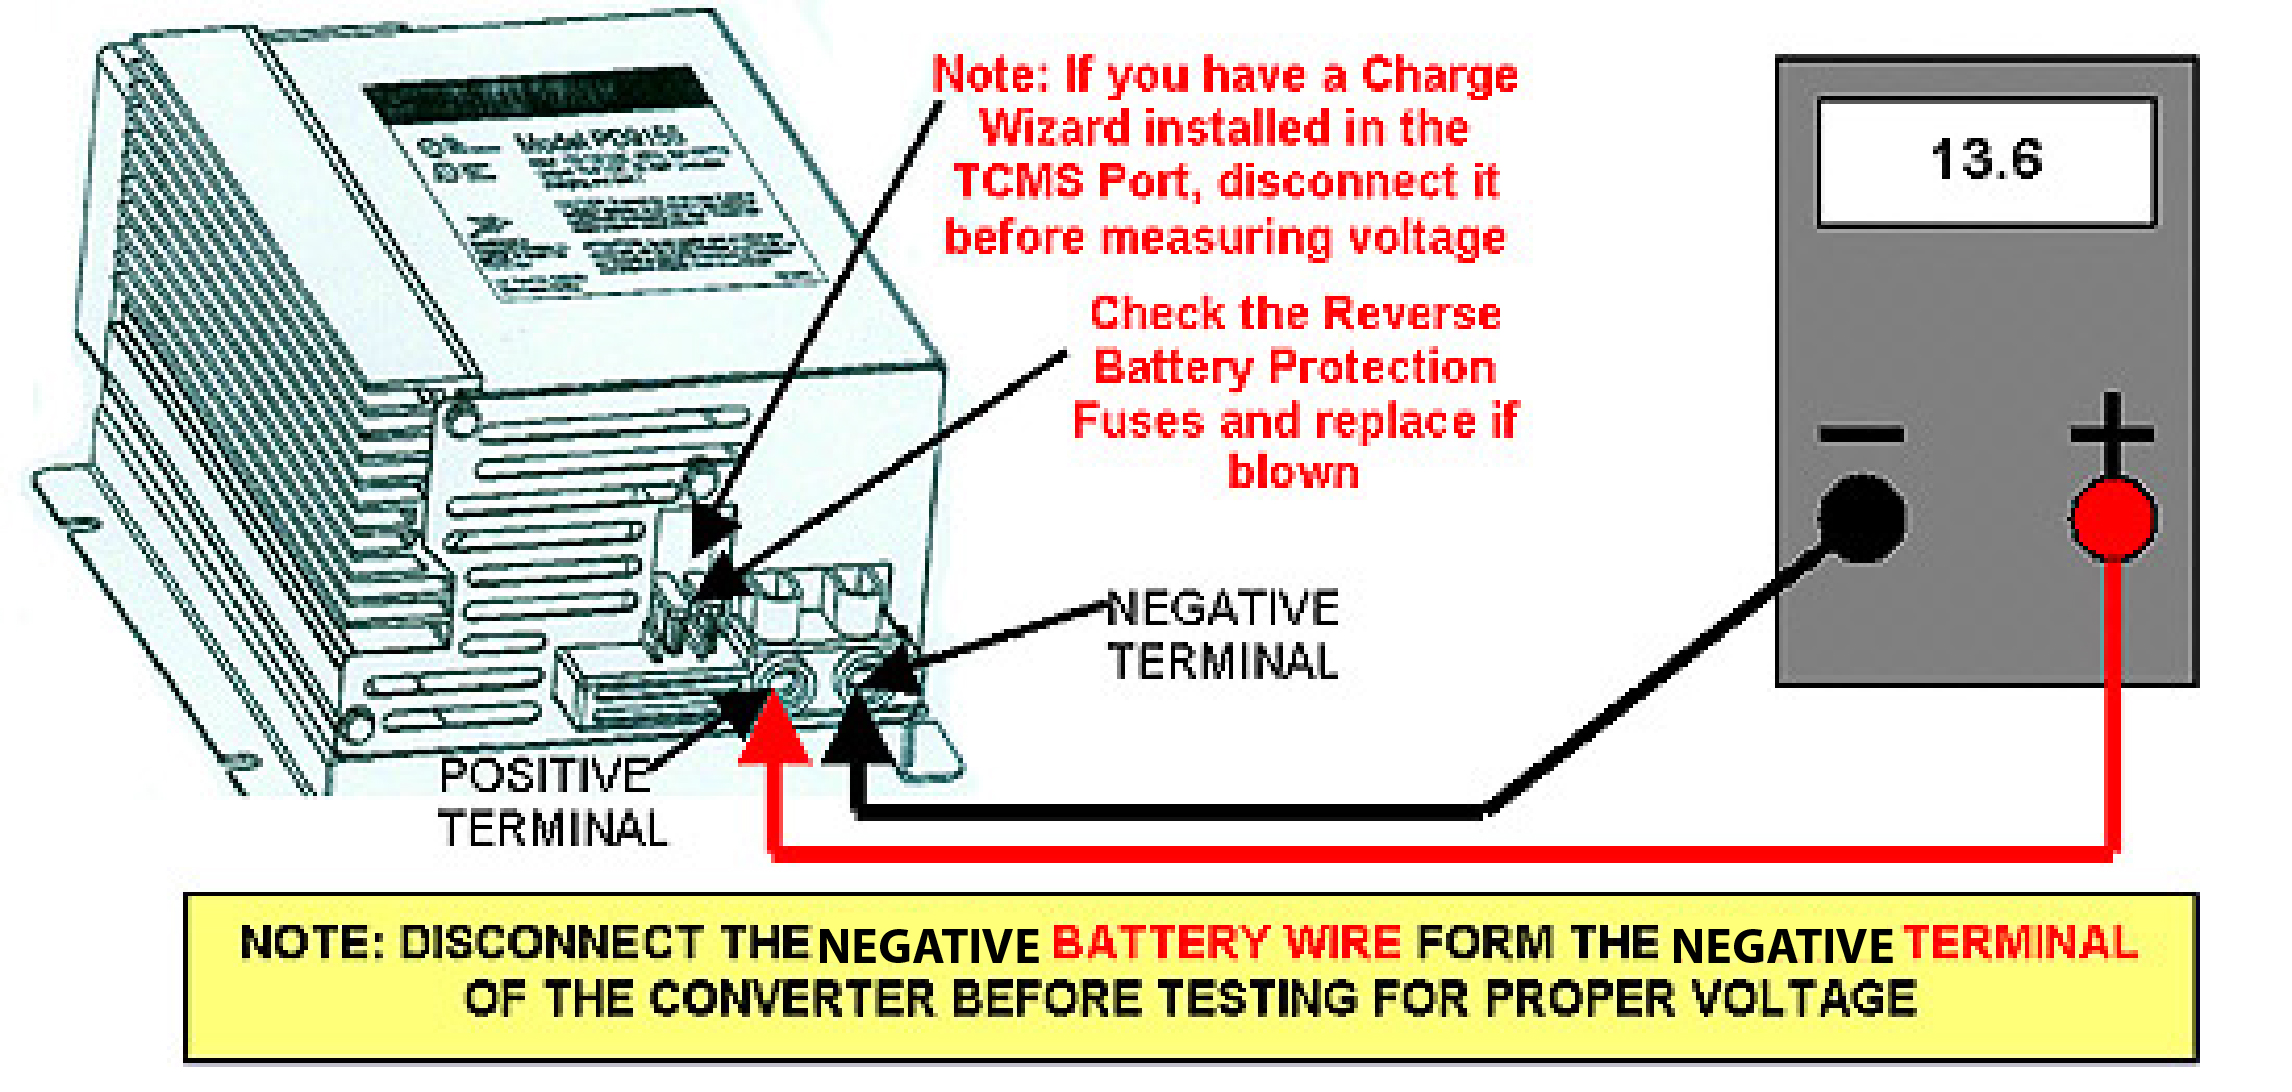
Next, connect the multimeter’s black lead to the battery’s negative terminal. Then, connect the red lead to the battery’s positive terminal. This will help you measure the voltage accurately.
Checking For Proper Voltage
Once the multimeter is connected, check the reading on the display. A fully charged RV battery should read between 12.6 and 12.8 volts. If the reading is lower, the battery may need charging.
Also, make sure the RV converter is providing the correct voltage. The converter should output a voltage between 13.6 and 14.4 volts. This ensures the battery is charging properly.
If the voltage readings are within the correct ranges, the connection is good. If not, you may need to check the wiring or the converter.
Troubleshooting Common Issues
Connecting a battery to an RV converter can sometimes be tricky. Knowing how to troubleshoot common issues can save you time and stress. Here are some common problems and their solutions.
Loose Connections
Loose connections are a frequent problem. They can cause the battery to not work correctly. First, check all connection points. Ensure all terminals are tight and secure. Use a wrench if needed.
Inspect the wires for any signs of wear or damage. Replace any frayed or broken wires. A good connection ensures that the battery charges properly.
Battery Not Charging
If the battery is not charging, there could be several reasons. Start by checking the voltage of the battery. Use a multimeter for this purpose.
| Voltage Reading | Condition |
|---|---|
| 12.6V or higher | Fully charged |
| 12.4V | Partially charged |
| 12.0V or lower | Needs charging |
If the battery voltage is low, check the converter output. Ensure the converter is supplying the correct voltage. The output should be between 13.6V to 14.4V.
If the converter output is correct, the issue might be with the battery. Consider testing the battery with a load tester. This will show if the battery can hold a charge under load.
- Check all fuses in the system.
- Inspect the battery terminals for corrosion.
- Ensure the converter is properly grounded.
If the problem persists, the converter might need replacement.
Maintaining The Connection
Maintaining the connection between your RV battery and converter is crucial. It ensures a stable power supply for your RV’s electrical system. Regular inspections and cleaning are key to avoiding issues.
Regular Inspections
Check the battery and converter connections every few weeks. Look for any signs of wear, corrosion, or loose wires. This helps you catch problems early.
Inspect the battery terminals and cables. Ensure they are secure and free from damage. A quick visual check can prevent bigger issues later.
Cleaning And Tightening Connections
Clean the battery terminals regularly to remove any corrosion. Use a mixture of baking soda and water for cleaning. Apply the mixture with a small brush and scrub gently.
Rinse with clean water and dry thoroughly. After cleaning, check all connections. Tighten any loose connections with a wrench.
Ensure all wires are firmly attached to the terminals. Properly tightened connections prevent power loss and ensure safety.
Credit: www.progressivedyn.com
Frequently Asked Questions
How Do I Connect A Battery To An Rv Converter?
To connect a battery to an RV converter, first, ensure all power is off. Connect the positive battery terminal to the converter’s positive terminal. Then, connect the negative battery terminal to the converter’s negative terminal. Secure all connections tightly.
What Tools Do I Need To Connect A Battery?
You will need a wrench, screwdriver, and possibly wire cutters. Ensure you have safety gloves and goggles. These tools help make secure connections.
Can I Use Any Battery For My Rv Converter?
No, you should use a deep-cycle battery. Deep-cycle batteries are designed for repeated discharging and recharging, making them ideal for RV converters.
Is It Safe To Connect The Battery Myself?
Yes, but follow safety guidelines. Ensure the power is off before connecting. Wear gloves and goggles. If unsure, consult a professional.
Conclusion
Connecting a battery to your RV converter is easier than you think. Just follow the steps carefully. Always ensure safety first. Double-check your connections. Proper setup ensures your RV runs smoothly. A well-connected battery extends your RV’s life. Regular maintenance is key.
Happy travels with your well-powered RV!


