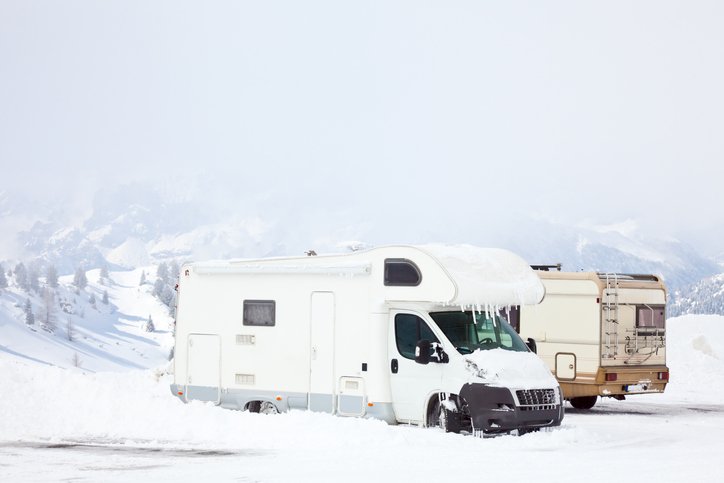
Knowing when to winterize your RV is crucial for its longevity. Winterizing helps prevent damage from freezing temperatures.
As the colder months approach, preparing your RV becomes essential. Many RV owners wonder about the right time to start this process. Winterizing your RV involves draining the water system, adding antifreeze, and ensuring all components are protected from the cold.
This process helps avoid costly repairs and ensures your RV is ready for spring adventures. Understanding the best time to winterize can save you a lot of trouble. This guide will help you determine the perfect moment to start winterizing your RV, ensuring it stays in top shape through the winter months. Stay with us to learn more!
Importance Of Winterizing Your Rv
Winterizing your RV is crucial. It protects your investment and ensures your RV stays in good condition. Cold weather can cause significant damage to your vehicle if not properly prepared. By winterizing, you avoid costly repairs and extend the life of your RV.
Preventing Damage
Cold weather can cause water to freeze in your RV’s pipes. Frozen pipes can burst, leading to expensive repairs. Winterizing your RV prevents this by draining all water systems. It also protects your water heater and water pump from damage. Insulating your RV helps keep internal temperatures stable. This prevents damage to appliances and interior fixtures.
Maintaining Performance
Winterizing keeps your RV in top shape. It ensures all systems remain functional during cold months. Proper maintenance of the battery, engine, and tires is essential. Winterizing includes checking and maintaining these parts. This keeps your RV ready for your next adventure. Regular winterization also helps maintain the value of your RV. A well-maintained RV performs better and lasts longer.

Credit: www.reddit.com
Signs It’s Time To Winterize
Winterizing your RV is crucial to protect it from cold weather. Knowing when to start is key. Here are some signs to look out for.
Falling Temperatures
When temperatures start dropping consistently, it’s time to act. Freezing temperatures can damage your RV’s plumbing. Check the weather forecast regularly.
- Night temperatures below freezing
- Daytime temperatures consistently low
- Frost appearing on the ground
Even a single freeze can cause problems. Winterizing before this happens is best.
End Of Camping Season
Another sign is the end of the camping season. Many campgrounds close after fall. When your last trip is near, start planning to winterize.
- Finish your final trip
- Clean and empty the RV
- Begin the winterizing process
Winterizing ensures your RV is ready for storage. It keeps your RV in good condition for next season.
Remember, an ounce of prevention is worth a pound of cure. Prepare early and enjoy peace of mind.
Essential Tools And Supplies
Winterizing your RV is crucial to protect it from cold weather. You need the right tools and supplies to do this job well. These tools will help you avoid damage and keep your RV in great shape. Below are some essential items you will need.
Antifreeze
Antifreeze is vital for winterizing your RV. It prevents your pipes from freezing and bursting. Use RV-specific antifreeze. It is safe for your water system. Pour it into your plumbing lines to keep the water from freezing. You will need about 2-3 gallons for most RVs.
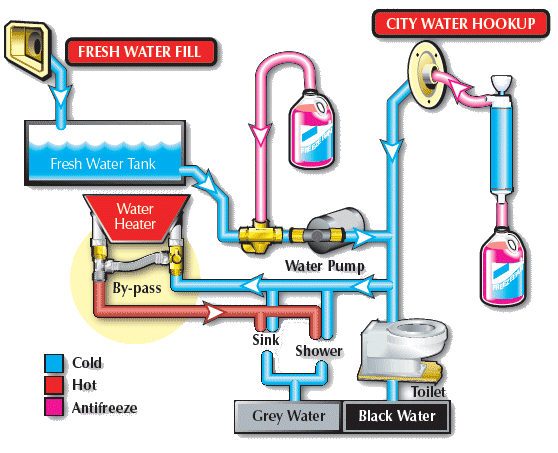
Water System Tools
To winterize your water system, you need a few tools. A water pump converter kit is essential. This kit helps you pump antifreeze into your water lines. You also need a water heater bypass kit. This kit prevents antifreeze from entering your water heater. It saves antifreeze and makes the process easier.
You will also need a set of basic wrenches and pliers. These will help you disconnect and reconnect parts of your water system. A blowout plug is useful too. It helps remove any water left in your lines. Attach it to your air compressor for the best results.
Credit: gagscamperway.com
Step-by-step Winterizing Process
Winterizing your RV is a crucial task to protect it during cold weather. This guide will walk you through the step-by-step process. Follow each step to ensure your RV remains in good condition throughout the winter months.
Draining Water Systems
Draining your RV’s water systems is the first and most important step. Water left in the pipes can freeze and cause damage. Here’s how to properly drain your systems:
- Turn off the water pump and disconnect the water supply.
- Open all faucets, including the hot and cold taps, to let the water drain out.
- Flush the toilet to empty the water from the bowl and the tank.
- Drain the water heater. Be careful, as the water may still be hot.
- Use a water pump converter kit to bypass the water heater.
- Drain the fresh water tank by opening the drain valve.
- Drain the gray and black water tanks at a dump station.
- Blow out the water lines with compressed air to remove any remaining water.
Adding Antifreeze
After draining the water systems, the next step is to add antifreeze. This prevents any residual water from freezing and causing damage. Follow these steps:
- Close all faucets and drains that you opened in the previous step.
- Pour RV antifreeze into the fresh water tank.
- Turn on the water pump to circulate the antifreeze through the system.
- Open each faucet, one at a time, until you see pink antifreeze coming out. Start with the farthest faucet and work your way back to the closest.
- Flush the toilet until you see pink antifreeze in the bowl.
- Pour a small amount of antifreeze down each drain, including the shower and sinks.
- Add antifreeze to the gray and black water tanks by flushing it through the toilet and sink drains.
- Ensure all faucets and valves are closed securely.
Following these steps will help protect your RV from the harsh winter conditions. Draining water systems and adding antifreeze are essential parts of the winterizing process.
Protecting The Interior
Winterizing your RV is crucial to protect its interior. The cold can damage various parts inside. Follow these steps to keep your RV in good shape during the winter months.
Cleaning And Storing Items
Start by cleaning the inside of your RV thoroughly. Remove any food items to prevent rodents and pests. Clean all surfaces, floors, and cabinets. Use a vacuum to get rid of dust and dirt.
- Clean and dry the refrigerator and freezer.
- Remove and store all bedding and linens.
- Store kitchen utensils in a dry place.
- Place moisture absorbers in cabinets.
Sealing Windows And Doors
Check all windows and doors for any gaps or leaks. Sealing these gaps will prevent cold air from entering your RV. It also helps to keep pests out.
Inspect the weather stripping around doors and windows. Replace any worn-out weather stripping. Use caulking to seal any cracks or gaps. Ensure that all seals are tight and secure.
| Task | Materials Needed |
|---|---|
| Inspect weather stripping | Weather stripping, scissors |
| Seal cracks | Caulking gun, caulk |
| Check window seals | Sealant tape |
Following these steps ensures your RV interior remains protected during winter. Keeping it clean and sealing it properly prevents many issues.
Securing The Exterior
When preparing to winterize your RV, securing the exterior is crucial. Protecting the outside of your RV ensures it stays in good condition throughout the cold months. Let’s explore two key steps: covering the RV and inspecting the roof and seals.
Covering The Rv
Invest in a high-quality RV cover. A durable cover shields your RV from snow, ice, and harsh weather. It helps prevent damage to the exterior paint and windows.
Follow these steps to cover your RV:
- Clean the RV thoroughly.
- Ensure the cover is dry before using it.
- Secure the cover tightly to avoid wind damage.
Consider using tire covers as well. They protect your tires from sun damage and cracking.
Inspecting Roof And Seals
Regular roof inspection is essential. Look for any signs of wear or damage. Address any issues immediately to prevent water leaks.
Check the seals around windows and doors. Ensure they are intact and not cracked. Replace any damaged seals.
Use a high-quality sealant to reinforce the seals. This helps keep the interior dry and prevents heat loss.
Inspecting and maintaining the roof and seals can extend the life of your RV. It ensures you are ready for the next adventure once winter is over.
Battery And Electrical Care
Taking care of your RV’s battery and electrical system is crucial in winter. Cold weather can be tough on batteries and electrical components. Properly maintaining these elements ensures your RV stays in good shape and is ready for your next adventure.
Disconnecting Batteries
Disconnecting the battery prevents it from draining during winter. First, turn off all electrical components. Next, locate the battery and disconnect the negative cable first. Finally, disconnect the positive cable. Store the battery in a cool, dry place to extend its life.
| Step | Action |
|---|---|
| 1 | Turn off all electrical components |
| 2 | Locate and disconnect the negative cable |
| 3 | Disconnect the positive cable |
| 4 | Store the battery in a cool, dry place |
Checking Electrical Components
Inspect all electrical components before winter storage. Check the condition of wires, fuses, and connectors. Replace any damaged parts to avoid problems later. Test lights and appliances to ensure they work correctly. This will save you from surprises when you use your RV again.
- Inspect wires for wear and tear
- Check fuses and replace if needed
- Inspect connectors for corrosion
- Test lights and appliances
Common Mistakes To Avoid
Winterizing your RV is essential. It helps protect your vehicle during the cold months. Making mistakes during this process can lead to costly repairs. Below are common mistakes to avoid.
Ignoring Small Leaks
Small leaks can become big problems. Water can freeze and expand, causing damage. Always check for leaks before winterizing.
Inspect these areas thoroughly:
- Roof
- Windows
- Doors
- Plumbing lines
Seal any leaks you find. Use the right sealant to ensure a proper fix. Ignoring small leaks can lead to significant issues when temperatures drop.
Using The Wrong Antifreeze
Not all antifreeze is the same. Using the wrong type can harm your RV. Use non-toxic RV antifreeze, not automotive antifreeze.
Here is a quick comparison:
| Type | Usage |
|---|---|
| Non-toxic RV Antifreeze | Safe for plumbing and drinking water systems |
| Automotive Antifreeze | For car engines, not safe for water systems |
Always double-check the label. Ensure you are using the correct antifreeze. This simple step can save you from major plumbing repairs.
Frequently Asked Questions
When Should I Winterize My Rv?
Winterize your RV before temperatures consistently drop below freezing. This usually occurs in late fall.
What Happens If I Don’t Winterize My Rv?
If you don’t winterize, freezing temperatures can cause pipes to burst. This may lead to costly repairs.
Can I Winterize My Rv Myself?
Yes, you can winterize your RV yourself. Follow a step-by-step guide or refer to your RV’s manual.
What Supplies Do I Need To Winterize My Rv?
You need antifreeze, a water pump converter kit, and basic tools. Ensure you have enough to complete the job.
Conclusion
Preparing your RV for winter is crucial for its longevity. Start winterizing your RV early. Check the weather forecast to time it right. Protecting your pipes, tanks, and systems will save you money. A well-maintained RV ensures safe travels. Regular maintenance checks help spot issues early.
Winterizing is a small task with big benefits. Enjoy peace of mind during the cold months. Your RV will be ready for adventures when spring arrives. Happy travels!


