Understanding the wiring diagram for a Duo Therm RV thermostat is essential. It helps ensure your RV’s heating and cooling systems work correctly.
Whether you’re upgrading your RV thermostat or troubleshooting an issue, knowing how to read the wiring diagram is crucial. This guide will help you understand the components and connections involved. You’ll learn about the color codes, terminal labels, and the functions of each wire.
With this knowledge, you can confidently install or repair your Duo Therm thermostat. So, let’s dive in and simplify this technical aspect of your RV living.

Credit: pantherrvproducts.com
Basics Of Rv Thermostats
Understanding the basics of RV thermostats can help you keep your RV comfortable. These devices control the heating and cooling systems in your RV. They ensure a stable indoor climate. Let’s dive into the specifics of Duo Therm RV Thermostats and their features.
What Is A Duo Therm Rv Thermostat?
A Duo Therm RV Thermostat is a device designed to regulate temperature inside your RV. It connects to both the heating and cooling systems. This thermostat helps maintain a comfortable environment, regardless of the weather outside. Duo Therm is known for its reliability and ease of use.
Common Features
Duo Therm RV Thermostats come with several common features:
- Digital Display: Easy-to-read screen showing current temperature and settings.
- Temperature Control: Allows precise adjustment of temperature for both heating and cooling.
- Programmable Settings: Lets you set different temperatures for various times of the day.
- Compatibility: Works with most RV heating and cooling systems.
- Power Source: Usually powered by the RV’s 12-volt system.
These features make Duo Therm RV Thermostats a popular choice among RV owners. They are easy to install and use. Plus, they help maintain a consistent indoor climate, enhancing your RV experience.
| Feature | Description |
|---|---|
| Digital Display | Shows current temperature and settings |
| Temperature Control | Adjust temperature for heating and cooling |
| Programmable Settings | Set different temperatures for different times |
| Compatibility | Works with most RV systems |
| Power Source | Powered by RV’s 12-volt system |
Understanding these basics helps you get the most out of your Duo Therm RV Thermostat. It ensures your RV remains comfortable, no matter where you are.
Tools And Materials Needed
Installing a Duo Therm RV thermostat requires the right tools and materials. This section will guide you through the essentials needed to complete the task efficiently.
Essential Tools
- Screwdriver Set: A variety of screwdrivers are needed.
- Wire Strippers: For stripping the ends of wires.
- Multimeter: To check electrical connections.
- Drill: For making necessary holes.
- Voltage Tester: Ensures power is off during installation.
Required Materials
- Duo Therm RV Thermostat: The main component.
- Wiring Diagram: For correct connections.
- Electrical Tape: Insulates wires.
- Wire Nuts: Secure wire connections.
- Mounting Screws: To secure the thermostat.
Having these tools and materials ready will make the installation process smoother. Below is a table summarizing the essential tools and required materials:
| Tools | Materials |
|---|---|
| Screwdriver Set | Duo Therm RV Thermostat |
| Wire Strippers | Wiring Diagram |
| Multimeter | Electrical Tape |
| Drill | Wire Nuts |
| Voltage Tester | Mounting Screws |
Safety Precautions
Before working on your Duo Therm RV thermostat wiring diagram, it’s crucial to follow safety precautions. Electrical work can be hazardous if not done properly. This section will guide you through essential safety measures to ensure a safe and successful installation. Follow these tips to protect yourself and your RV.
Electrical Safety
First, disconnect the RV from any power source. This reduces the risk of electric shock. Use insulated tools to handle wires. Insulated tools provide an extra layer of protection. Always check wires for any signs of damage. Damaged wires can cause short circuits.
Wear rubber-soled shoes while working on electrical components. They help prevent electrical shocks. Avoid working in wet conditions. Water and electricity are a dangerous combination. Use a voltage tester to ensure no live wires are present.
Handling Components
Handle thermostat components with care. They are sensitive and can easily get damaged. Do not force wires into the terminals. Gentle pressure ensures a secure connection without damaging the wires. Keep the wiring diagram nearby for reference. It helps avoid mistakes during installation.
Make sure your hands are clean and dry. Dirt and moisture can cause poor connections. Label each wire before disconnecting them. This makes reassembling easier and more accurate. Store small components in a safe place. Losing them can delay your installation.
Following these safety precautions will help you complete your Duo Therm RV thermostat wiring project safely. Stay alert and take your time for the best results.
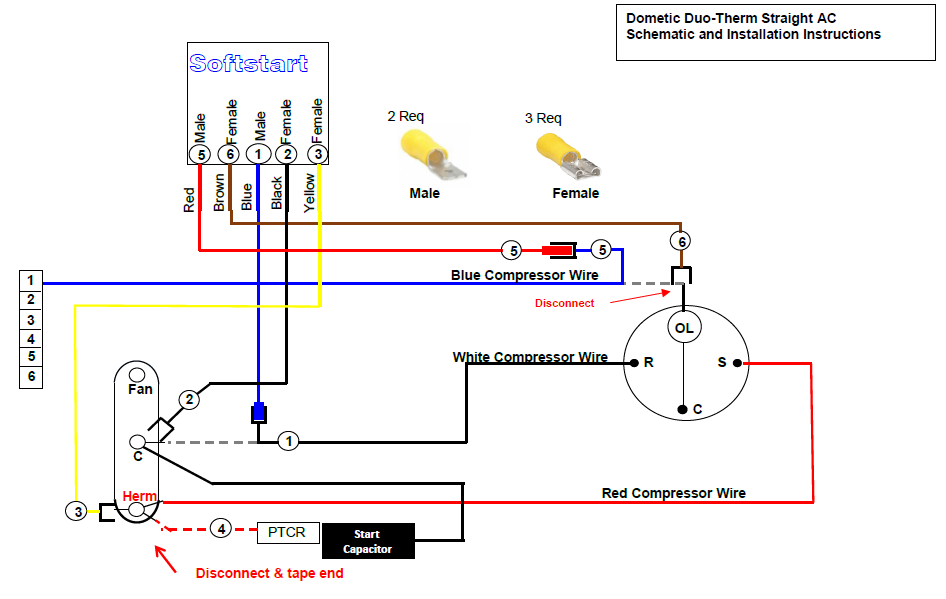
Wiring Diagram Overview
The Duo Therm RV thermostat wiring diagram helps you understand the connections. You can identify how to wire your thermostat correctly. This ensures that your RV’s climate control system works well. Let’s explore the diagram and its components.
Reading The Diagram
Reading the wiring diagram can seem tricky at first. Start by familiarizing yourself with the layout. Each line represents a wire, and each symbol represents a component. Follow the lines to see how the components connect. This will help you understand the flow of electricity.
Key Symbols And Terms
Wiring diagrams use specific symbols and terms. Recognizing these is crucial. Common symbols include lines for wires, dots for connections, and zigzags for resistors. Terms like “power source,” “ground,” and “relay” are essential to know. Each plays a vital role in the system. Understanding these helps in troubleshooting and repairs.
Step-by-step Wiring Instructions
Wiring your Duo Therm RV thermostat can seem daunting. With clear instructions, the process becomes simple. Follow these steps for a successful installation.
Disconnecting Power
First, disconnect the power to your RV. This prevents any electrical accidents. Ensure all power sources are off, including the battery.
Connecting Wires
Locate the wires from your old thermostat. Note their colors and connections. Use these as a guide.
Attach the wires to the new thermostat. Typically, red is for power, white is for heat, and yellow is for cooling. Green usually connects to the fan.
Secure each wire firmly. Loose connections can cause malfunctions.
Double-check your connections. Make sure each wire is connected to the correct terminal.

Credit: www.amazon.com
Troubleshooting Common Issues
Troubleshooting common issues with your Duo Therm RV thermostat can save you time and frustration. Understanding the wiring diagram helps in identifying and fixing these issues. Let’s dive into some common problems you might face.
No Power To Thermostat
If your thermostat has no power, start by checking the power source. Ensure the RV battery is charged. Examine the fuse box for blown fuses. Replace any blown fuses with the correct type.
Next, inspect the wiring connections. Loose or damaged wires can cause power issues. Tighten any loose connections. Replace any damaged wires. Refer to the wiring diagram for proper connections.
Inaccurate Temperature Readings
Inaccurate temperature readings can be frustrating. First, check the thermostat’s placement. It should not be near heat sources or drafts. These can affect the temperature sensor.
Next, clean the thermostat. Dust and dirt can interfere with its operation. Use a soft brush or cloth to clean it. Also, verify the wiring connections. Incorrect connections can lead to false readings. Use the wiring diagram to ensure everything is correctly connected.
Maintenance Tips
Proper maintenance of your Duo Therm RV thermostat ensures optimal performance. This guide helps you with simple tips to keep your system running smoothly.
Regular Checks
Conducting regular checks on your Duo Therm RV thermostat is crucial. Look for any loose wires or connections. Tighten them to prevent malfunctions. Test the thermostat’s functionality by adjusting the temperature settings. Ensure it responds correctly.
Inspect the wiring diagram periodically. Verify that the connections match the diagram. This helps in identifying potential issues early.
Cleaning And Care
Dust and dirt can affect your thermostat’s performance. Clean it regularly to maintain efficiency. Use a soft, dry cloth to wipe the surface. Avoid using water or cleaning solutions.
Check the thermostat’s sensors for dust buildup. Clean them gently with a soft brush. This ensures accurate temperature readings.
| Component | Frequency | Action |
|---|---|---|
| Wiring Connections | Monthly | Inspect and tighten |
| Thermostat Surface | Weekly | Wipe with dry cloth |
| Sensors | Monthly | Clean with soft brush |
Follow these maintenance tips to ensure your Duo Therm RV thermostat operates efficiently. Regular checks and proper cleaning can extend its lifespan and save you from unexpected repairs.
Credit: www.softstartrv.com
Frequently Asked Questions
How To Wire A Duo Therm Rv Thermostat?
Wiring a Duo Therm RV thermostat requires following the color-coded wires. Ensure each wire is connected to the correct terminal. Refer to the wiring diagram provided with the thermostat. Always turn off power before working with electrical components.
What Color Wires Go Where On Rv Thermostat?
The wire colors usually include red for power, white for heat, yellow for cool, and green for fan. Refer to the specific wiring diagram for your model to ensure proper connections. Always double-check before finalizing the setup.
Where Can I Find The Wiring Diagram?
The wiring diagram for your Duo Therm RV thermostat is typically found in the user manual. It can also be available on the manufacturer’s website. It provides detailed instructions on connecting each wire to the appropriate terminal.
Why Is My Rv Thermostat Not Working?
If your RV thermostat is not working, check the wiring connections first. Ensure all wires are properly connected and secure. Also, check if the thermostat has power. If issues persist, the thermostat itself may need replacing.
Conclusion
Understanding the Duo Therm RV thermostat wiring diagram is essential. It makes installation easier. Follow the steps outlined for a smooth setup. Proper wiring ensures your thermostat functions correctly. This can save you from future issues. Always double-check connections for safety.
Enjoy a comfortable RV experience with a well-installed thermostat. Happy travels!


