Understanding the wiring diagram for your RV’s fresh water tank sensor is essential. It helps ensure accurate water level readings and proper functionality.
Imagine being on a road trip and unsure about your water supply. Knowing your RV’s fresh water tank sensor wiring can save you from such worries. This guide will walk you through the basics, ensuring your sensor works correctly. With clear instructions and easy-to-follow steps, you’ll gain confidence in managing your RV’s water system.
Stay with us to learn more and keep your adventures worry-free.
Tools And Materials
Setting up an RV fresh water tank sensor wiring diagram requires specific tools and materials. Having the right supplies ensures a smooth process. Below are the essential items you need.
Required Tools
- Wire Strippers: For removing insulation from wires.
- Screwdrivers: Both flathead and Phillips head.
- Multimeter: To check voltage and continuity.
- Heat Gun: For shrinking heat shrink tubing.
- Crimping Tool: For securing wire connectors.
Necessary Materials
- Wire: 14- or 16-gauge wire is often used.
- Wire Connectors: Butt connectors and ring terminals.
- Heat Shrink Tubing: To insulate and protect connections.
- Electrical Tape: For additional insulation.
- RV Fresh Water Tank Sensor: The main component.
Each tool and material plays a vital role. Proper preparation helps avoid mistakes. Make sure you have everything before starting the installation.
Safety Precautions
Ensuring safety while working on your RV fresh water tank sensor wiring diagram is crucial. This section outlines the essential precautions to follow. Adhering to these guidelines will help prevent accidents and ensure a smooth installation.
Electrical Safety
Working with electrical components requires strict safety measures. Follow these steps:
- Turn off the power supply before starting any wiring work.
- Use a voltage tester to ensure no live wires are present.
- Avoid working in wet or damp conditions to prevent electrical shocks.
- Keep wires organized and away from sharp edges to prevent damage or short circuits.
Personal Protective Equipment
Wearing the right protective gear is essential. Here are the recommended items:
| Equipment | Purpose |
|---|---|
| Insulated gloves | Protect hands from electrical shocks. |
| Safety glasses | Shield eyes from debris and sparks. |
| Protective clothing | Prevent skin contact with electrical components. |
Always double-check your gear before starting any work. Stay safe and ensure a successful installation.
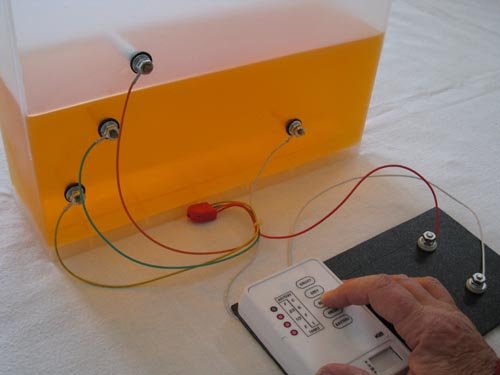
Understanding The Wiring Diagram
Understanding the wiring diagram for your RV fresh water tank sensor is crucial. It ensures the proper functioning of your water system. An accurate wiring setup helps avoid potential issues and keeps your water monitoring system reliable.
Sensor Components
The first step is to know the sensor components involved. These include the sensor itself, the control panel, and the wiring. Each component plays a vital role in the overall system.
- Sensor: Measures the water level in the tank.
- Control Panel: Displays the water level.
- Wiring: Connects the sensor to the control panel.
Wiring Color Codes
Understanding the wiring color codes is essential. Each wire color has a specific function. This helps in proper installation and troubleshooting.
Here is a simple table to help you understand the common wiring color codes:
| Color | Function |
|---|---|
| Red | Power Supply (+) |
| Black | Ground (-) |
| Green | Signal Output |
| Yellow | Optional Signal |
Always double-check the wiring diagram specific to your RV model. This ensures accuracy and safety.
Credit: www.sunlineclub.com
Preparing For Installation
Preparing for the installation of your RV fresh water tank sensor wiring diagram is crucial. This step ensures a smooth and efficient setup process. Follow these steps carefully to avoid any mishaps and ensure safety.
Powering Down The Rv
First, power down the RV. This step is vital for safety. Turn off all electrical appliances and disconnect the RV from any power source. This helps prevent any accidental shocks or damage to the electronics.
Next, locate the main power switch. Turn it off. Ensure the RV is completely powered down. Double-check all switches and connections. Safety comes first.
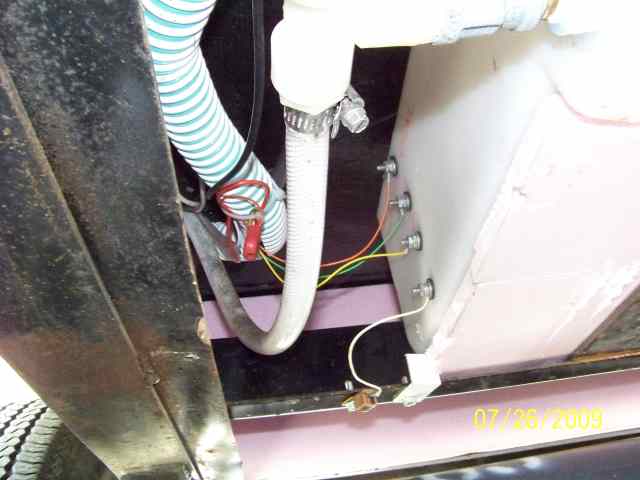
Accessing The Tank
Now, access the fresh water tank. Locate the tank in your RV. It is usually under a bed or a storage compartment.
Remove any covering or panel that hides the tank. Use a screwdriver if necessary. Be gentle to avoid damaging the panels.
Once you have accessed the tank, identify the existing wiring. Take note of how the wires are connected. This will help you later during the wiring process.
Ensure the area around the tank is clean. Remove any debris or dirt. This will make the installation process smoother and more efficient.
Wiring The Sensor
Correctly wiring the RV fresh water tank sensor ensures accurate water level readings. Follow the wiring diagram for precise connections.
Wiring the fresh water tank sensor in your RV ensures accurate water level readings. This task might seem challenging but can be managed with some basic steps. By following a clear wiring diagram, you can complete this job efficiently.
Connecting The Wires
First, gather all the necessary tools and materials. You will need wire cutters, strippers, connectors, and your wiring diagram. Start by identifying the wires on your sensor. Typically, these include power, ground, and signal wires. Cut the wires to the desired length using wire cutters. Strip about half an inch of insulation from each wire end. This exposes the copper wire for connection. Refer to your wiring diagram to match the sensor wires to the corresponding RV wires. Use wire connectors to join the wires. Twist the exposed ends of the matching wires together. Insert them into the connector and secure tightly. Repeat this for each wire. Ensure each connection is firm to avoid any loose wires.
Securing Connections
Once the wires are connected, secure them properly. Use electrical tape to wrap each connection. This prevents any short circuits or exposed wires. Proper insulation is critical for safety. Next, bundle the wires together using zip ties. This keeps the wiring organized and reduces clutter. Attach the bundled wires to a stable part of the RV with clips or clamps. This prevents the wires from moving or getting damaged during travel. Check each connection again to ensure they are tight and secure. A loose wire can cause incorrect readings or sensor failure. Double-check your wiring diagram to confirm all connections are correct. By following these steps, you can wire your RV fresh water tank sensor effectively. This ensures reliable water level monitoring during your travels. “`
Testing The Installation
After wiring the RV fresh water tank sensor, it’s time to test the installation. This ensures the sensors work correctly and provide accurate readings. Follow these steps to power up the system and verify sensor functionality.
Powering Up The System
First, connect the power supply to the sensor system. Ensure all connections are secure. Use a voltmeter to check the voltage at the power source. The voltage should match the system requirements as specified in the manual.
Next, turn on the power supply. Observe the sensor display panel. It should light up, indicating the system is receiving power. If the display does not light up, recheck the wiring connections.
Verifying Sensor Functionality
Once the system is powered, the next step is to verify sensor functionality. Fill the fresh water tank partially with water. Observe the sensor display panel. The panel should show a partial reading corresponding to the water level.
Continue filling the tank to different levels. At each level, check the sensor display. The readings should change accordingly. If the readings do not change, inspect the sensor wiring for any loose connections.
Finally, fill the tank to its maximum capacity. The display should show a full reading. This confirms the sensor is working correctly and the installation was successful.
Summary Table
| Step | Description |
|---|---|
| Power Connection | Secure all connections, check voltage with a voltmeter |
| Power On | Turn on power, observe display panel for lights |
| Partial Fill | Fill tank partially, check sensor readings |
| Full Fill | Fill tank to maximum, verify full reading on display |
By following these steps, you can ensure your RV fresh water tank sensor is installed correctly and functioning as expected.
Troubleshooting Common Issues
Dealing with issues in your RV fresh water tank sensor can be frustrating. Understanding the common problems can help you fix them quickly. Let’s delve into some typical issues and their solutions.
Sensor Malfunction
One common issue is sensor malfunction. The sensors might give incorrect readings. This can happen due to dirt or residue on the sensor. Cleaning the sensor usually resolves this problem. Ensure the sensor is free from any buildup. If cleaning doesn’t help, the sensor might be faulty. In this case, replacing the sensor could be necessary.
Connection Problems
Connection problems can also cause issues with your RV water tank sensor. Loose or corroded wires can disrupt the signal. Check all connections carefully. Make sure wires are secure and free from corrosion. If the wires are damaged, replace them. Proper connections ensure the sensor functions correctly.
Maintenance Tips
Keeping your RV fresh water tank sensor in good working condition is key. Regular maintenance ensures accurate readings and prevents unexpected issues. Follow these simple tips to keep your sensor working properly.
Regular Inspections
Conducting regular inspections of your RV fresh water tank sensor is crucial. Check for any signs of wear or damage. Look at the wiring connections and ensure they are secure. Loose wires can cause inaccurate readings or sensor failure.
Use a multimeter to test the sensor’s electrical connections. Ensure the readings match the manufacturer’s specifications. If not, you may need to replace or repair the wiring.
Cleaning The Sensor
Regularly cleaning the sensor is vital for accurate readings. Over time, debris and residue can build up on the sensor, affecting its performance. Use these steps to clean your sensor properly:
- Turn off the water supply and drain the tank.
- Remove the sensor carefully, following the manufacturer’s instructions.
- Clean the sensor with a soft cloth and mild detergent.
- Rinse the sensor thoroughly with clean water.
- Reinstall the sensor and secure the wiring connections.
Cleaning your sensor regularly helps maintain its accuracy and longevity. Make it a part of your routine RV maintenance.
Frequently Asked Questions
What Is An Rv Fresh Water Tank Sensor?
An RV fresh water tank sensor monitors the water level in your RV’s tank. It helps you track usage and prevents overfilling.
How Does The Sensor Wiring Work?
The sensor wiring connects the sensor to the RV’s monitoring system. It transmits data about the water level to the display panel.
Why Does My Rv Tank Sensor Malfunction?
RV tank sensors may malfunction due to buildup of debris or mineral deposits. Regular cleaning can help maintain accuracy.
Can I Install A New Sensor Myself?
Yes, you can install a new sensor yourself. Follow the manufacturer’s instructions and ensure proper wiring for accurate readings.
Conclusion
Understanding your RV fresh water tank sensor wiring is essential. Accurate sensor readings ensure reliable water management. With clear wiring diagrams, you can troubleshoot easily. This keeps your RV adventures smooth and worry-free. Always refer to your RV manual for specific instructions.
Safe travels and happy camping!


